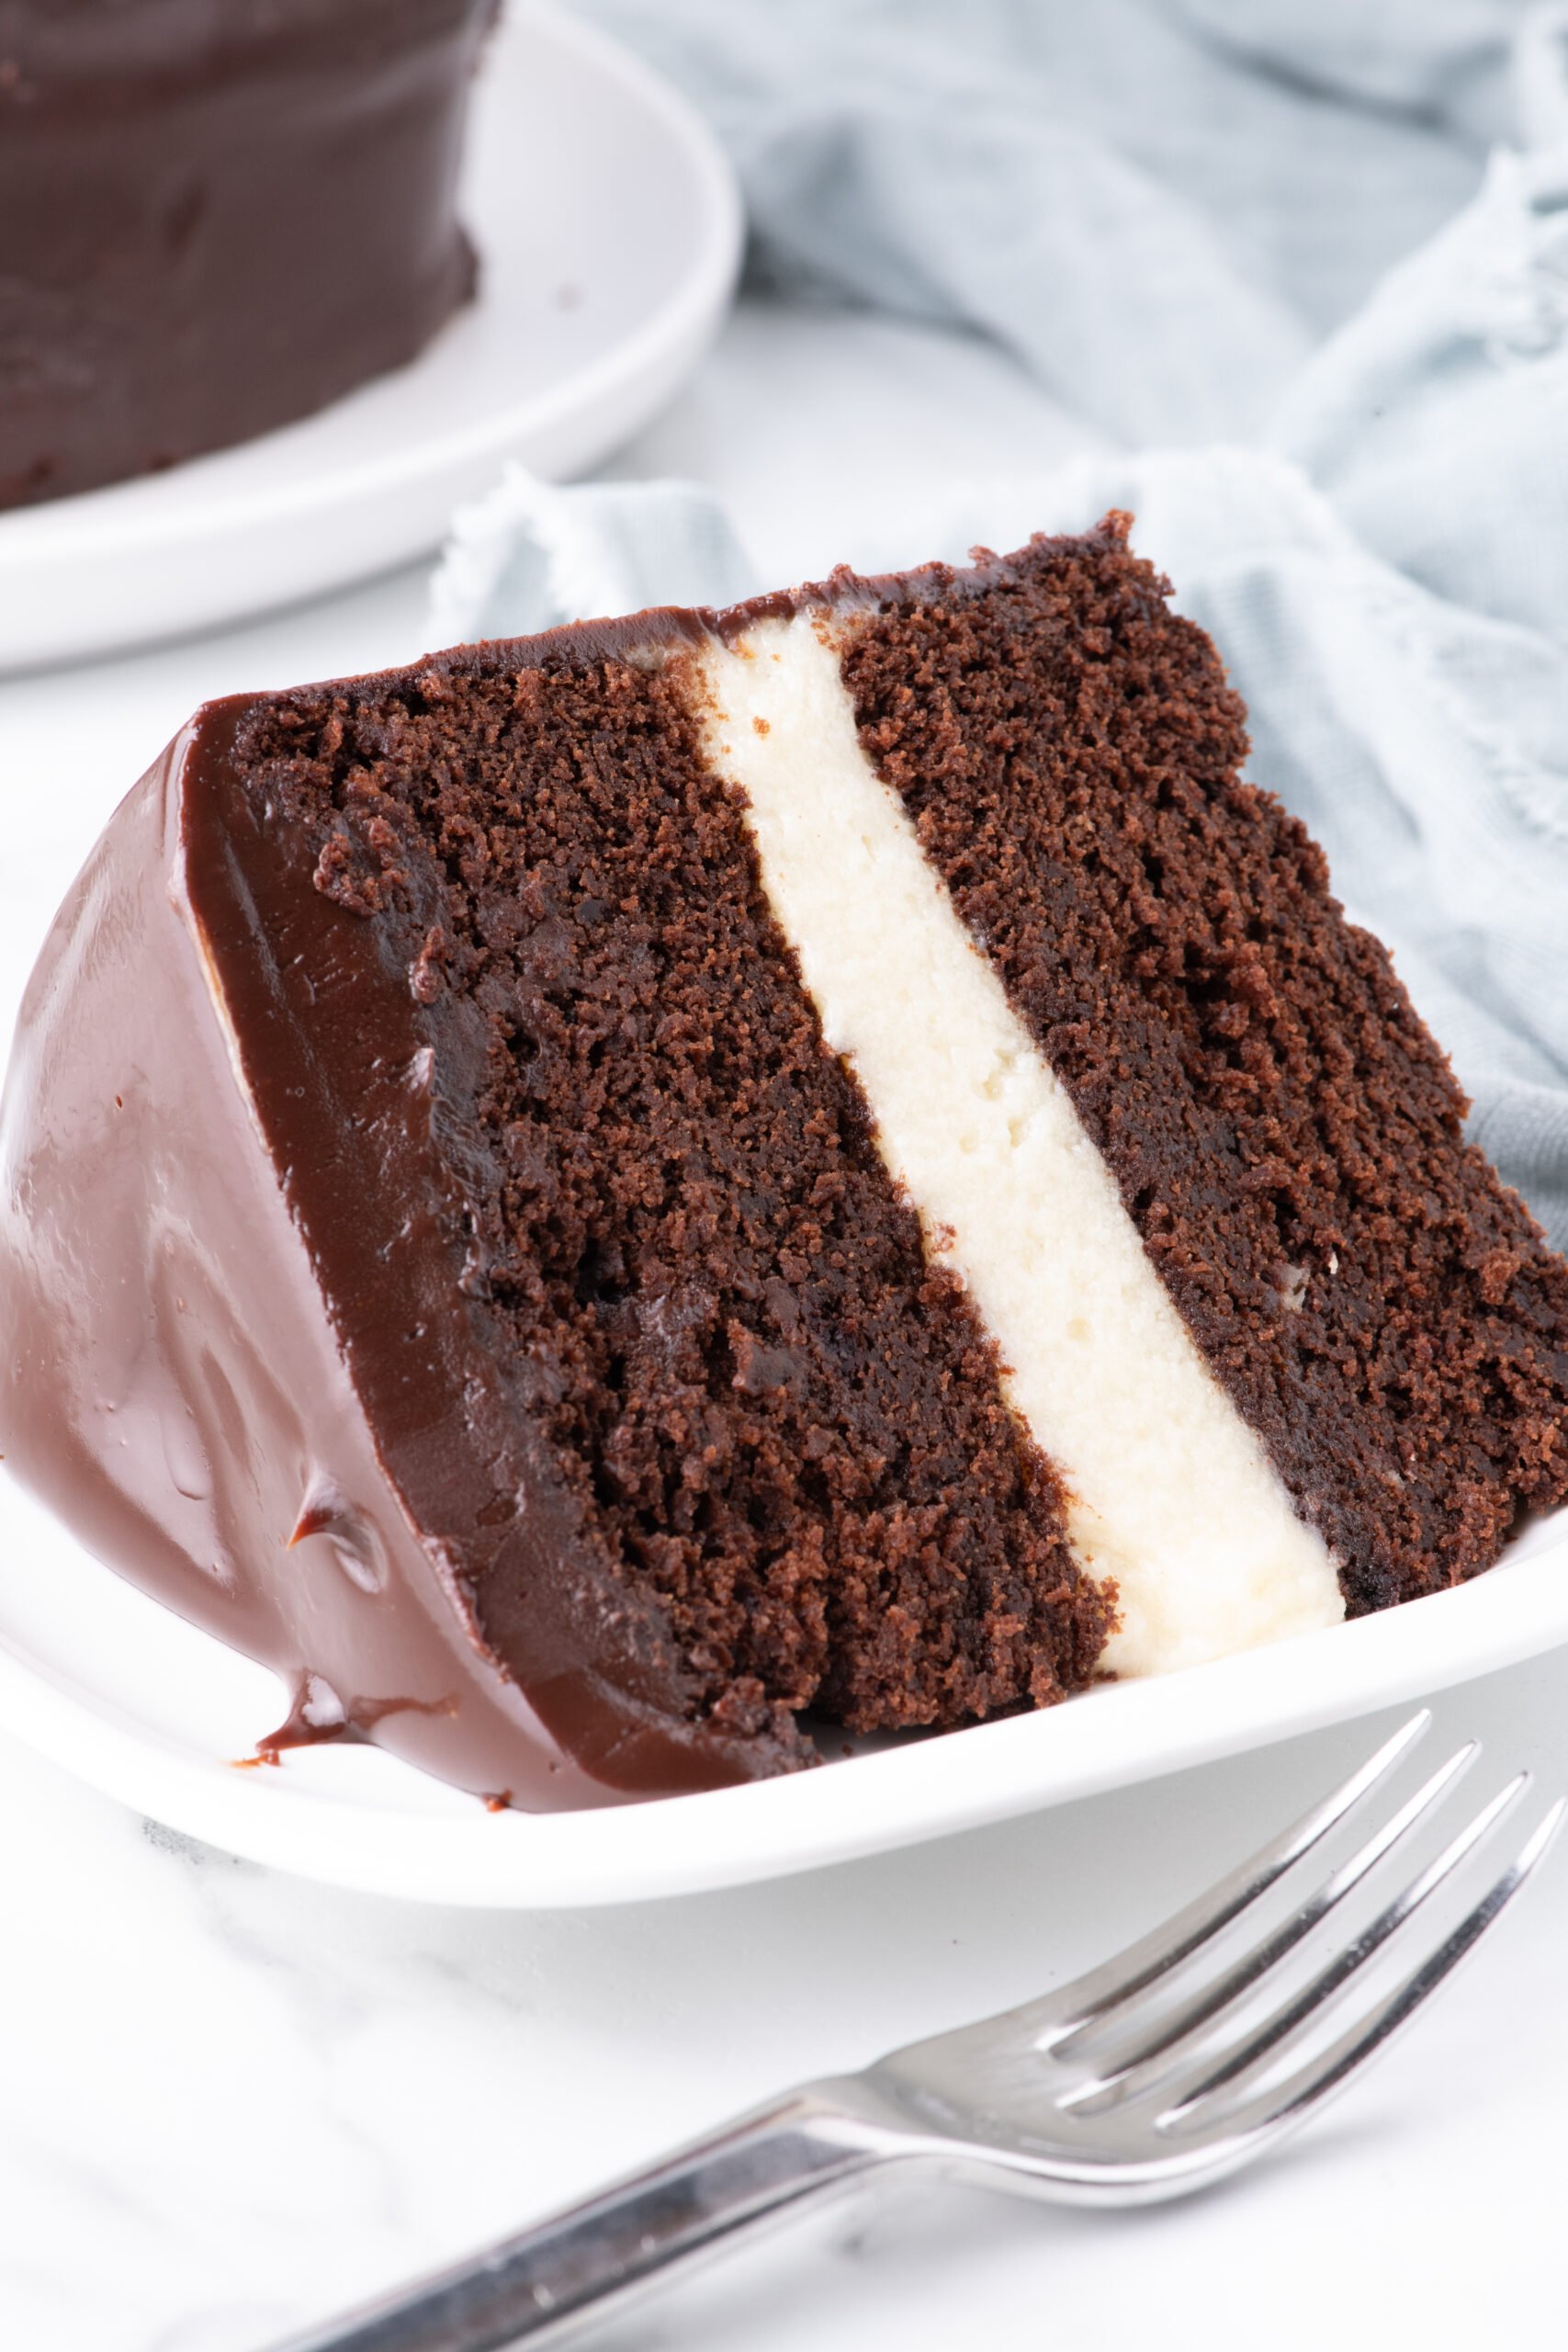
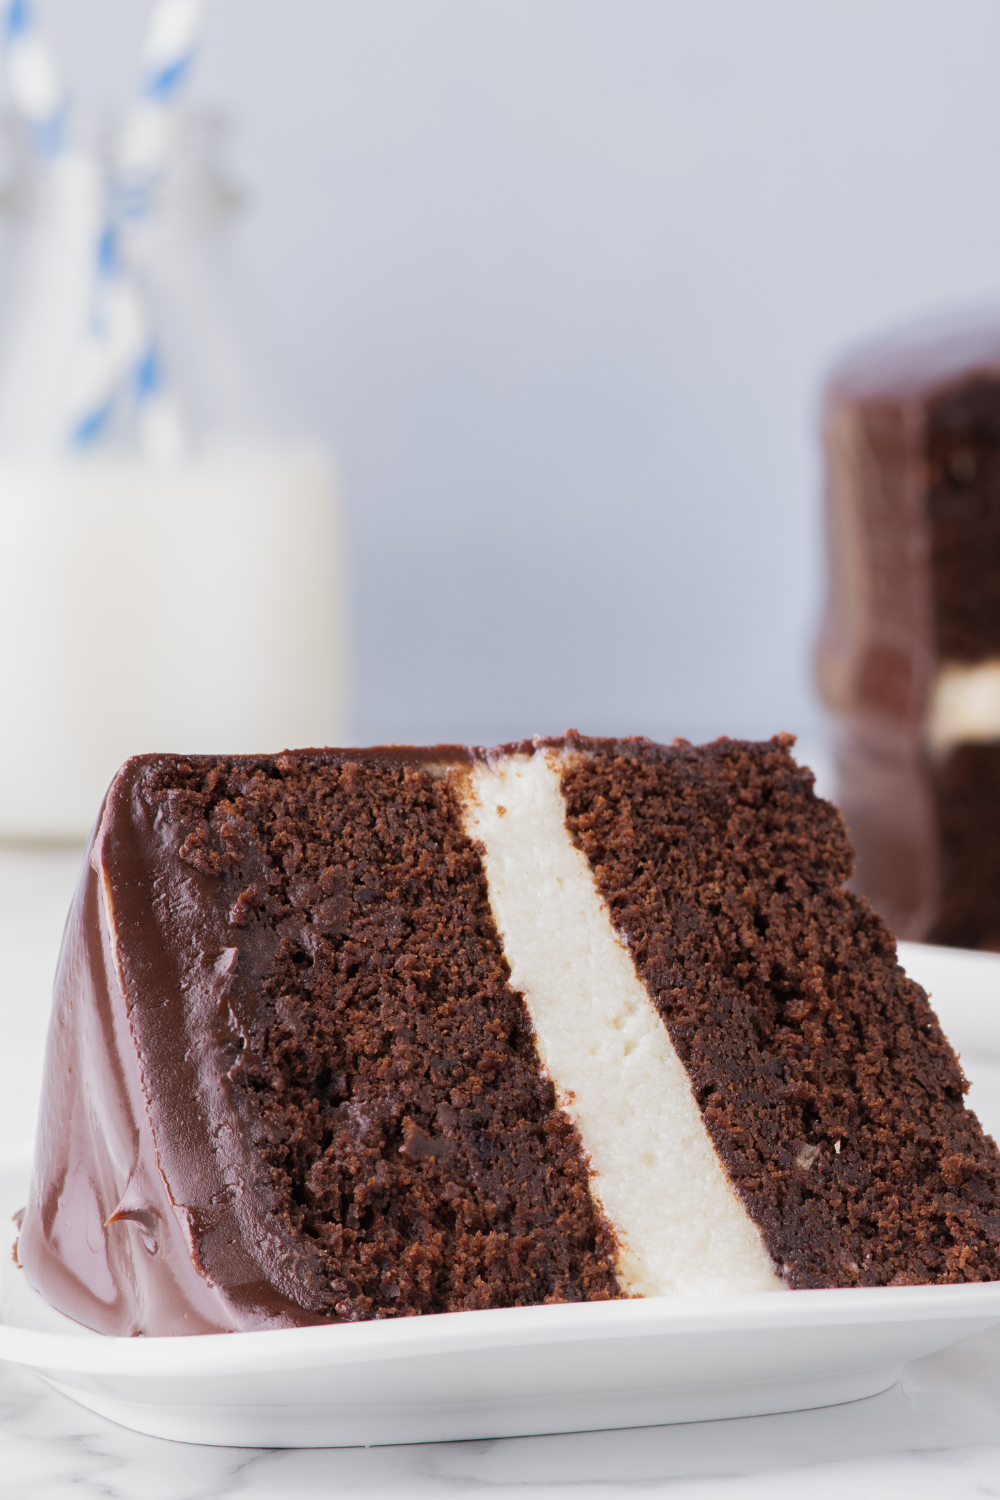
Transform your favorite childhood Hostess treat into a delicious layered cake. This Ding Dong Cake is a chocolate sponge-like cake filled with a velvety, silky, smooth, sweet, creamy filling.
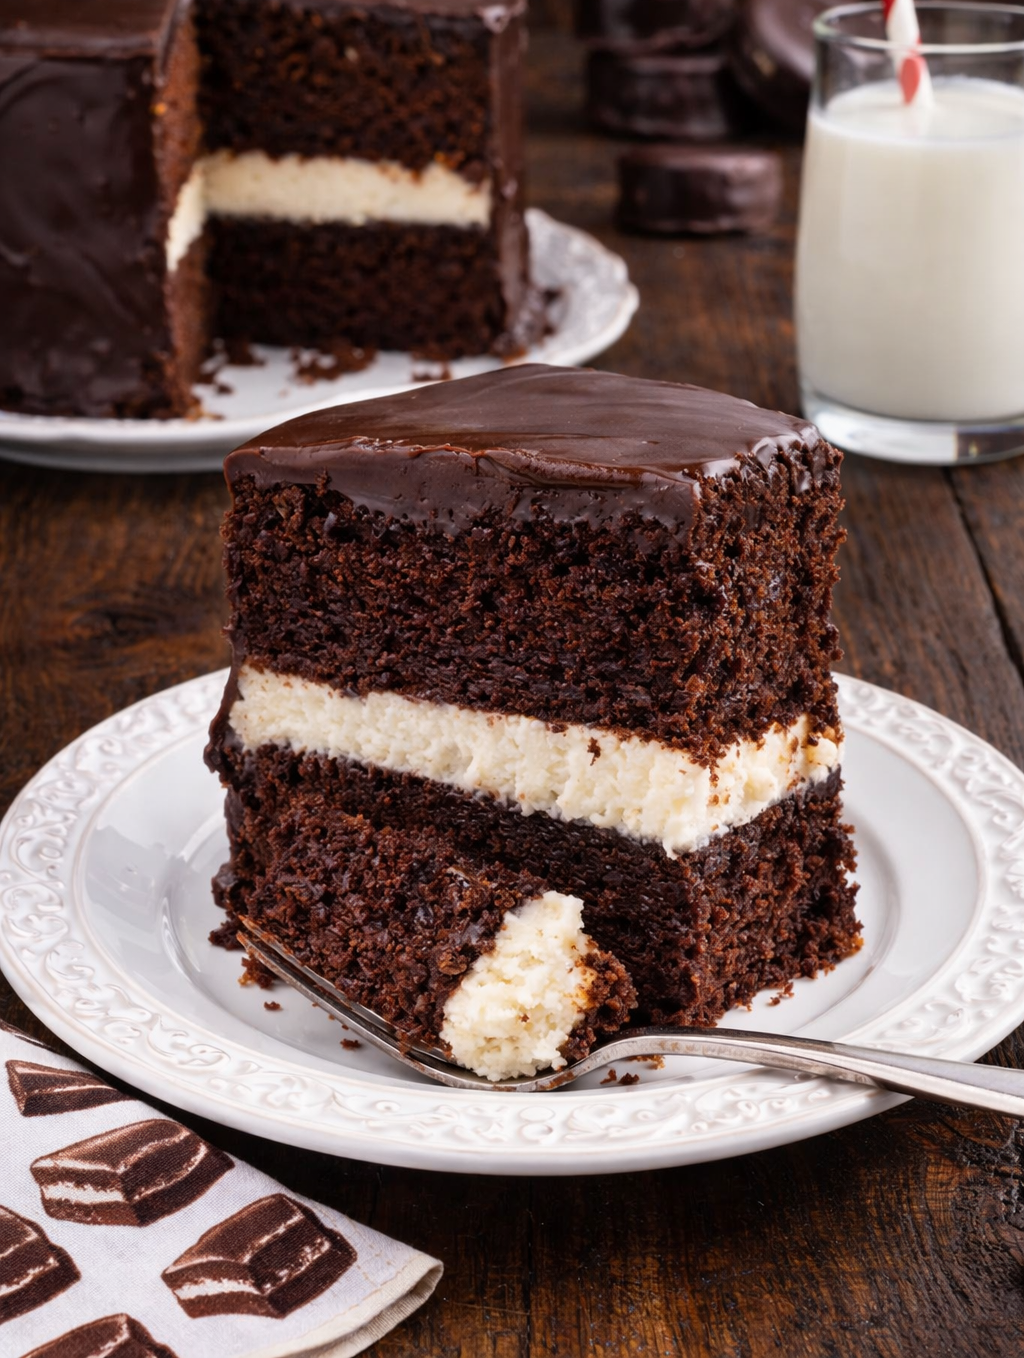
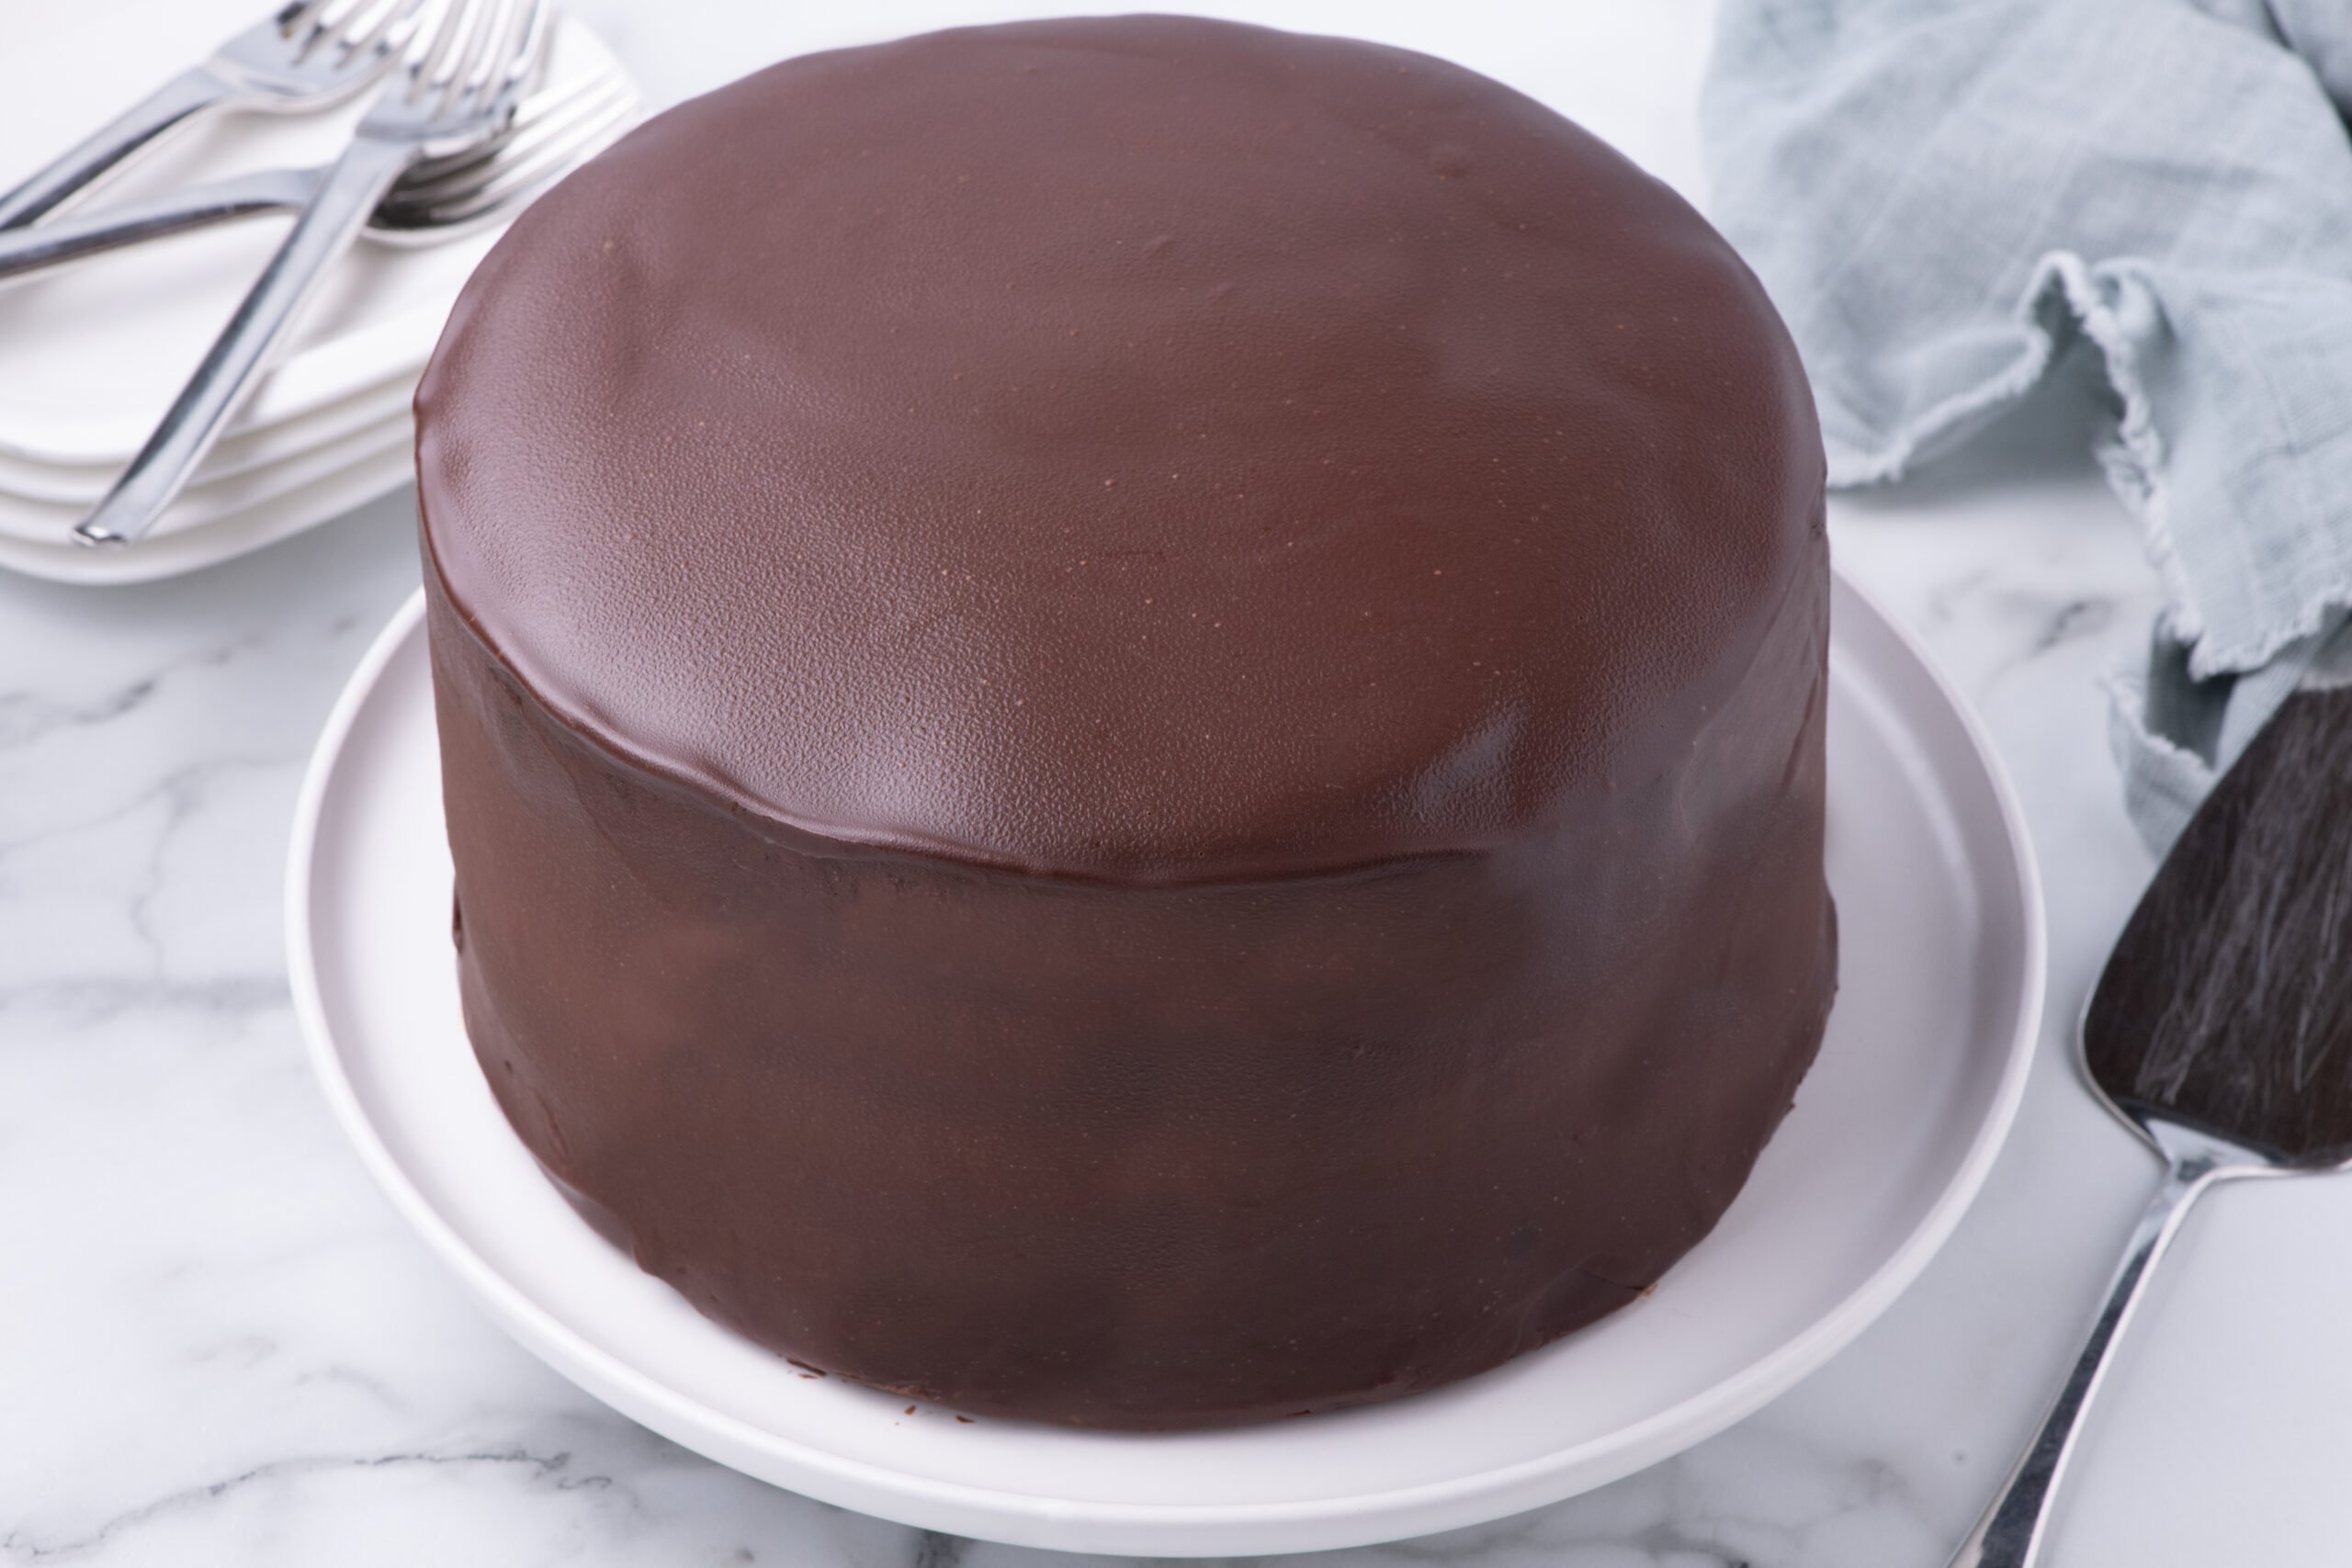
You then top the cake with a chocolate ganache glaze, and you are ready to slice and serve up for birthday parties, family gatherings, or take to your next potluck.

Let’s Talk About Ding Dong Cake: The Grown-Up Way to Relive a Snack Cake Childhood There’s something kind of magical about making a giant version of a childhood treat. You know what I’m talking about—that moment when you’re standing in the kitchen, spatula in hand, looking at a layer cake that’s basically a supersized Hostess Ding Dong. It hits that perfect sweet spot between nostalgia and full-on chocolate craving, and let’s be real: that’s the kind of dessert energy we all need right now.

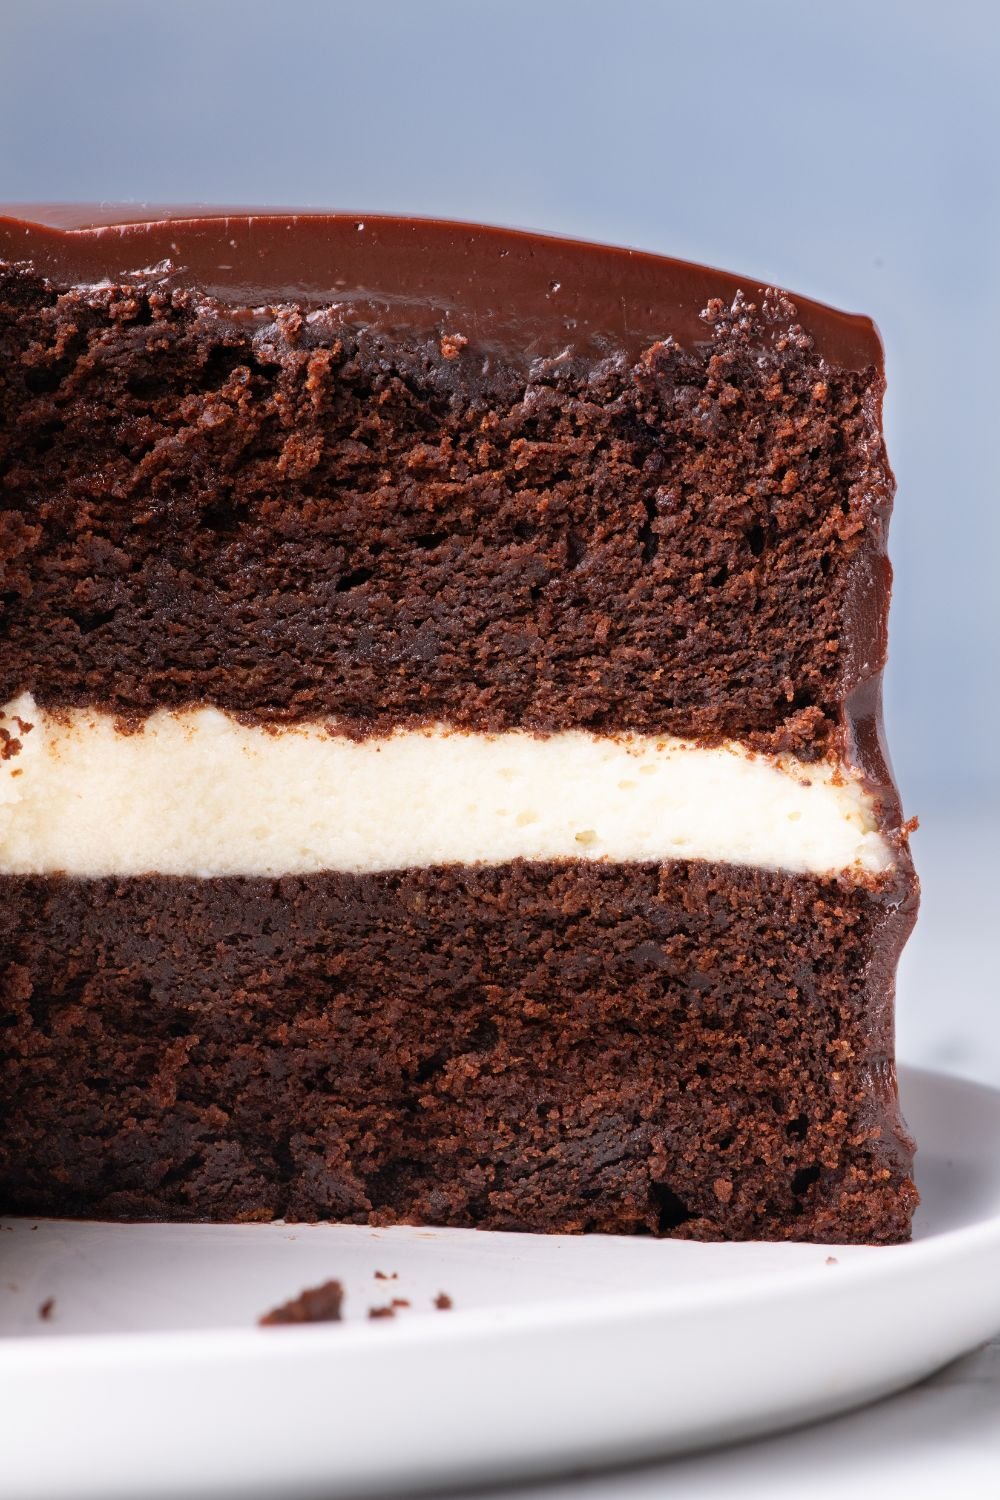
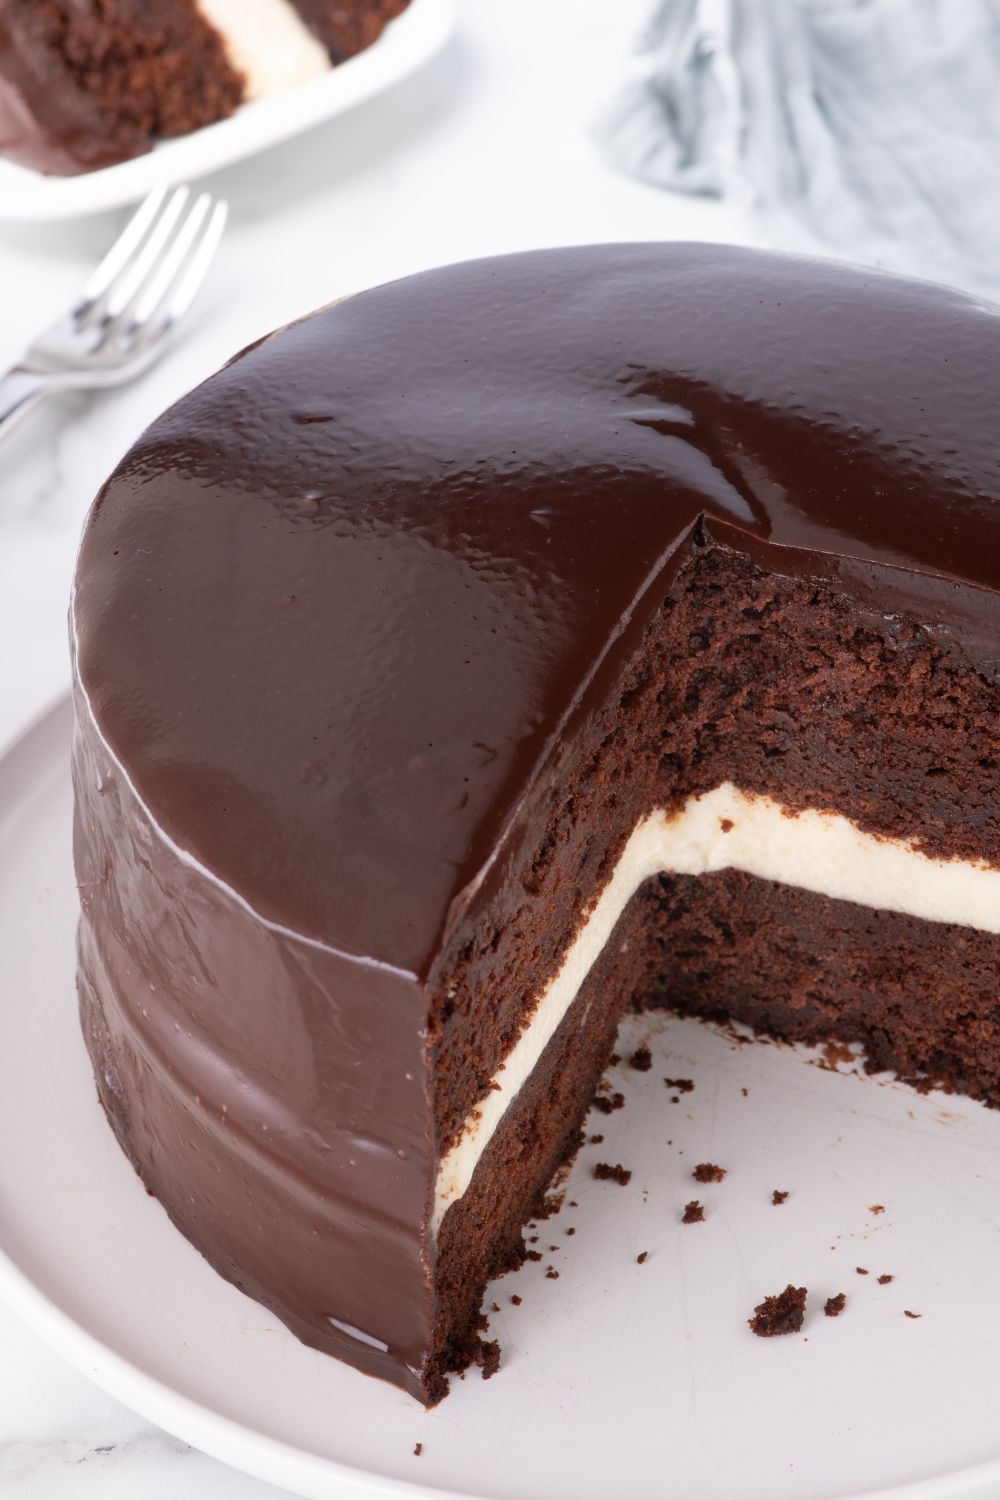
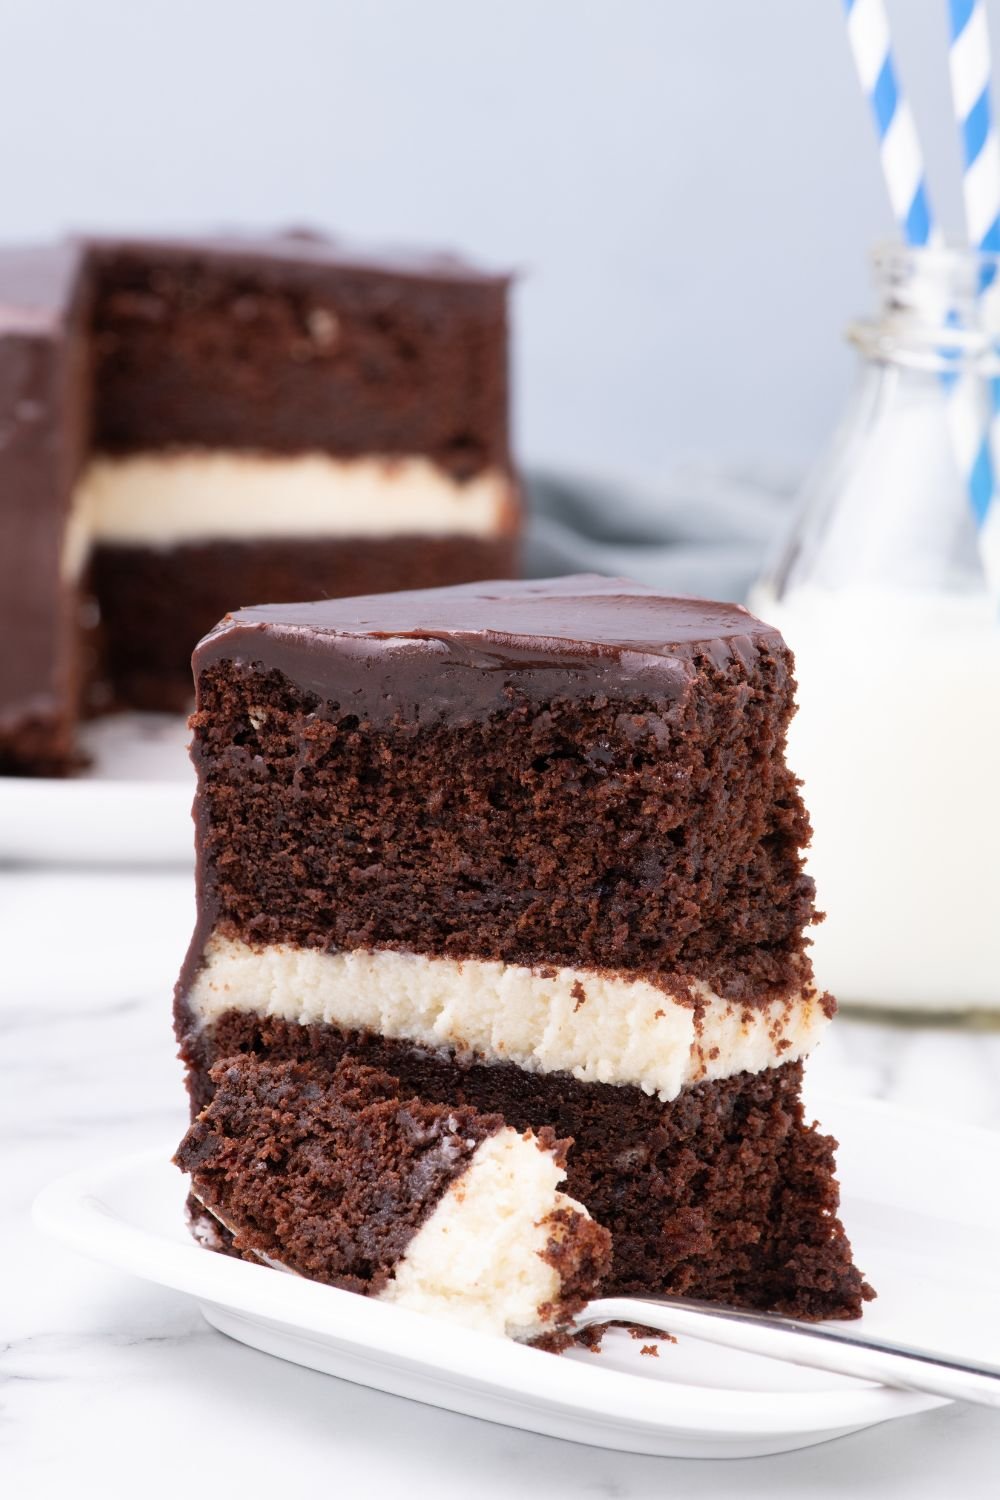
This Ding Dong Cake (aka Ho Ho Cake or Hostess Cake, depending on who you ask) is not just some cute copycat recipe. This is a cake cake. It’s two layers of dark, rich chocolate cake with a not-too-sweet creamy filling in the middle, all wrapped in a thick, glossy chocolate glaze that’s as satisfying to pour as it is to eat. It’s the kind of thing that makes you want to invite someone over just so you can casually say, “Oh, I made a Ding Dong Cake,” like that’s a normal Tuesday night activity.
Spoiler: it’s not. But it can be.
Real Talk: This Cake Takes a Minute (But It’s Worth It)
Let’s be clear—this is not a one-bowl, throw-it-together-and-eat-it-in-an-hour kind of situation. The whole process clocks in around two hours and change (yes, there’s chill time), and you’ll be using multiple bowls, your mixer, a saucepan or two, and probably every spatula in your kitchen. But if you’re in the mood to get a little messy and end up with something that feels way more impressive than a boxed cake mix, this is the project for you.
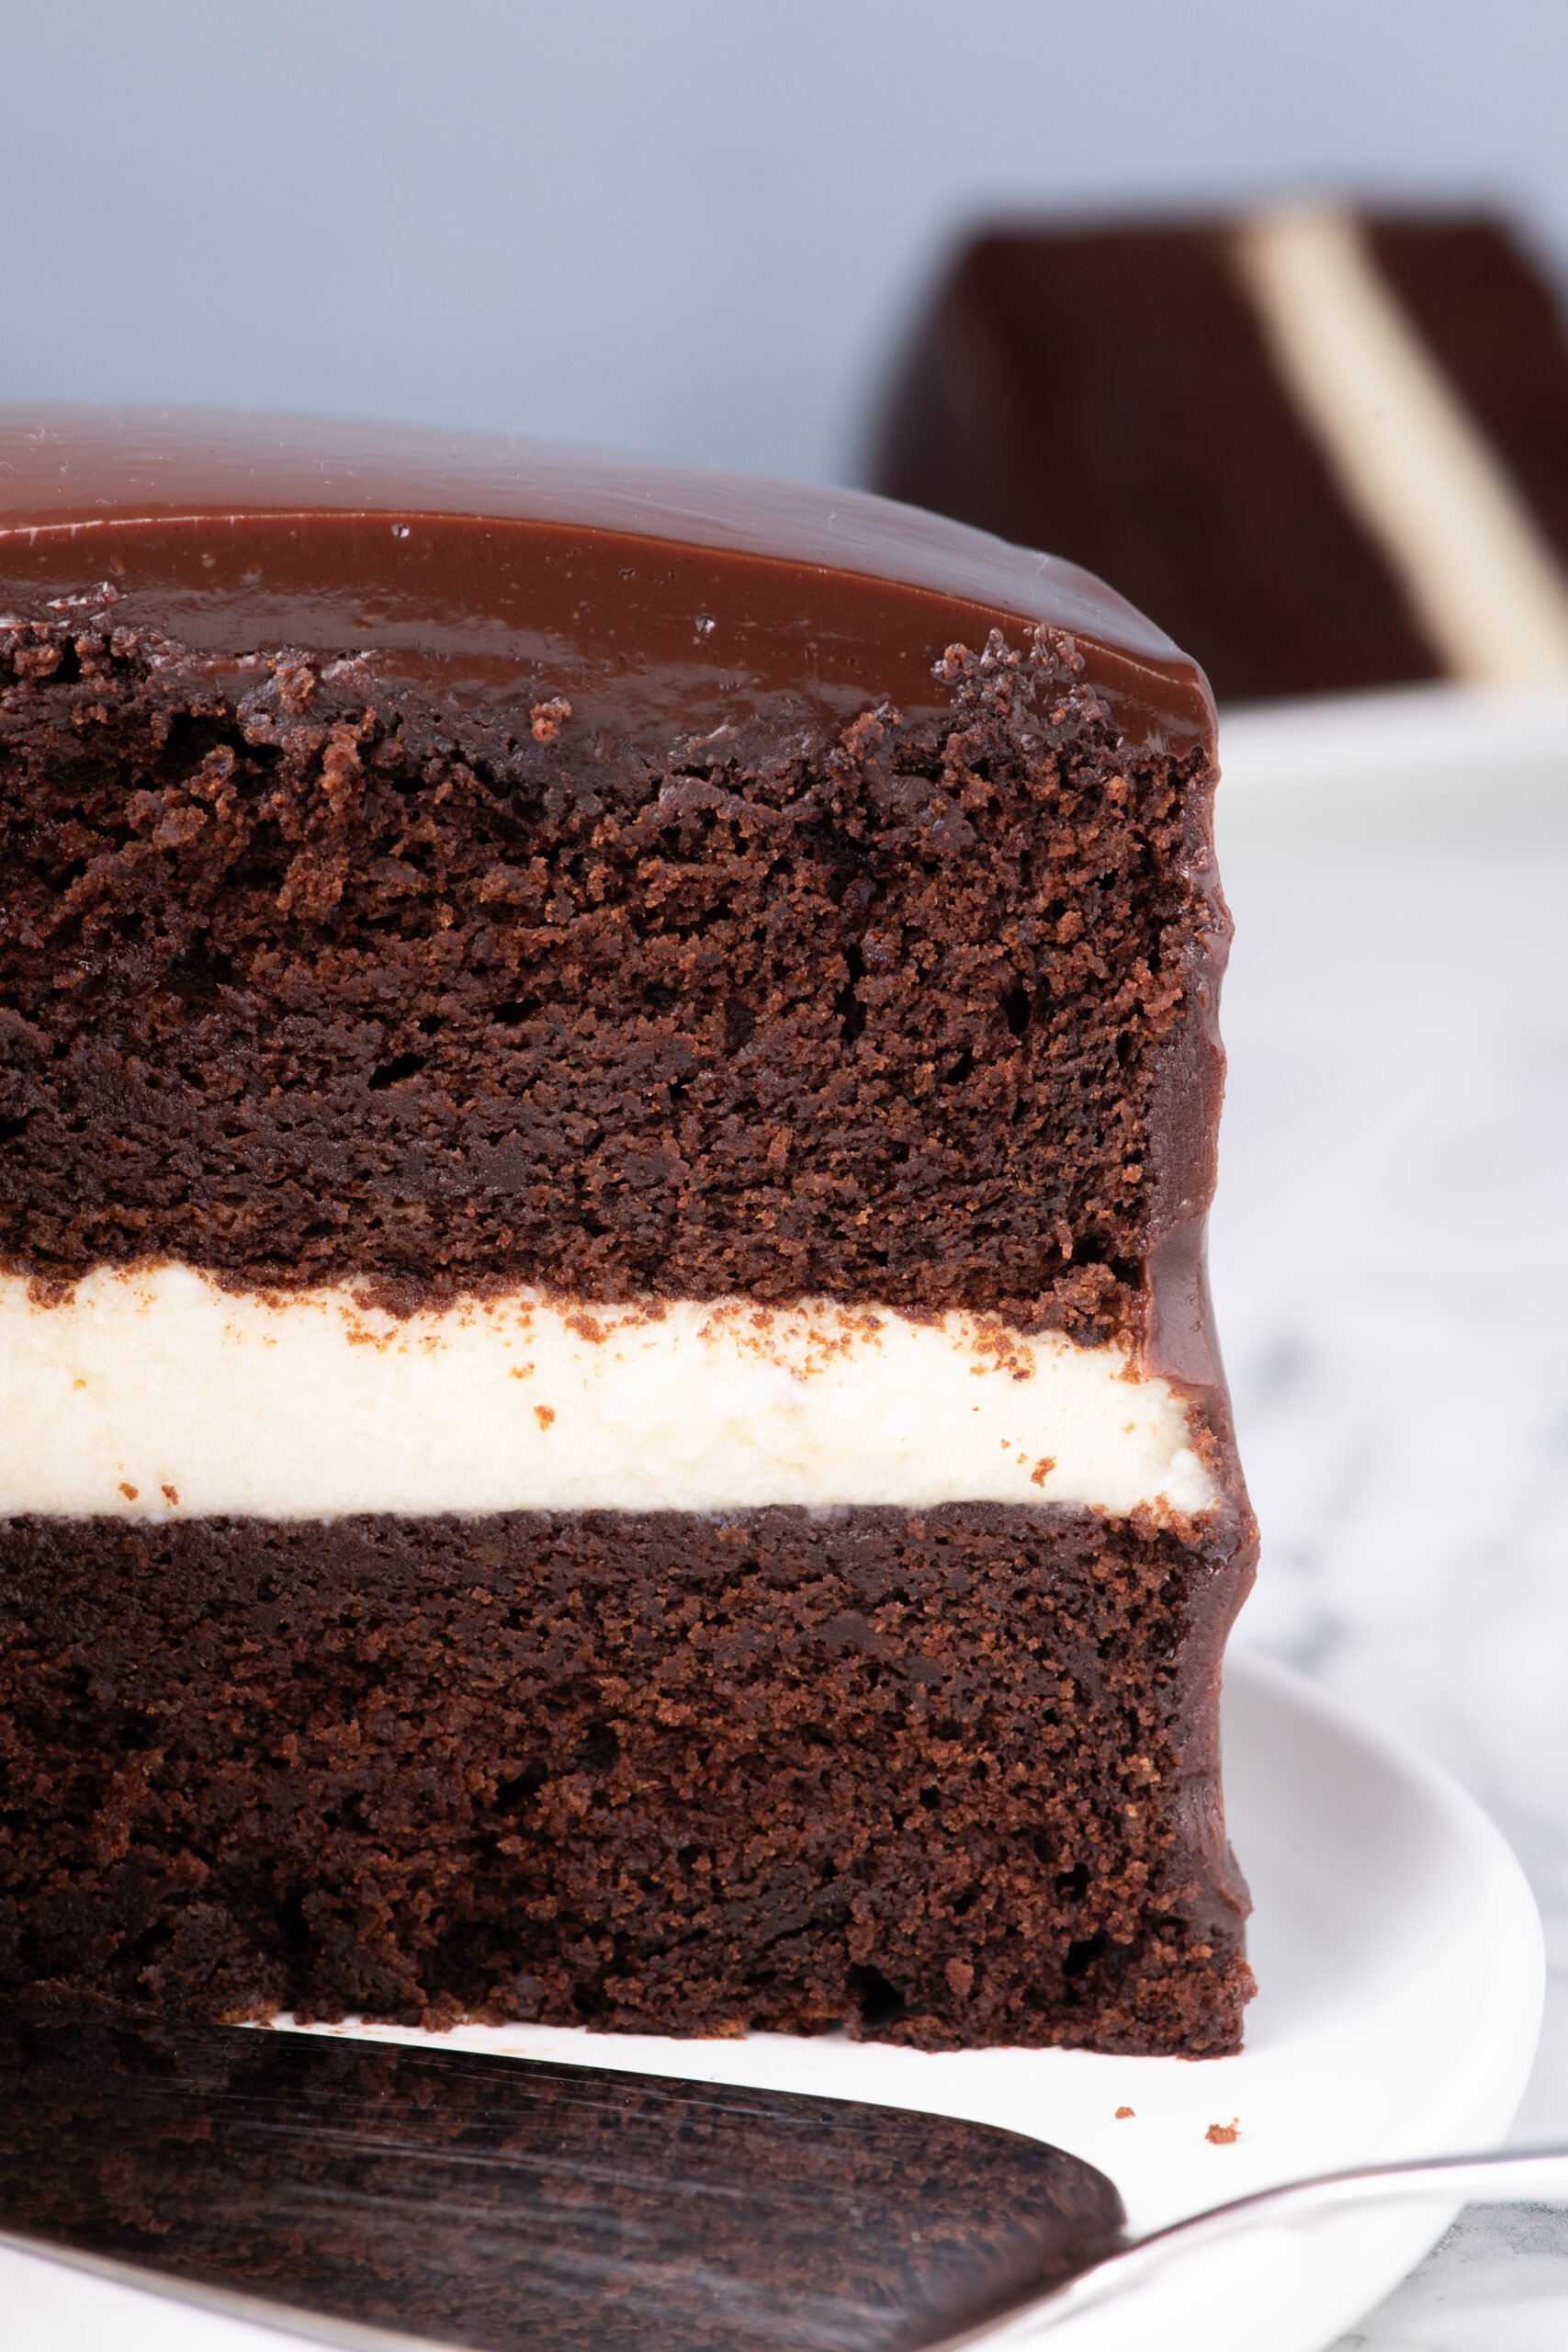
This cake is layered—literally and flavor-wise. You’ve got:
- A chocolate base made with coffee and cocoa powder that gives it depth (don’t worry, it doesn’t taste like coffee, it just brings out the chocolate)
- A light, fluffy filling that’s not whipped cream and not buttercream, but somewhere perfectly in between
- A ganache-style glaze that firms up in the fridge but stays shiny and luscious when you slice into it

Why People Are Obsessed With Ding Dong Cake
Honestly, I think part of the obsession is just how crave-worthy the whole thing is. It’s rich but not over-the-top sweet. It’s got texture, contrast, and that whole “secretly nostalgic” thing going on. If you grew up peeling foil off a little round snack cake, this is going to hit you right in the memory bank—in the best possible way.
Also? It’s kind of a showstopper. The glossy glaze alone makes it look like you know what you’re doing, even if this is your first layer cake. It’s one of those desserts that doesn’t need sprinkles, fruit, or fancy piping. It stands on its own.

Tips for my Home Bakers (Especially If You’re Not a “Cake Person”)
If you’re thinking, “This looks good but I don’t bake a lot,” here’s what you need to know:
- The chocolate-coffee mix is the flavor backbone here—don’t skip it. You won’t taste the coffee but it adds that dark, rich chocolate punch.
- Room temp butter and eggs really do matter. It helps everything come together smoothly without getting clumpy.
- The filling will seem weird at first. Cooking flour and cream into a pudding-like base might sound odd, but trust the process. It fluffs up into the lightest, most cloud-like middle layer. It’s the real MVP.
- The glaze is super forgiving. If it gets too thick, warm it gently. If it’s too thin, let it sit at room temp for a bit. Pour it slow and let gravity do the work—no fancy tricks needed.
- Chill time matters. Give this cake an hour in the fridge to firm up before slicing. You want that filling to hold its shape when you cut in.

When to Make This Cake
Birthday? Yes. Potluck? Absolutely. Tuesday because you’re bored and craving chocolate? 100%.
But the best time to make this cake might be when you need a little win. It’s a project, sure—but it’s a rewarding one. And if you’re going to spend a couple of hours in the kitchen, you might as well come out of it with something crave-worthy and shareable.
Ding Dong Cake FAQ
Can I make it ahead of time?
Yes! In fact, it’s better the next day. Make it the night before and chill it overnight. The flavors settle and the glaze sets up beautifully.
Can I skip the coffee?
You can sub with hot water, but the coffee enhances the chocolate flavor. Even if you’re not a coffee drinker, it’s worth it here.
What’s the filling like? Is it like whipped cream?
Not quite. It’s a cross between whipped cream and a light buttercream. It’s creamy, not too sweet, and holds up well between the layers without being dense.
How should I store it?
Keep it covered in the fridge. It’ll stay fresh for up to 4 days. Just bring it to room temp before serving if you want that perfect soft bite.
Can I use boxed cake mix?
Sure, if you’re short on time or just want to simplify things. The real magic is in the filling and glaze. But honestly, once you try the from-scratch version, it’s hard to go back.
Can I freeze it?
You can freeze the individual cake layers ahead of time. Just wrap them well and thaw before assembling. The finished cake doesn’t freeze well because of the cream filling.

This Ding Dong layered cake is tasty and has all the flavors of your favorite snack cake. Kids and adults will both get excited about a slice of this sweet treat.
Want more tasty cake ideas? Whip up this Italian love cake, Oreo cake, or even this Dr. Pepper cake. All are popular cake recipes on the blog. These desserts will surely become the talk of the night.
Reasons To Make This Ding Dong Cake
- Gives you all the flavors of a classic Dong Dong snack cake.
- This is a homemade cake, so you get rich and bold chocolate flavor in each bite.
- The filling is ultra fluffy and snow-like colored, so it is bright white just like the classic filling in your snack cakes.
- This cake can be served as a birthday party dessert, a weeknight dessert, or even as a treat to gift a loved one.
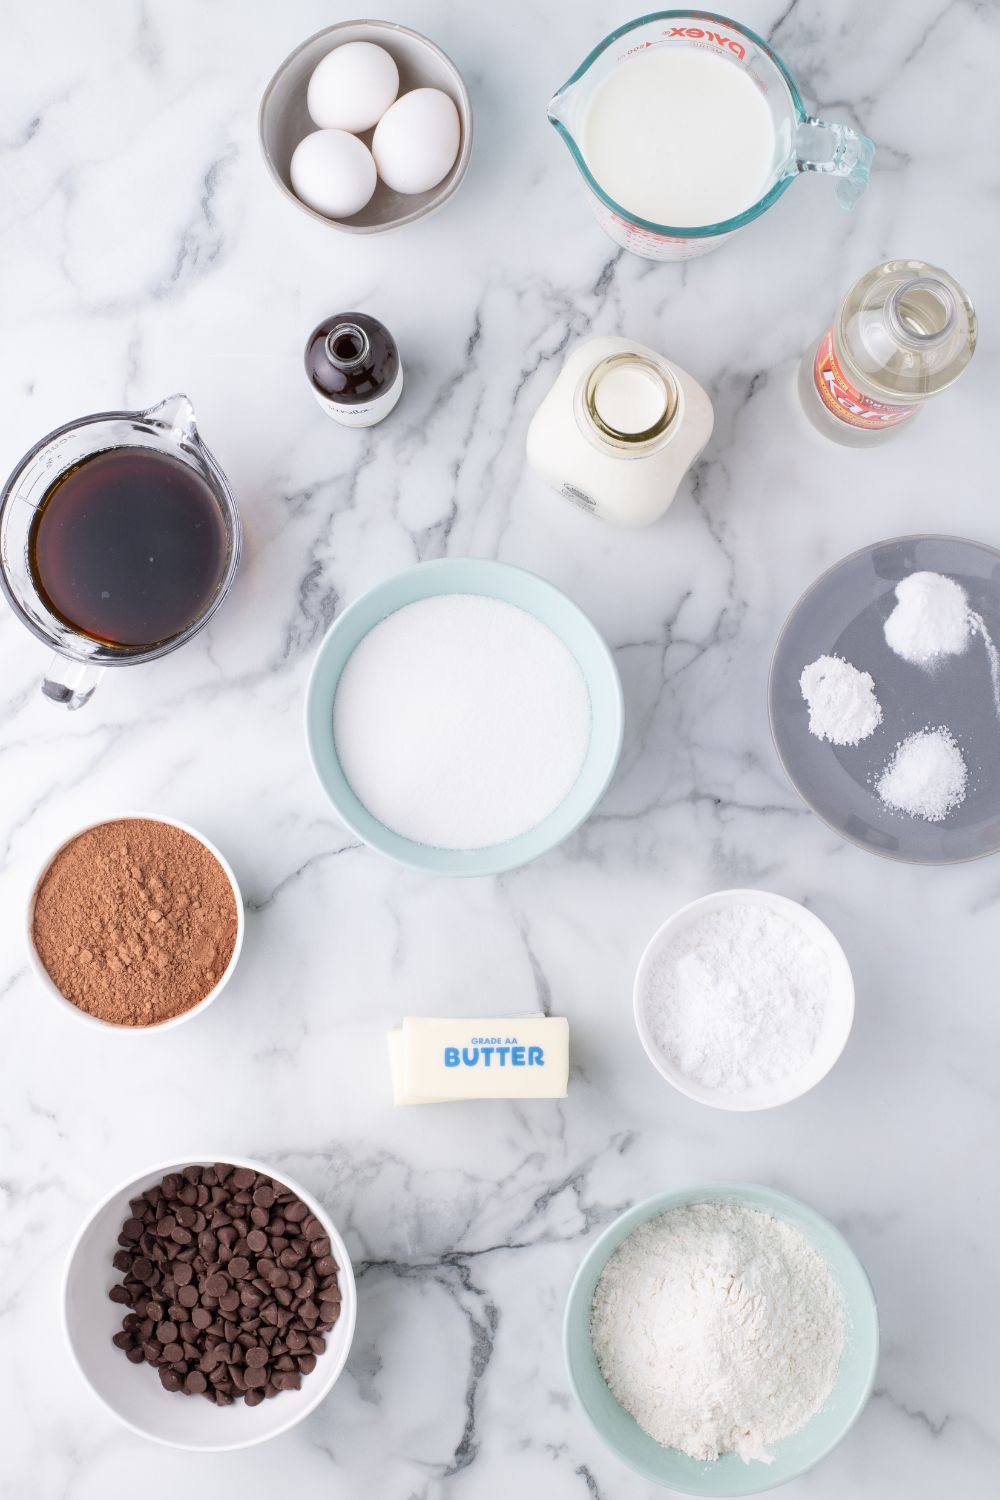
Ingredients You Will Need
- Butter: You should use unsalted butter at room temperature. That way, it will cream together nicely for the cake batter and the filling.
- Cocoa Powder: The cocoa powder is the perfect way to enrich the chocolate flavor of this cake.
- Semi-Sweet Chocolate: This is going to be used for this recipe. You can swap with dark chocolate or even milk chocolate; just know that it will alter the flavor.
- Vanilla: Use vanilla extract in the recipe. I recommend a clear vanilla for the filling to avoid altering the color.
- Black Coffee: Brew up some black and bold hot coffee to elevate the chocolate flavor.
- Buttermilk: The buttermilk creates a vibrant and moist texture to the cake.
- Baking Soda and Powder: Both help give the cake a light and fluffy texture.
- Salt: Sea salt is used to help elevate the flavor of the cake and the frosting ingredients.
- Sugar: This is divided between cake and frosting.
- Eggs: Reach for room temperature eggs so they cream together better with the cake batter.
- Heavy Cream: Heavy cream is used for the recipe.
- Light Corn Syrup: Corn syrup is the secret ingredient to the filling. It helps create a whole new level of sweetness.


Tips for Making Cake and Frosting
Use a bread knife or cake level to cut the tops off the cake to get an even and flat layer.
Do not overmix the cake batter, as this can cause the cake to bake tough and dense.
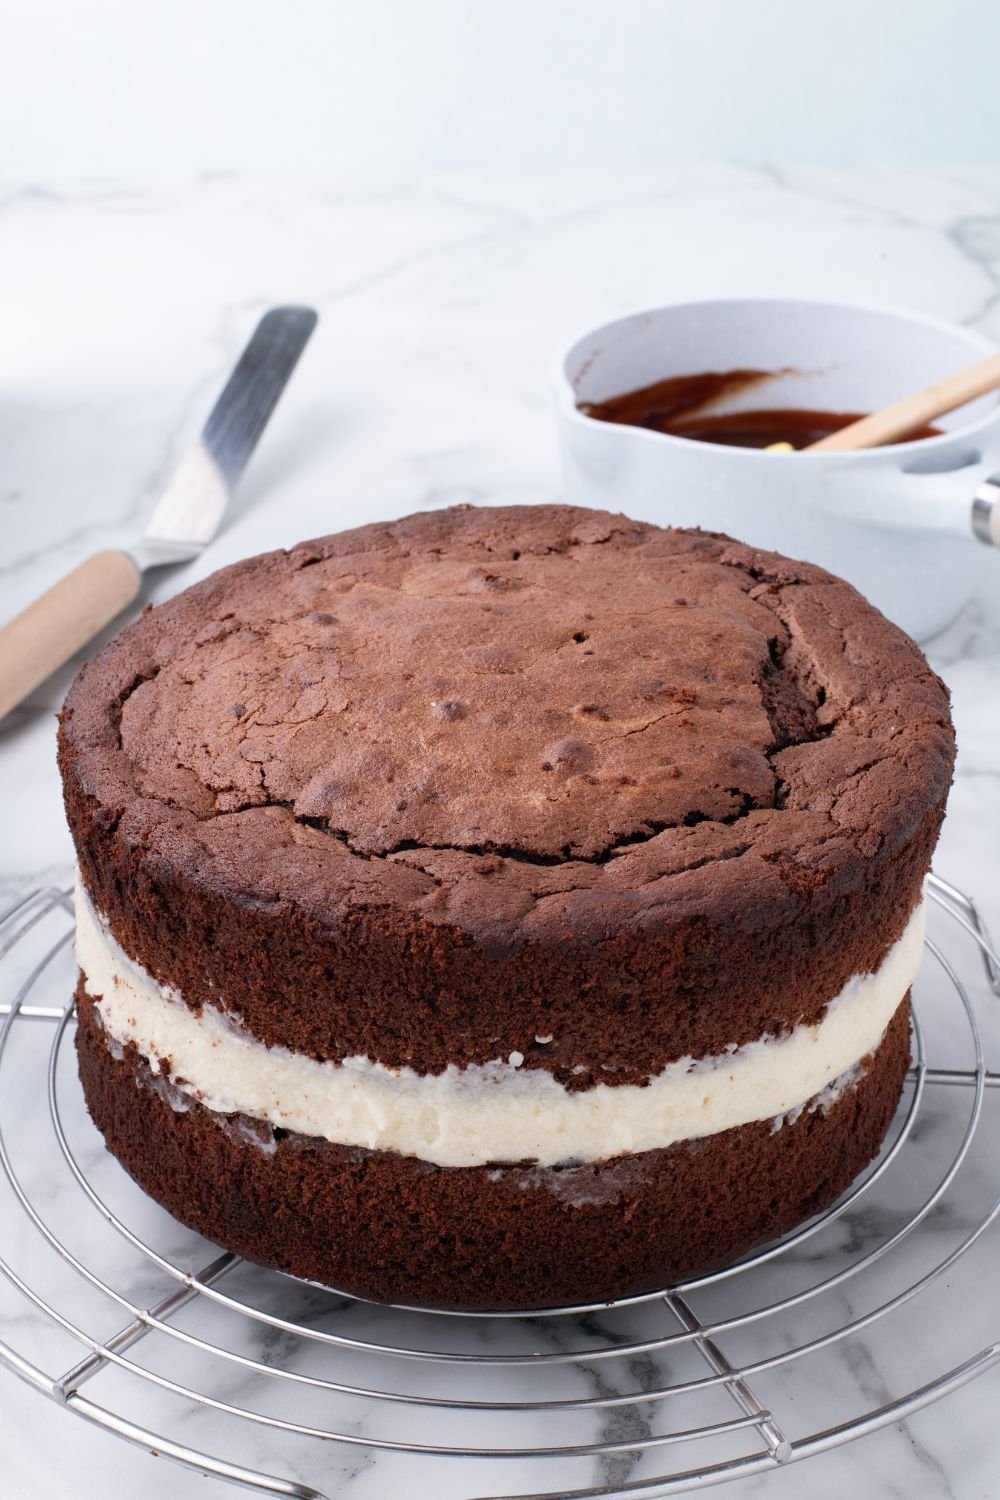
Allow your cakes to cool fully before you add the filling. Otherwise, the filling will melt.
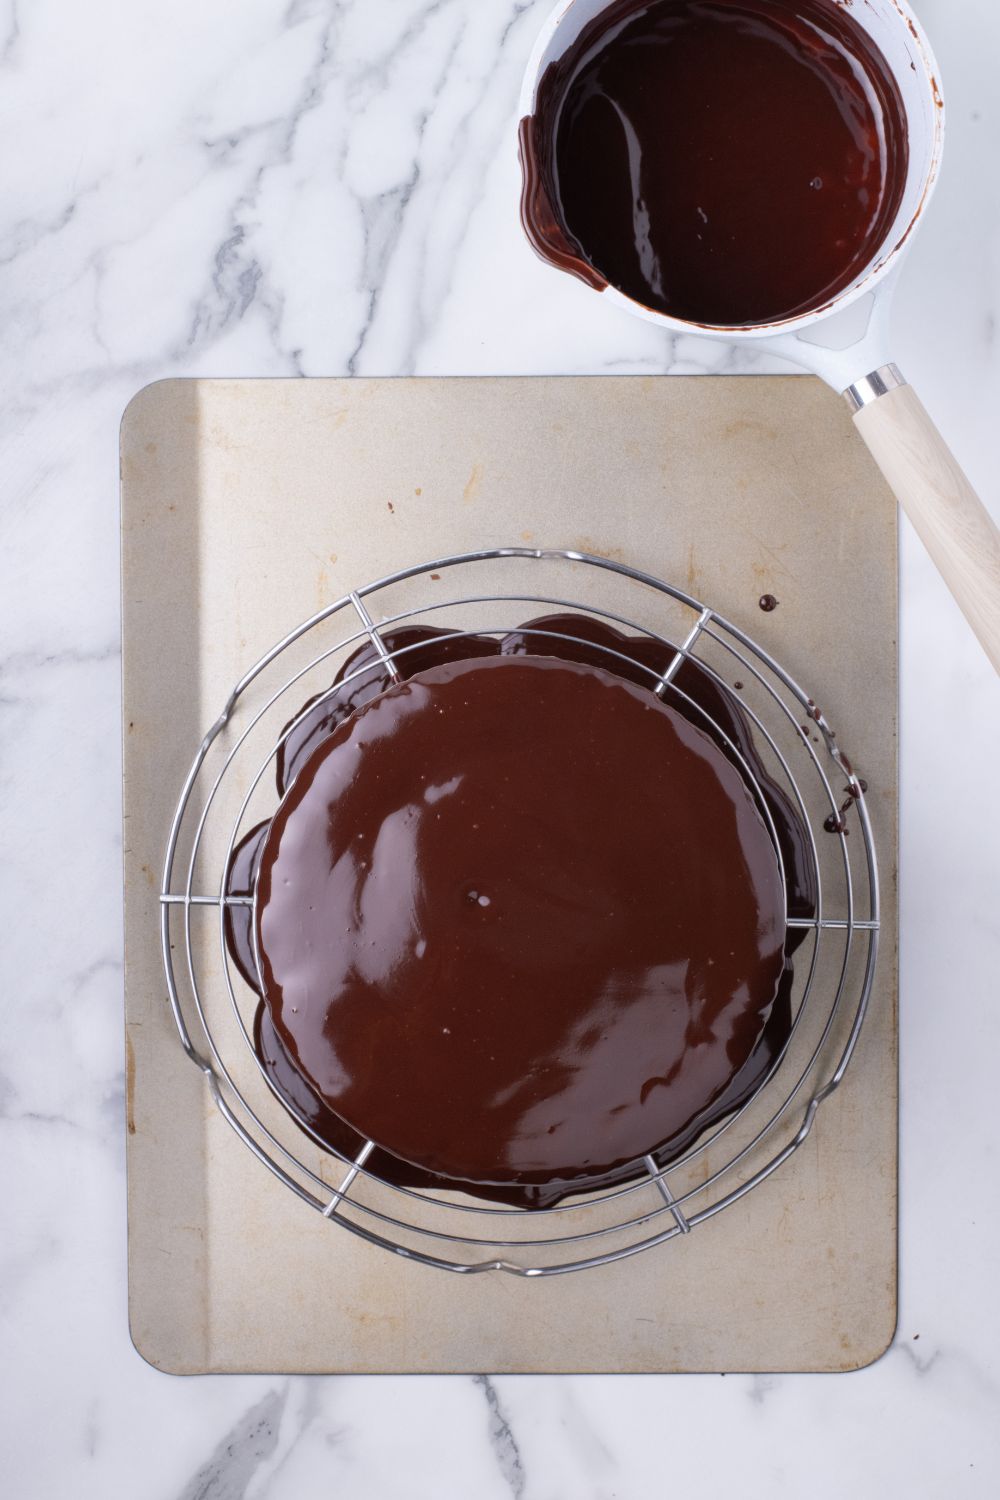
You will want to pour the glaze over the cake more than once, as it will take a few times to get an even glaze. Use a sheet pan or another pan to catch the glaze as it drips off the cake.
If you want a stronger chocolate flavor, use dark chocolate cocoa powder. It will help elevate the flavor even more.
Grease and line the baking pans with parchment paper to prevent the cakes from sticking.
Storing and Freezing Ding Dong Cake
Store your cake at room temperature in a sealed container for 3-4 days. You can also refrigerate it for up to 5-6 days.
Another option is freezing the cake,, which can be done for 2-3 months. Then, eat the cake straight from the freezer or thaw it on the counter or in the fridge.
Additional Questions
I do not like coffee. What can I use instead of coffee?
The coffee helps deepen the chocolate’s flavor. If you want to swap the coffee for whole milk, it is not used to flavor the cake.
I don’t have 8-inch pans, can I use my 9-inch cake pans?
Yes, you can use a 9-inch round cake pan instead of the 8-inch. Reduce the baking time to about 20-25 minutes or until the cake is entirely done.
One of the best parts of this cake is how it hits that sweet spot between comfort food and “wow, you made that?” It’s casual enough to eat in sweatpants but impressive enough to bring to a dinner party. No intricate decorating skills required—just a love of chocolate and a little patience while the layers come together. It’s the kind of dessert that earns repeat requests without making you feel like you’ve signed up for a full-time baking job.

And let’s be honest—there’s something satisfying about taking a bite of this and realizing it really does taste like a grown-up version of the snack cakes you hid in your lunchbox. It’s familiar, but better. Homemade, but not fussy. And once you’ve made it once, it goes straight into the “special occasion but also random Sunday afternoon” file.

So if you’re thinking about baking something that brings big flavor, a little nostalgia, and major chocolate energy to the table—this Ding Dong Cake is it. Throw on a playlist, grab your mixer, and make a cake that’s way more than just a Hostess throwback. It’s a total win.
Check out my Baking Blog BakingUpMemories.com where I have tons of cheesecakes and cakes!
More Dessert Recipes

Ding Dong Cake
Ingredients
- 2 cups 4 sticks unsalted butter, room temperature
- 1 cup unsweetened cocoa powder
- 12 ounces semisweet chocolate chips divided
- 1 cup black coffee hot
- 2 ½ teaspoons vanilla extract divided
- ¾ cup buttermilk
- 2 ¼ cups all-purpose flour divided
- 1 teaspoon baking powder
- 1 teaspoon baking soda
- 1 ½ teaspoons sea salt divided
- 2 ¾ cups sugar divided
- 3 large eggs
- 2 cups heavy cream divided
- 2 tablespoons light corn syrup
Instructions
- Prepare two 8-inch cake pans by greasing the bottoms with nonstick spray and fitting them with parchment paper rounds. Grease and flour the parchment and sides of the pans.
- Place the cocoa powder and 4 ounces of chocolate chips in a heatproof bowl. Pour the hot coffee over the chocolate and let it stand for a couple of minutes. Stir until melted and smooth.
- Stir in 1½ teaspoons of vanilla extract and buttermilk into the melted chocolate mixture and set aside until needed.
- In a medium size bowl whisk together 2 cups flour, baking powder, baking soda, and 1 teaspoon salt and set aside.
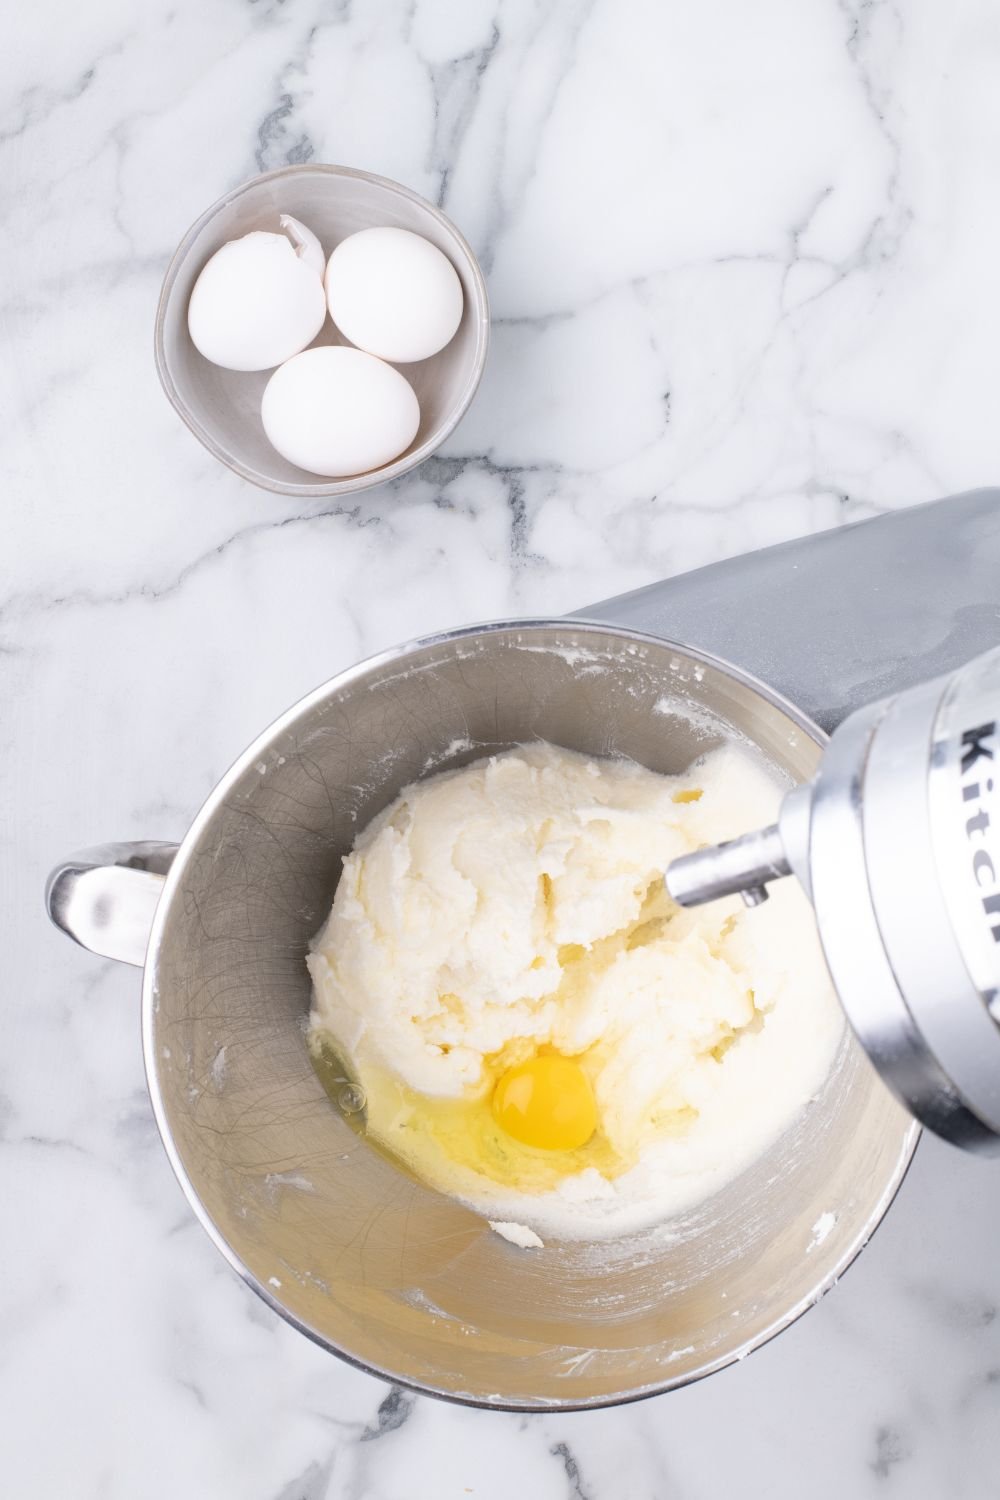
- In the bowl of a stand mixer fitted with a paddle attachment, beat together 2 cups sugar and 1 cup (2 sticks) butter until fluffy and light.
- Add in eggs, one at a time, beating before adding the next egg so that everything is well incorporated. Make sure to scrape down the sides of the bowl and continue to beat the sugar mixture until it is light and fluffy.
- Add 1/3 of the flour mixture to the butter mixture, stirring until just combined. Alternate with 1/2 cup of the chocolate mixture (beginning and ending with the flour mixture).
- Transfer the batter between the prepared cake pans, ensuring they are evenly divided.
- Bake the cakes on the center rack of the preheated oven for approximately 30 minutes or until a toothpick tester comes out clean and free of crumbs.
- Remove the cake pans from the oven and let them cool on a wire rack for 10 minutes. Carefully remove the cake from the pans and continue to let them cool on a wire rack for a further 20 minutes while you prepare the filling.
- In a small saucepan over medium/low heat, whisk together the remaining ¼ cup of flour and 1 cup of cream until you reach a pudding-like consistency (about 5 minutes). Make sure not to let it boil.
- Remove from heat, stir in the remaining 1 teaspoon of vanilla extract, and let it cool in the fridge for 15 minutes.
- In the bowl of a stand mixer fitted with the whisk attachment, beat the remaining 1 cup (2 sticks) of butter with the remaining ¾ cup of sugar and remaining ½ teaspoon of salt, until light and fluffy.
- Add the cooled flour and cream mixture to the butter and continue to beat for an additional 2 minutes (or until fluffy)
- To make the glaze: Add the remaining 1 cup heavy cream, 8 ounces chocolate chips, and 2 tablespoons corn syrup to a small saucepan over medium/low heat. Stir until the chocolate has melted and the mixture is smooth. Set aside and allow the glaze to come to room temperature (about 15 minutes but still pourable)
- Place one of the cooled cakes onto a wire cooling rack set. Place the filling on the cake’s center and spread the filling just shy of the edge of the cake using an offset spatula. Place the second cake layer on top of the filling and lightly press down so the filling doesn’t squeeze out.
- Place the wire rack over a baking sheet and pour the glaze slowly and evenly over the entire cake, making sure to cover all areas with the chocolate.
- Once the glaze has set, transfer the cake to a cake stand or large plate.
- Chill until ready to serve.
Did you make this recipe?
Make sure to follow on Pinterest for more recipes!

Leave A Reply!