Baking the American Flag Layered Cake! Let’s just be honest right from the start: when someone says “patriotic cake,” you probably imagine something loud, messy, and sugar-high-inducing. And you wouldn’t be wrong. But the American Flag Layered Cake? This one is different—it’s still all those things, but in the best, most celebratory, backyard-barbecue kind of way. Celebrate with style with this festive American Flag Layered Cake! It is a red, white, and blue layered cake topped with shiny stars. Perfect for Memorial Day, the Fourth of July, or any other patriotic celebration you have planned.
It’s the kind of cake that shows up when people are feeling good, the grill’s been working overtime, kids are running around with sparklers, and someone’s got country music playing a little too loud in the background. It’s unapologetically festive, layered like your aunt’s 7-layer dip, and when you slice into it? You get that little gasp from the table. That’s the magic of this cake.
And hey, it’s not hard—but let’s not pretend it’s a one-bowl, 20-minute situation either. This cake is a project. But it’s the kind of project that feels worth it. It’s about setting aside a couple of hours, making a small mess, and ending up with something that gets eaten down to the last crumb. That’s the kind of kitchen win we like.

The Layers Are the Party
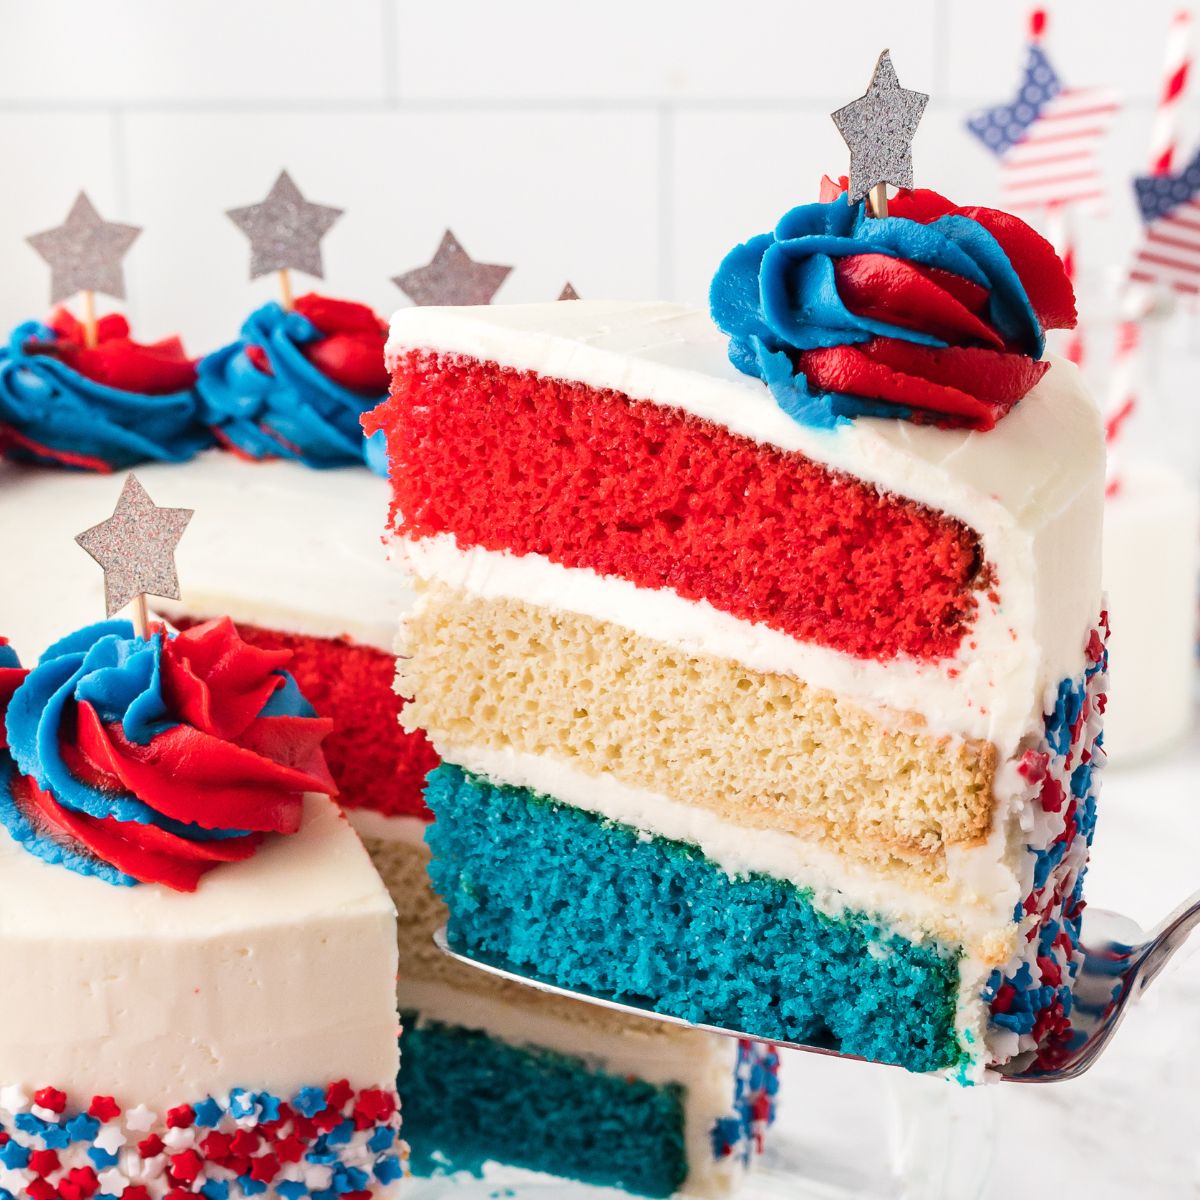
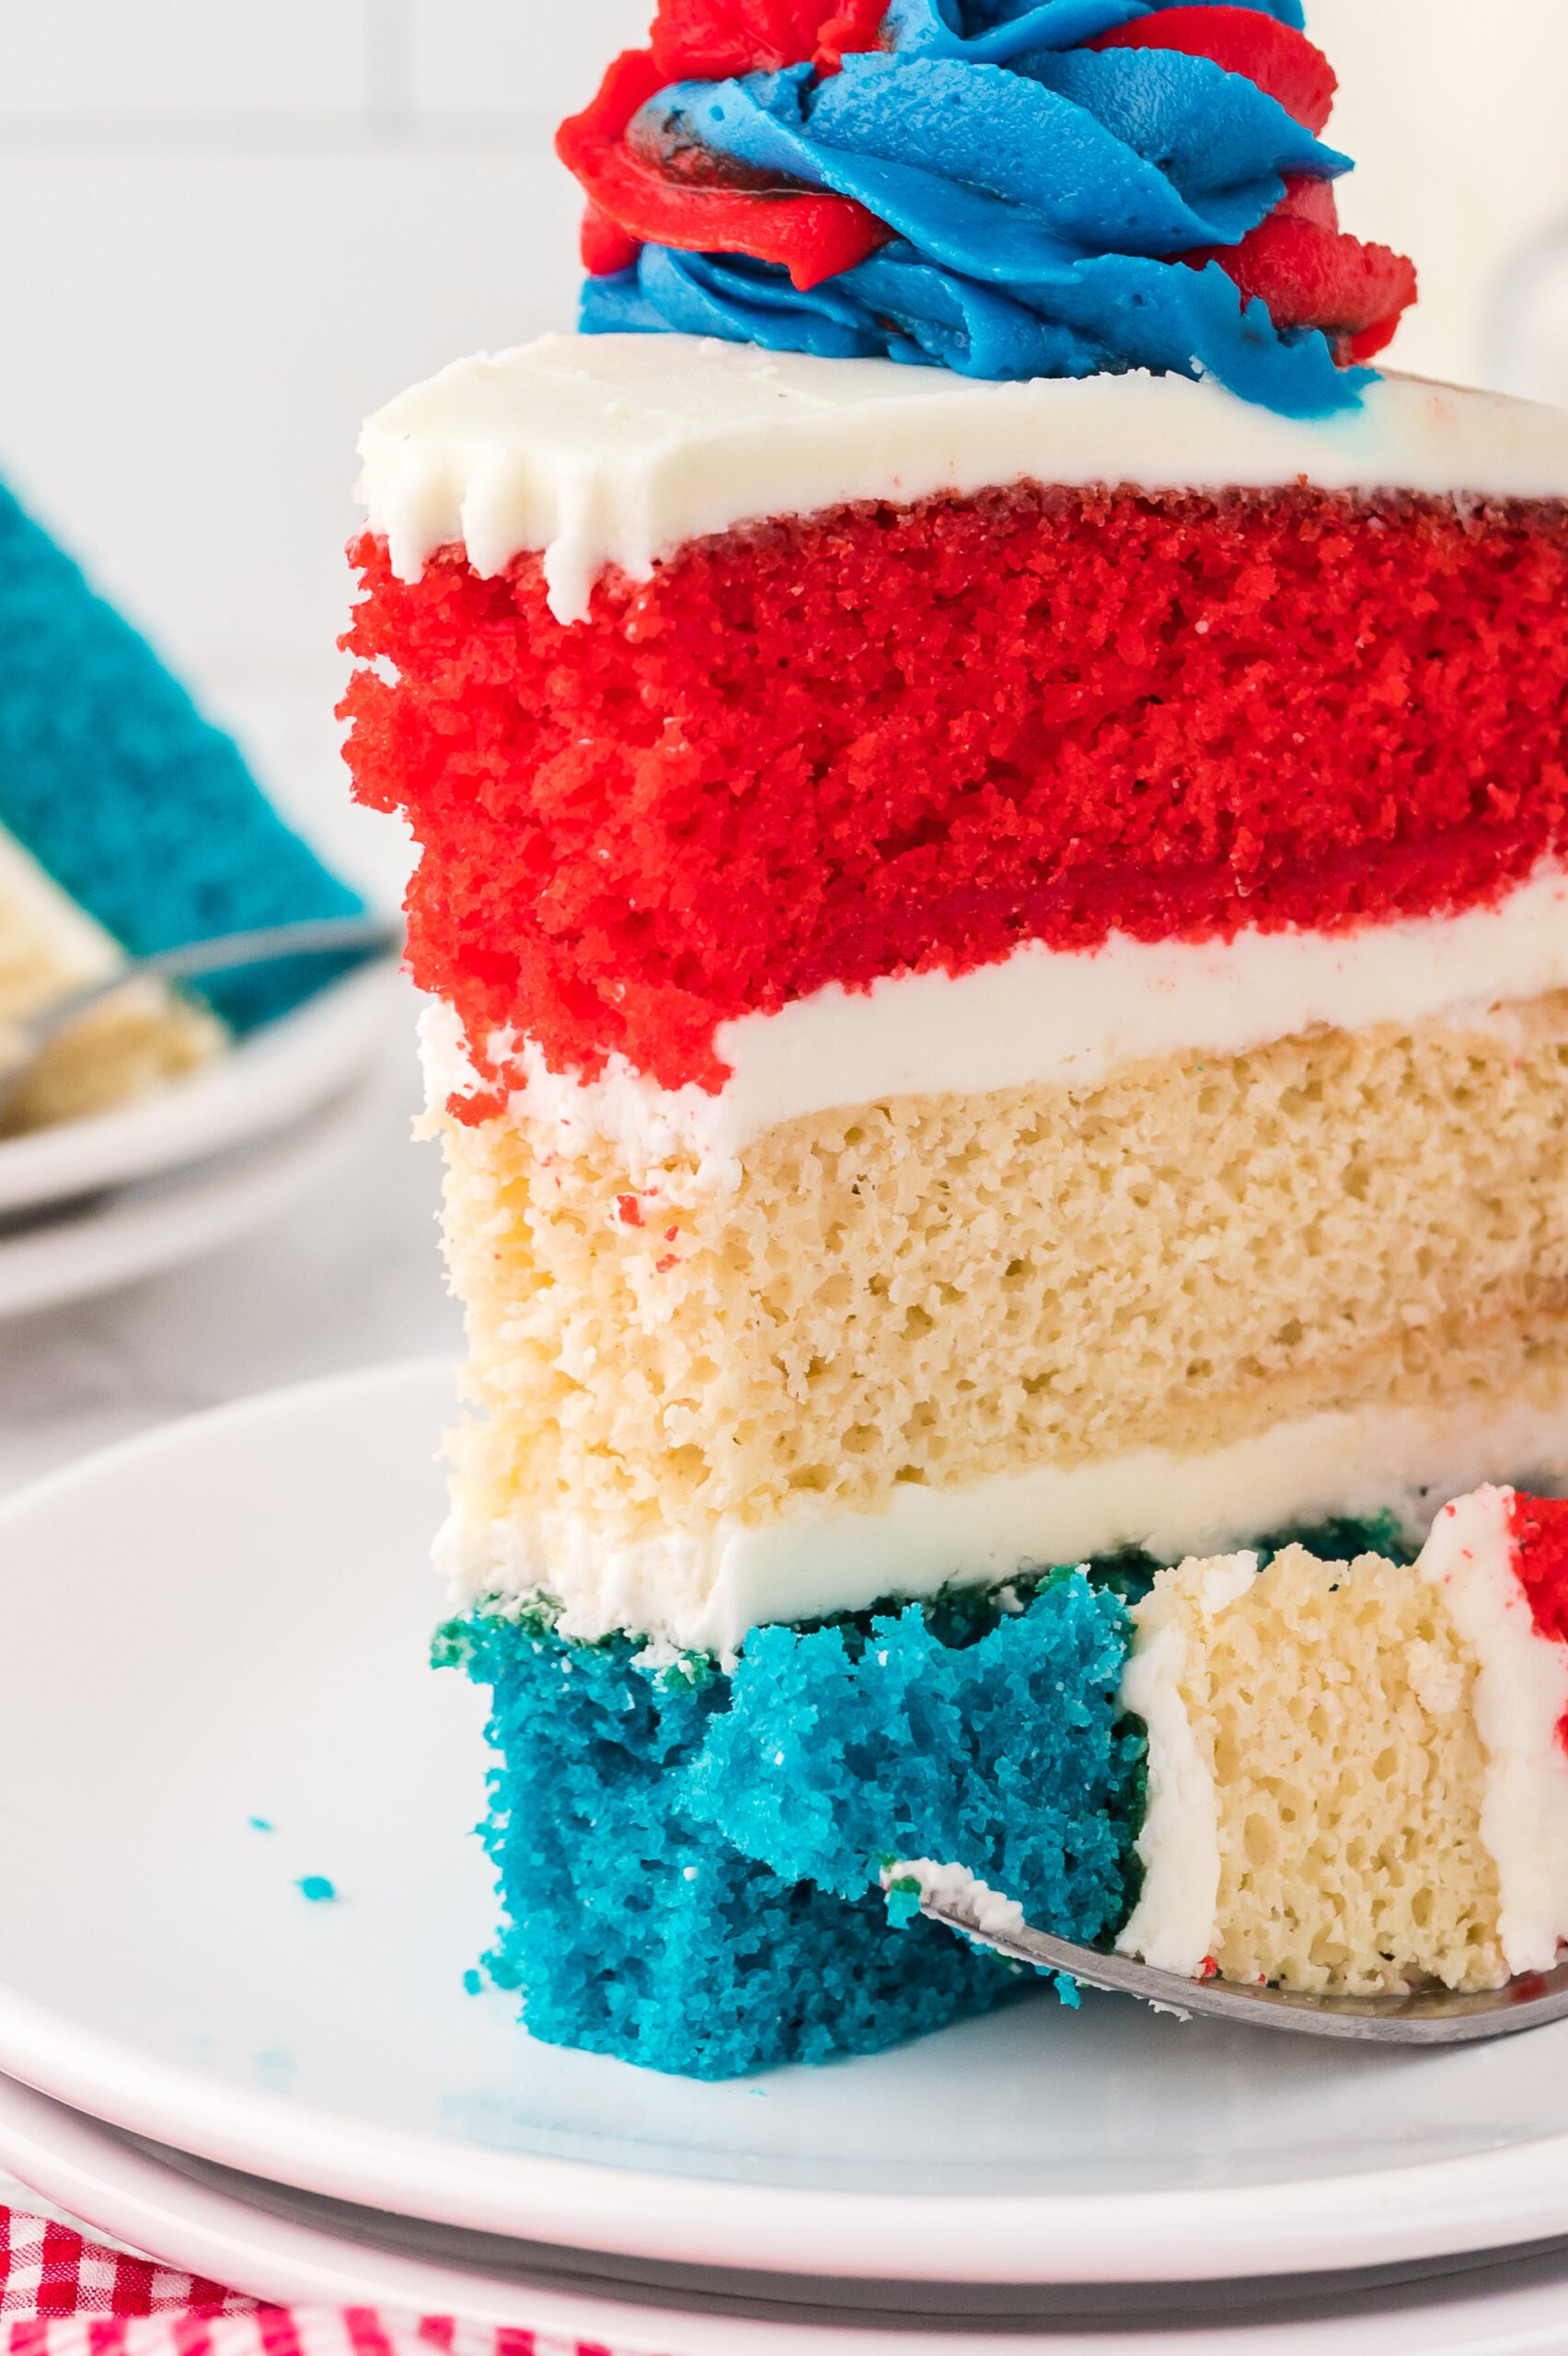
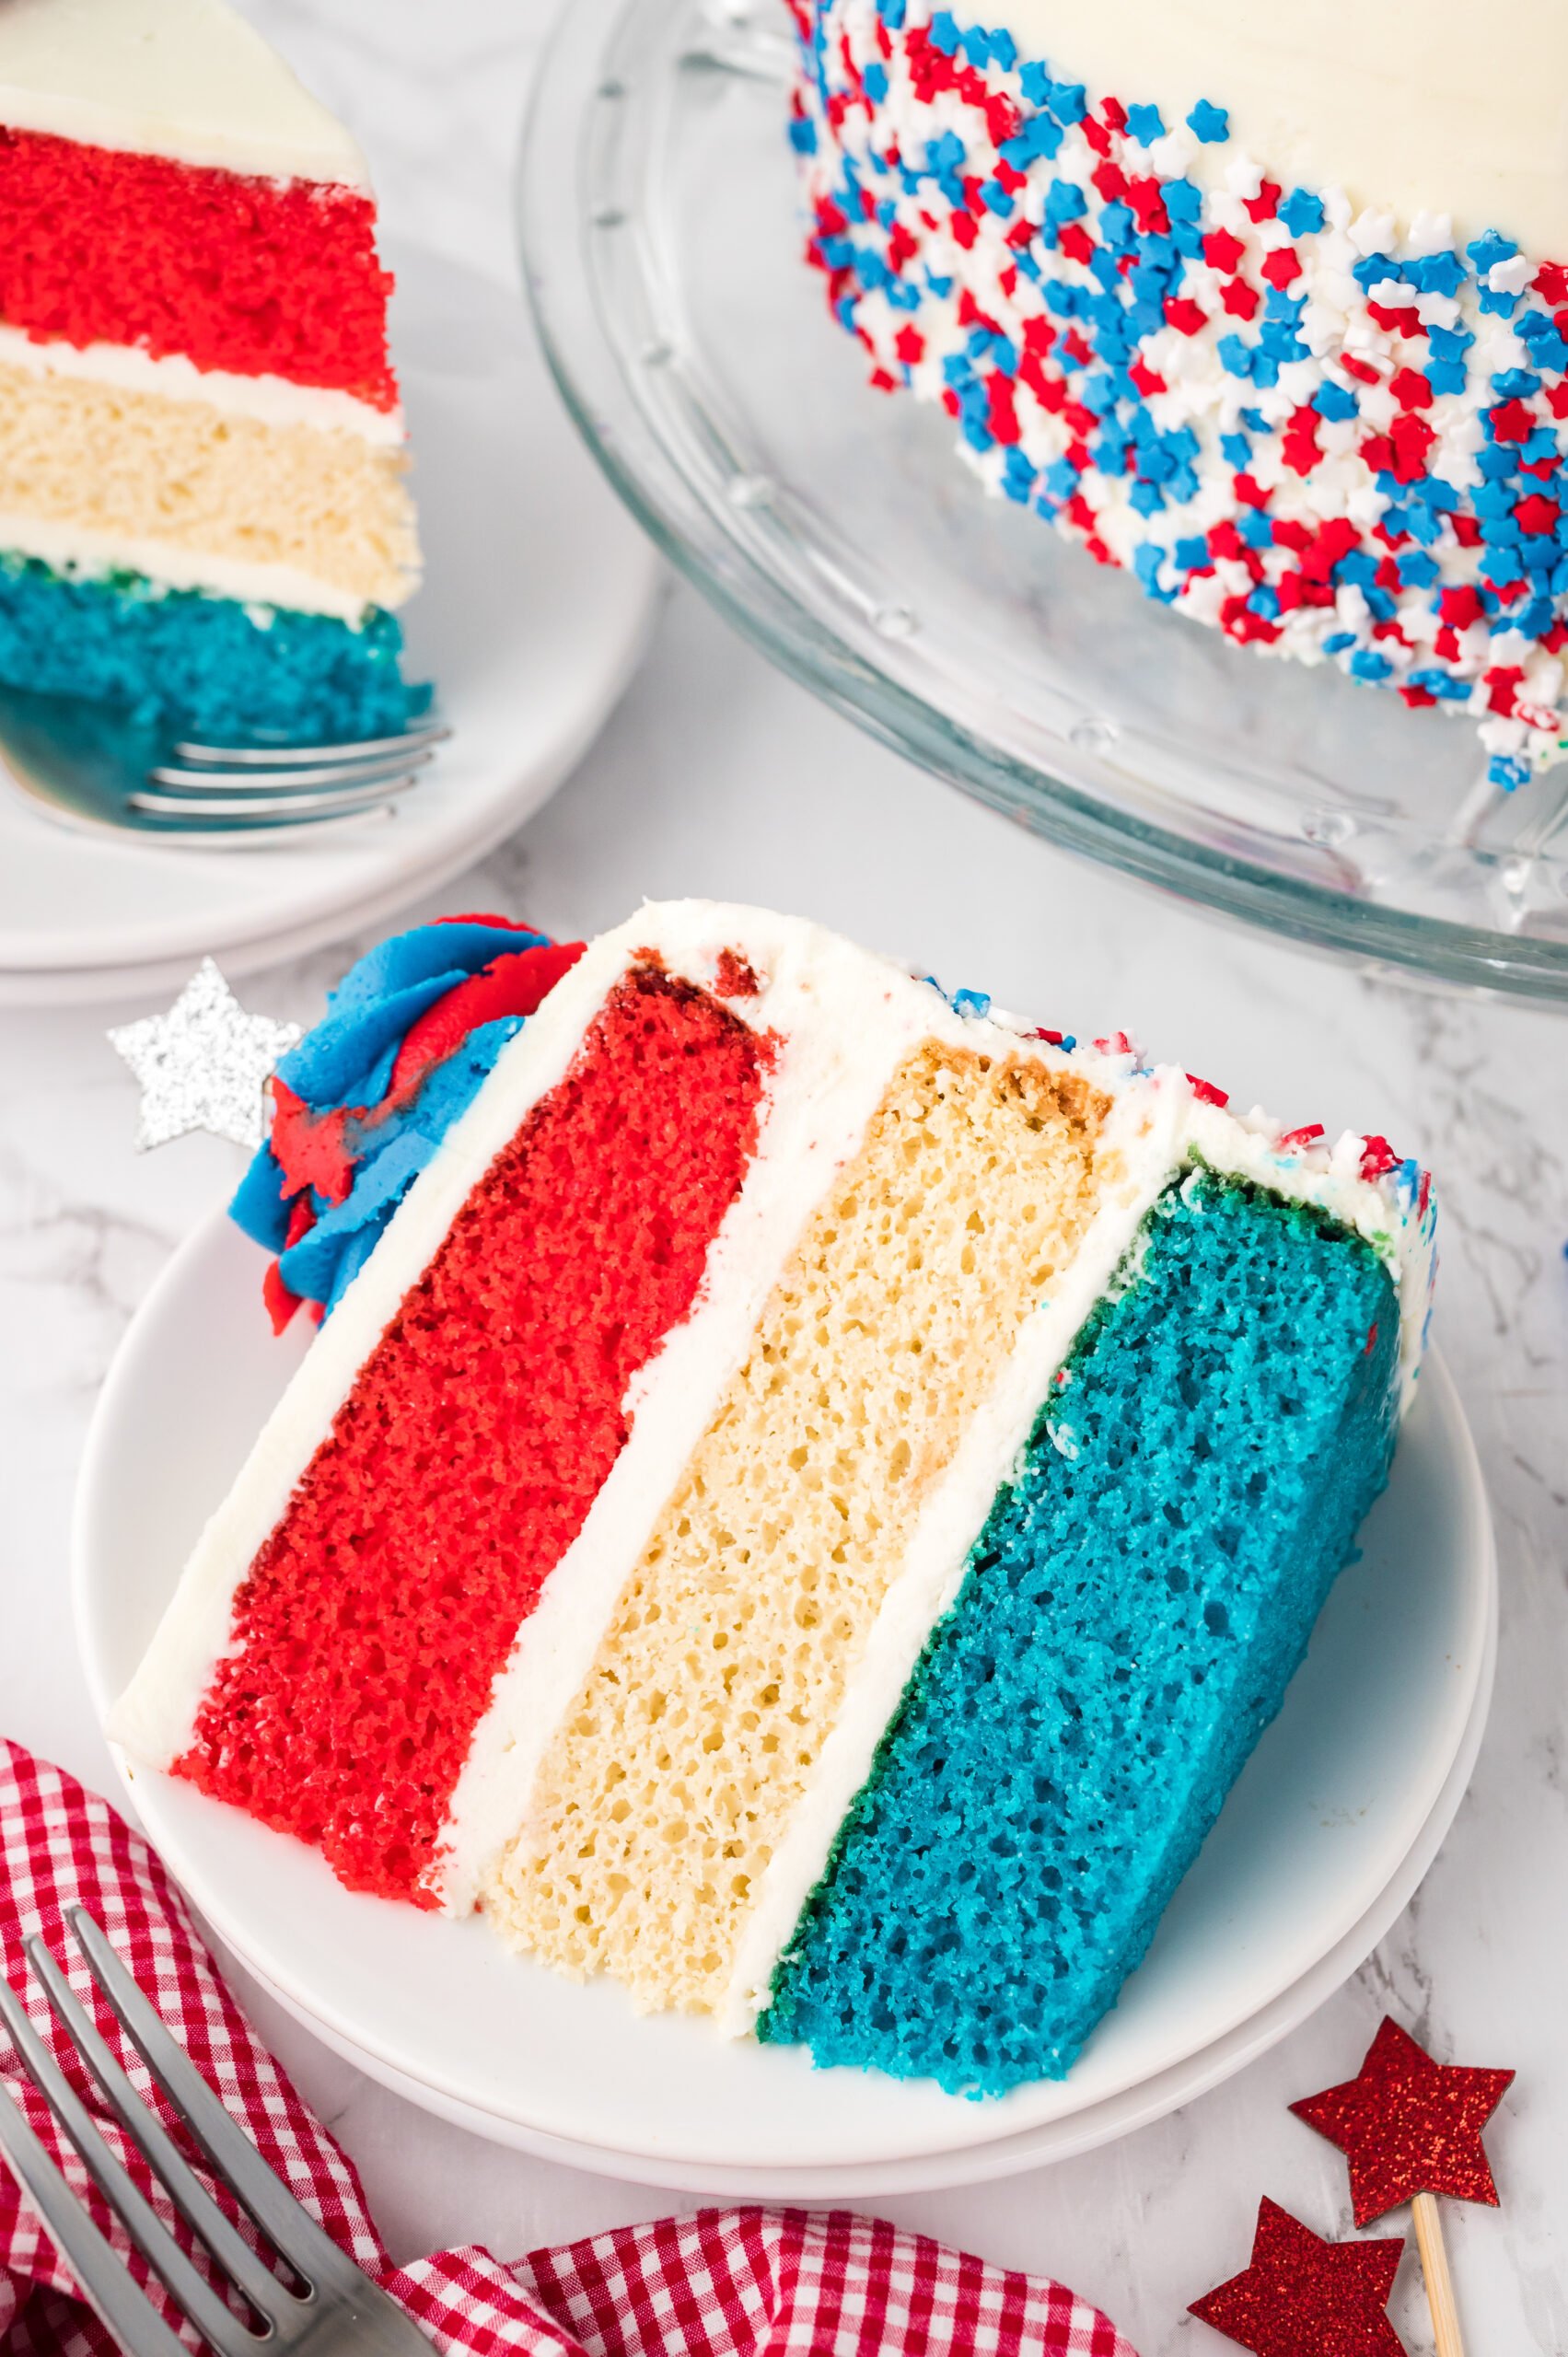
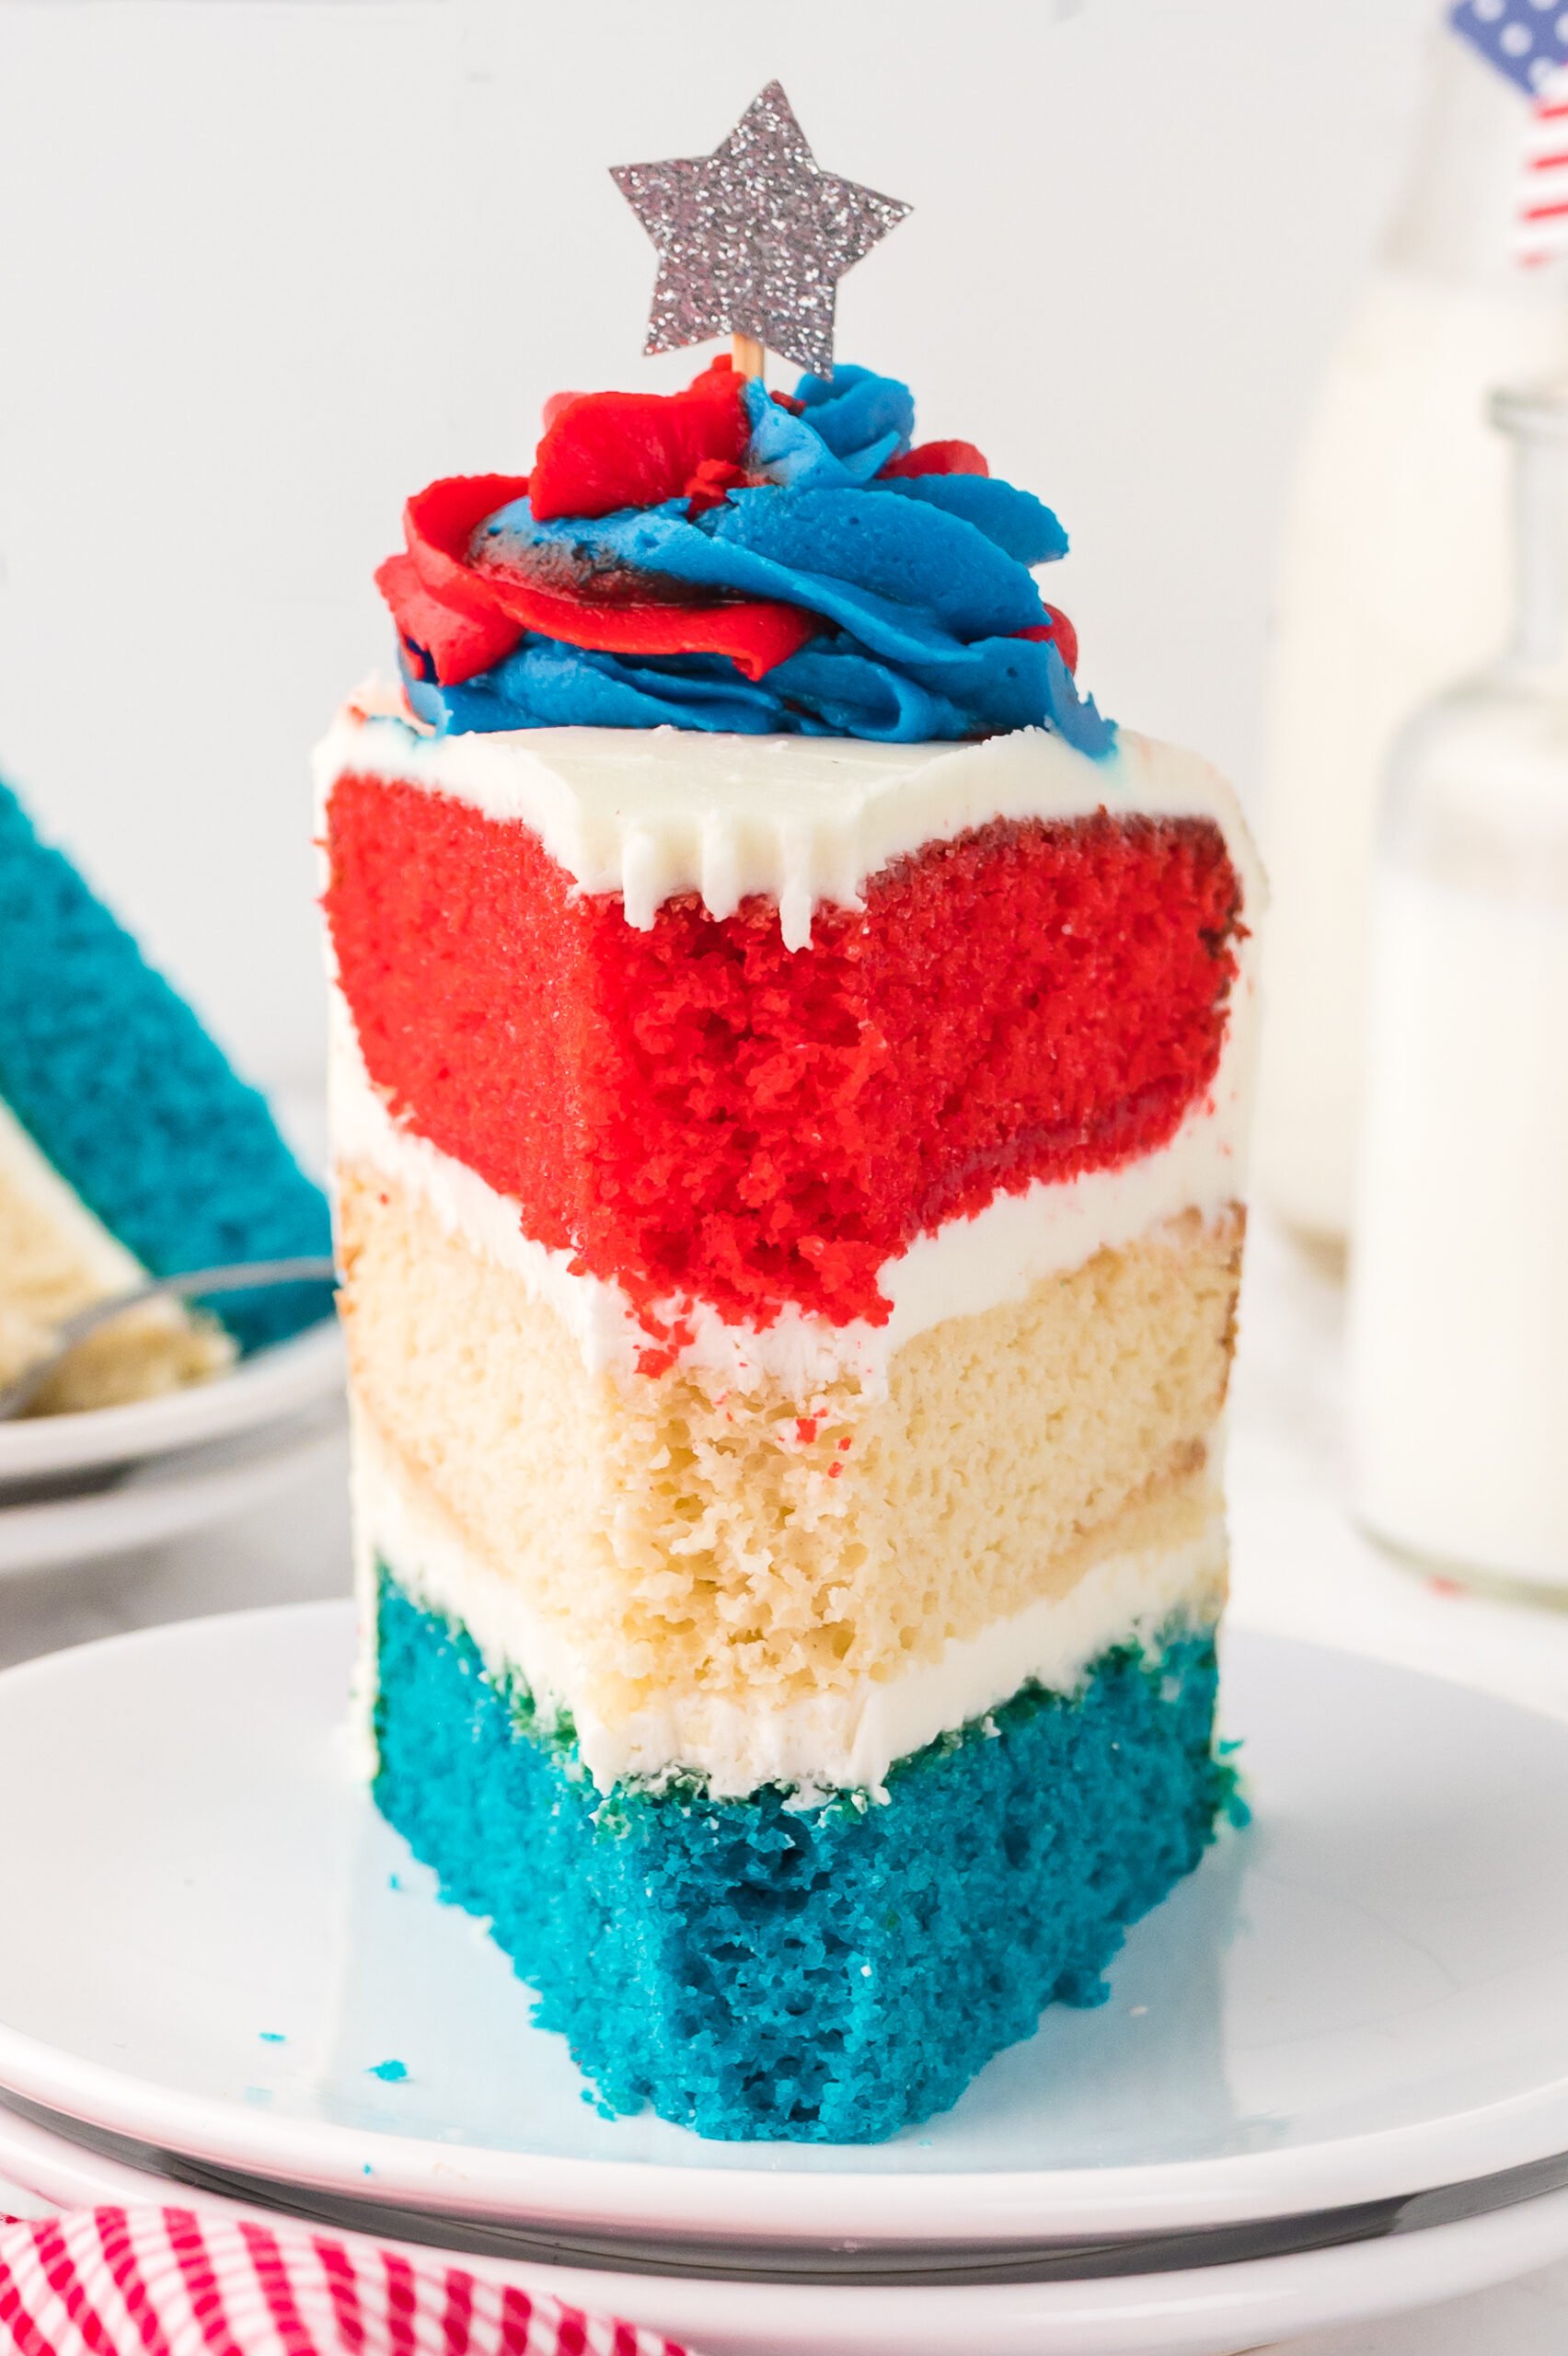
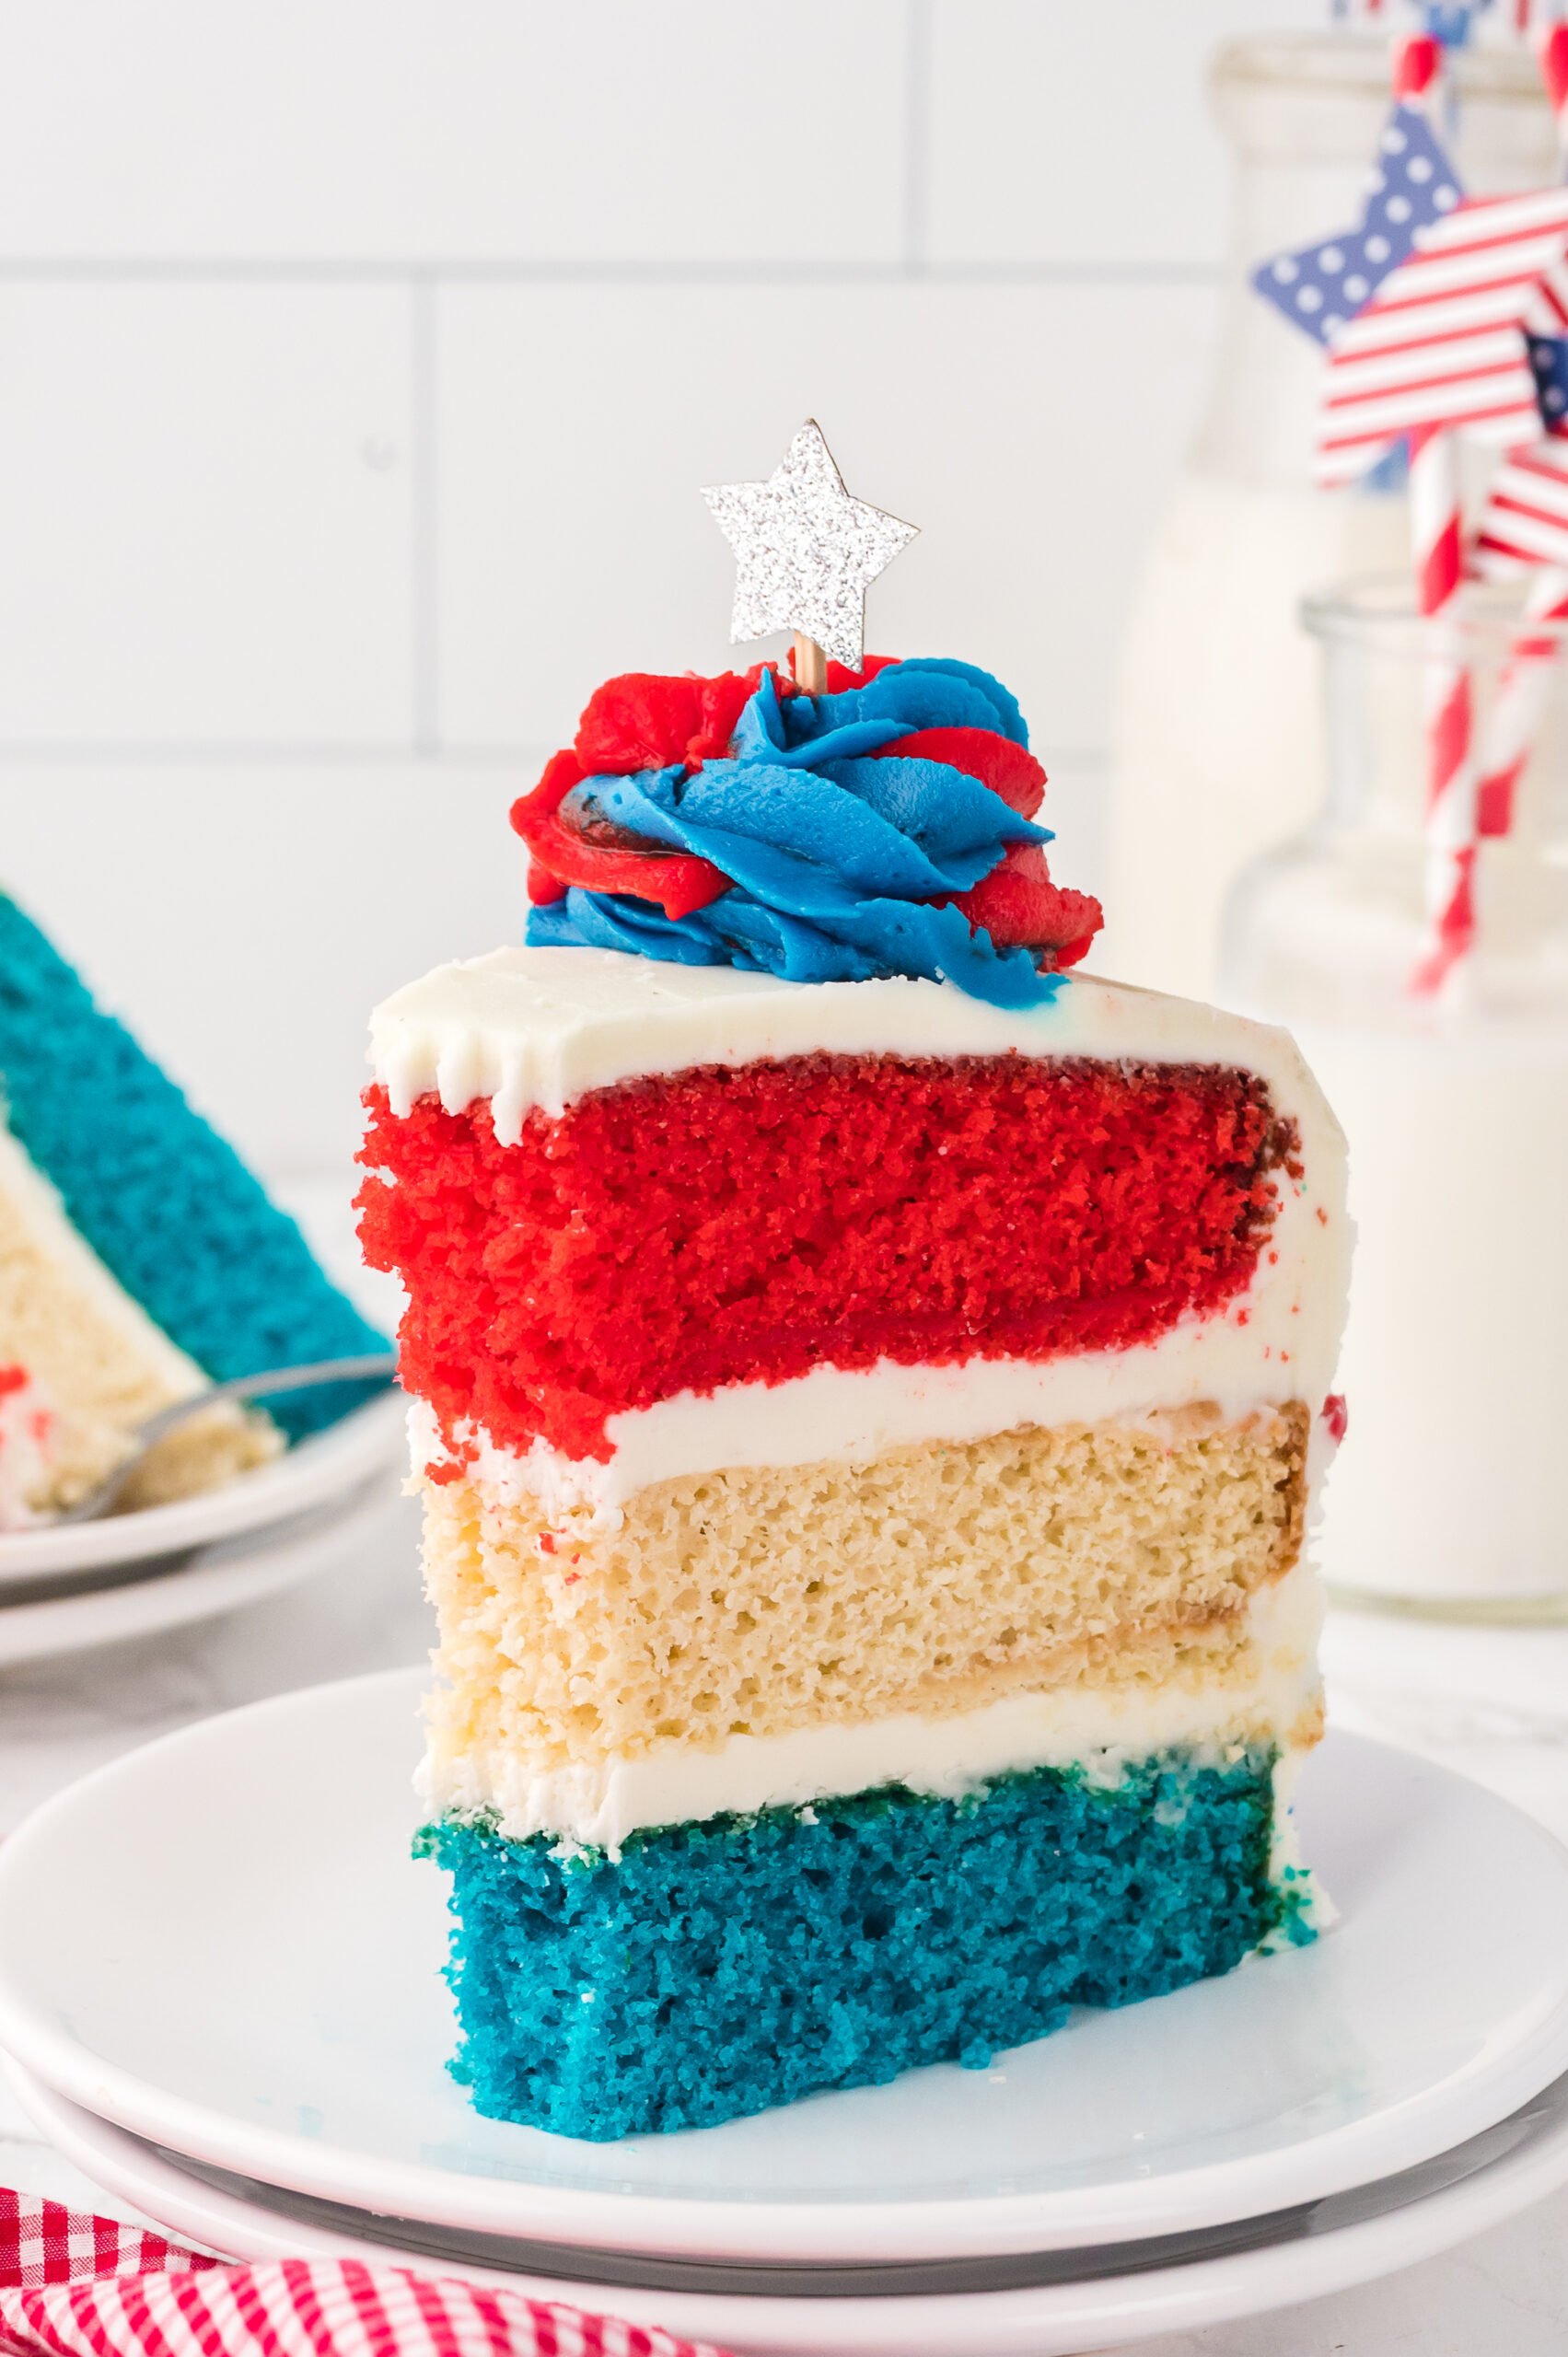
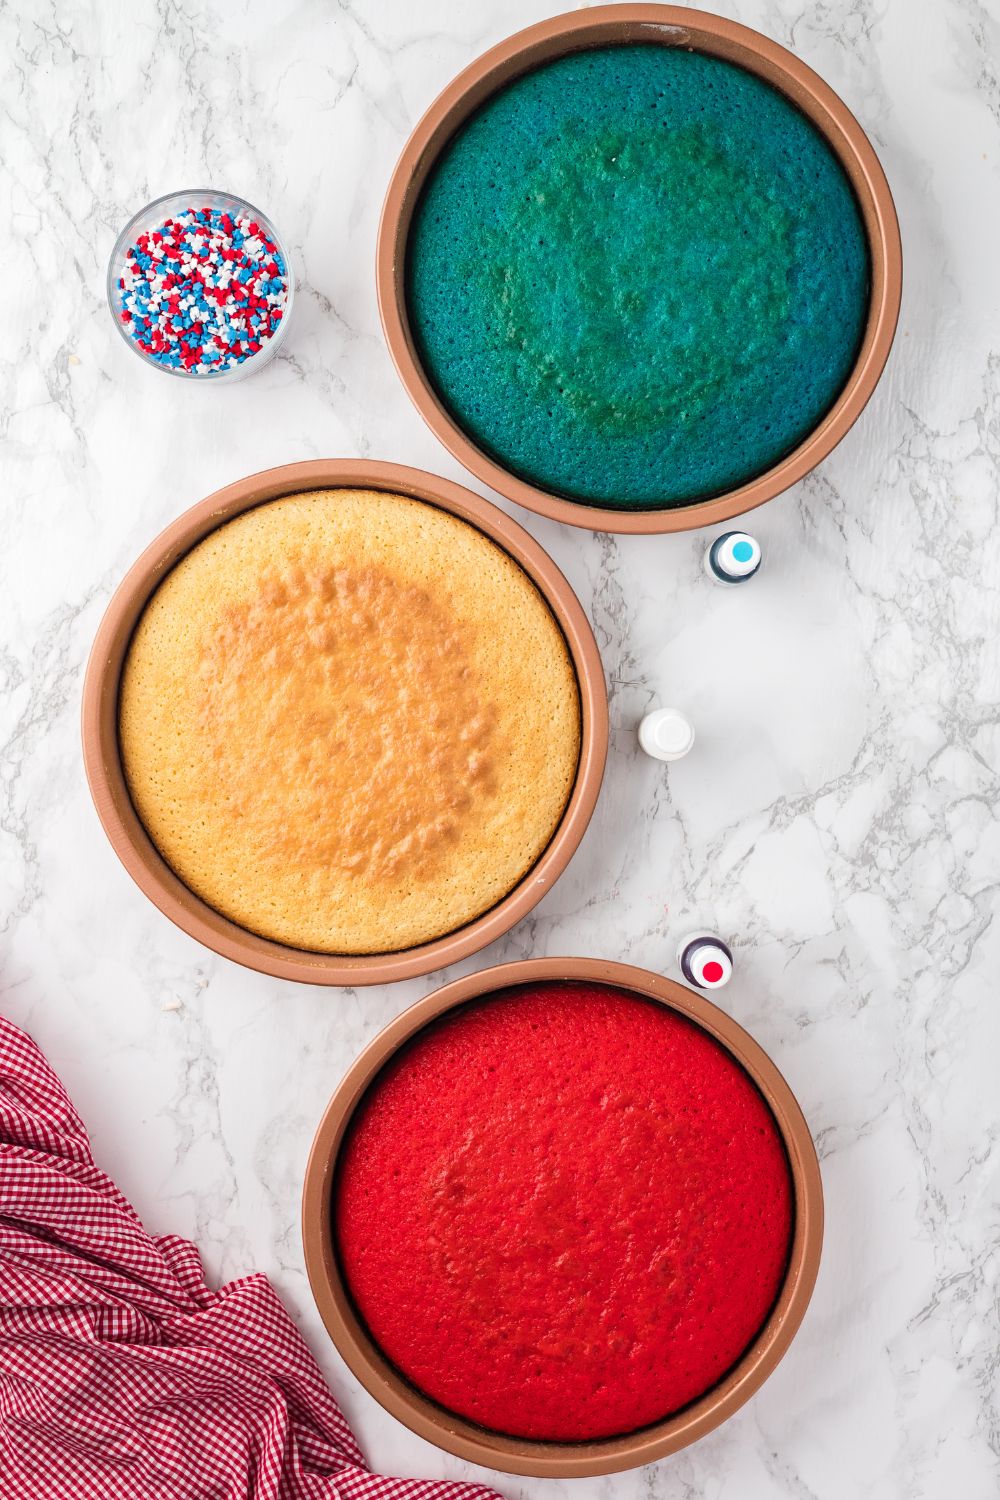
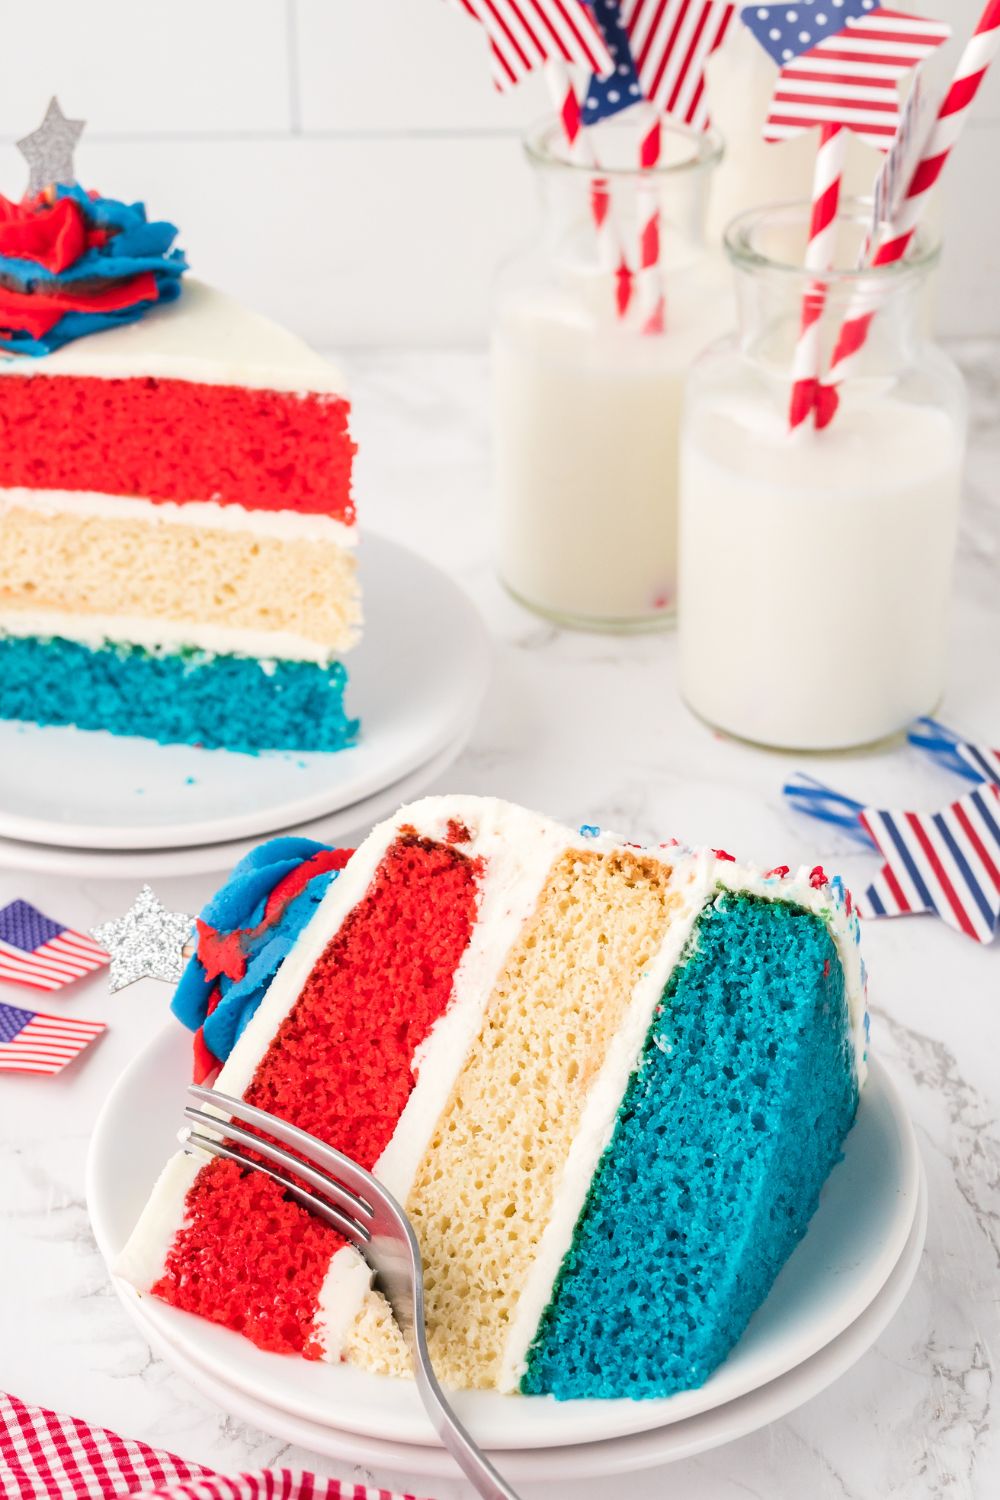
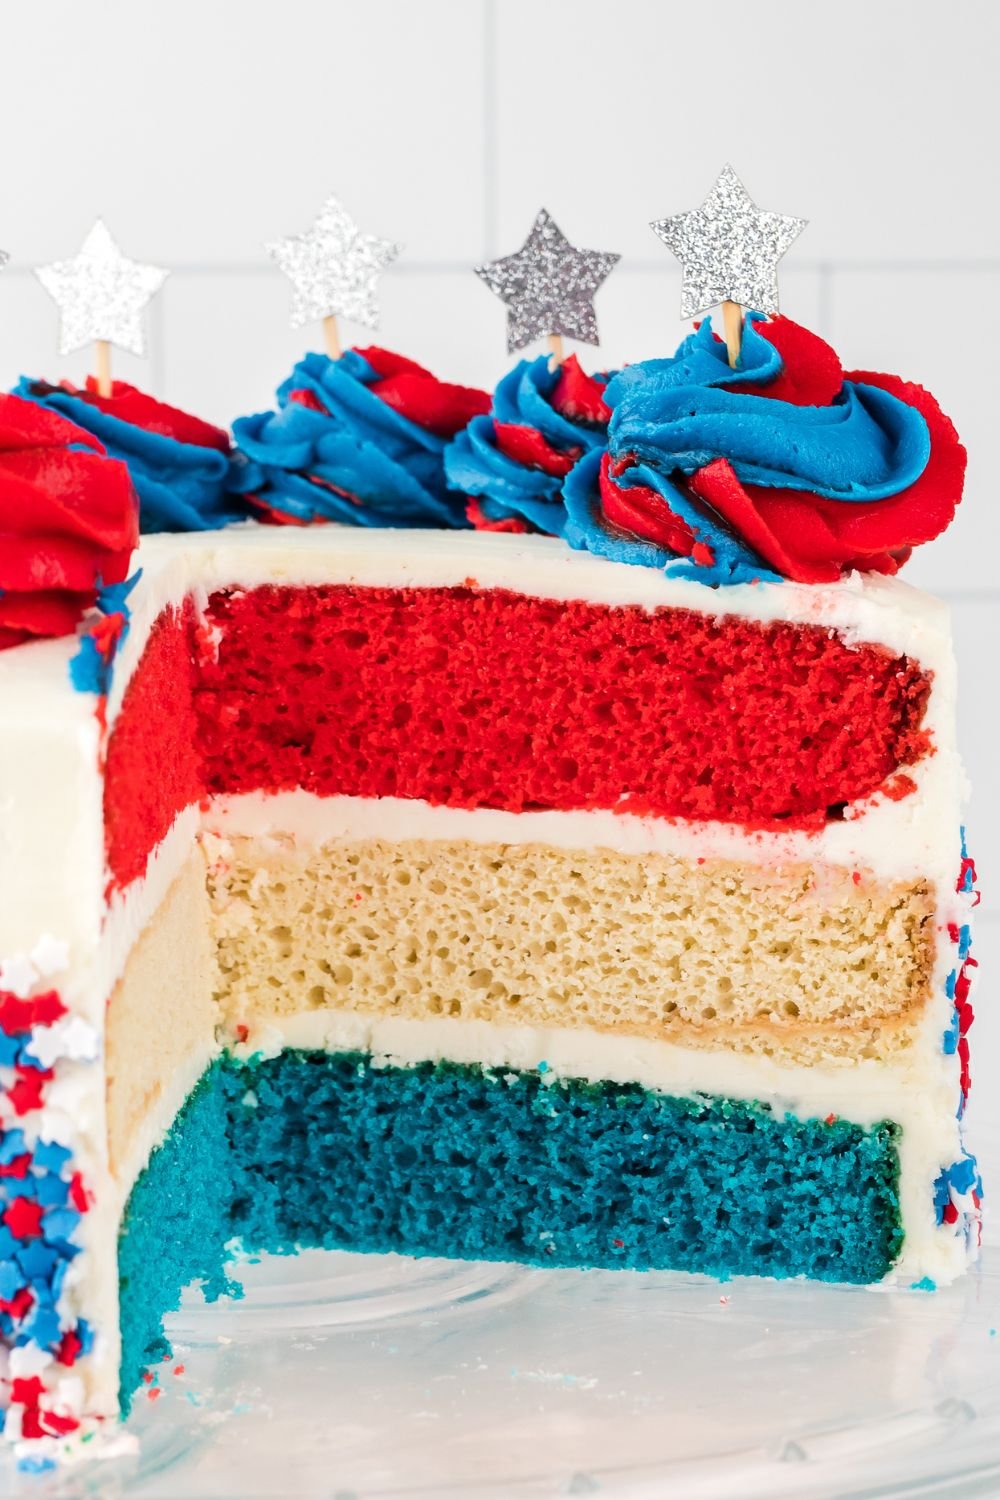
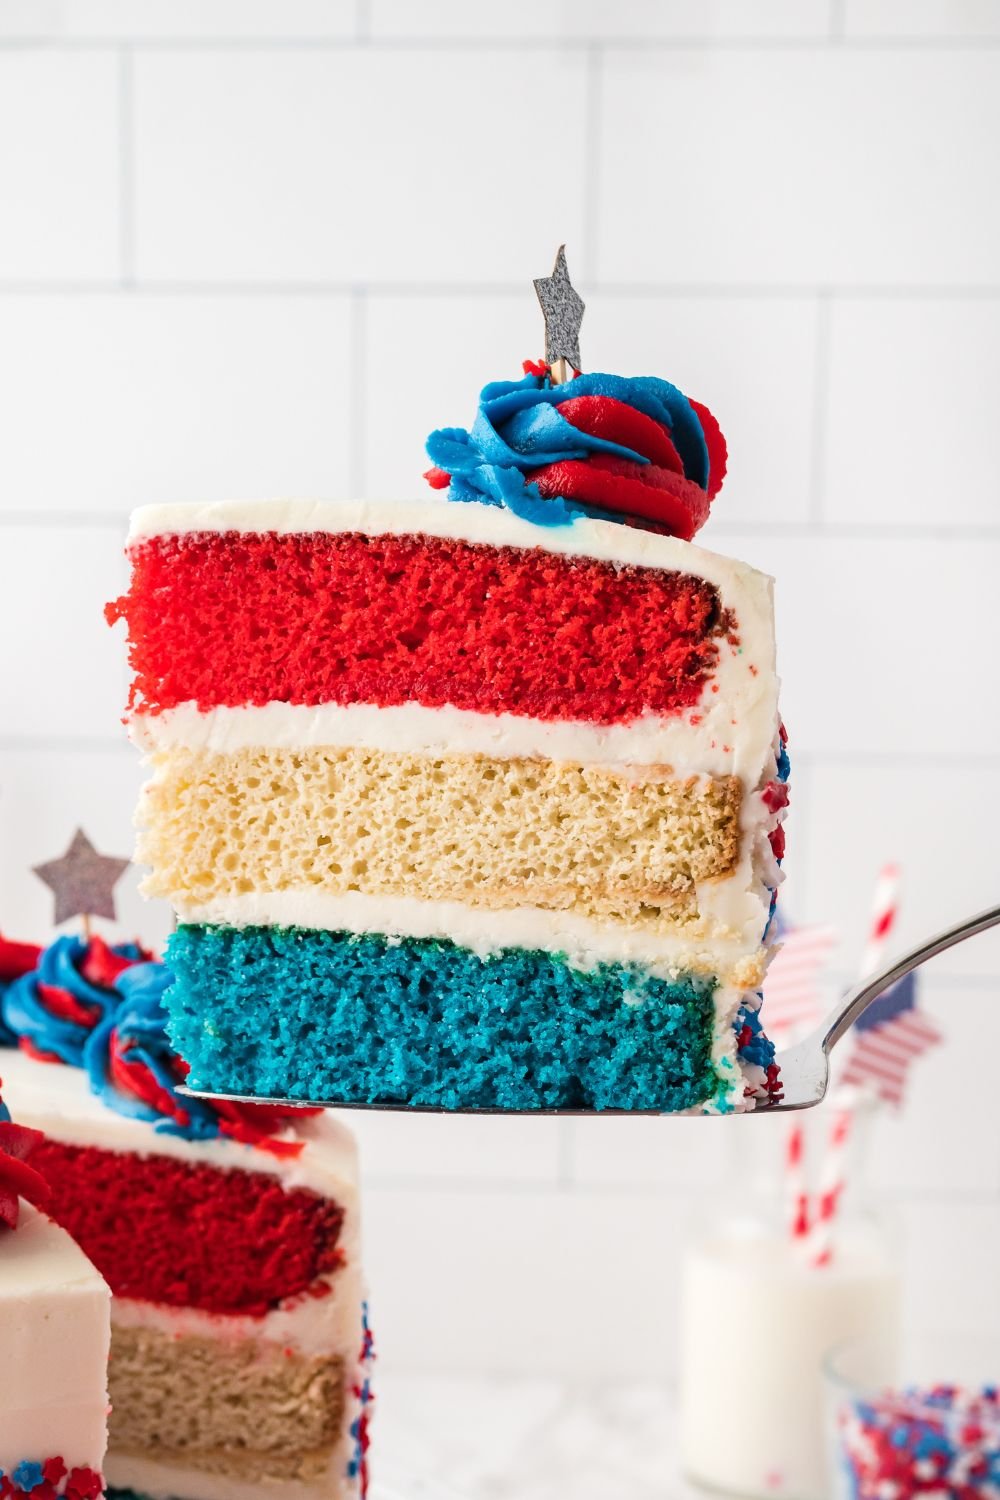
The cake itself? Classic. Think soft, buttery vanilla sponge—like the kind that reminds you of those bakery birthday cakes with the neon roses you had as a kid, but way better. You’re making three layers: one red, one blue, one plain. It’s a subtle nod to the flag without trying too hard. You get those clean slices of color when you cut it, and it just looks cool. No intricate carving, no fondant flags, just solid color layers that hold their own.
And pro tip: don’t skip the trimming step. Level cakes are a game-changer. You’re not building a cake skyscraper here, but you do want those clean edges and even stacking. The serrated knife is your best friend—just be patient, rotate the cake, and don’t rush it.
The Frosting: Let’s Talk About It
This frosting is not for the faint of heart, but it’s exactly what this cake needs. It’s the kind of frosting that kids want to sneak a finger into and adults pretend they don’t love, but we all know they do.
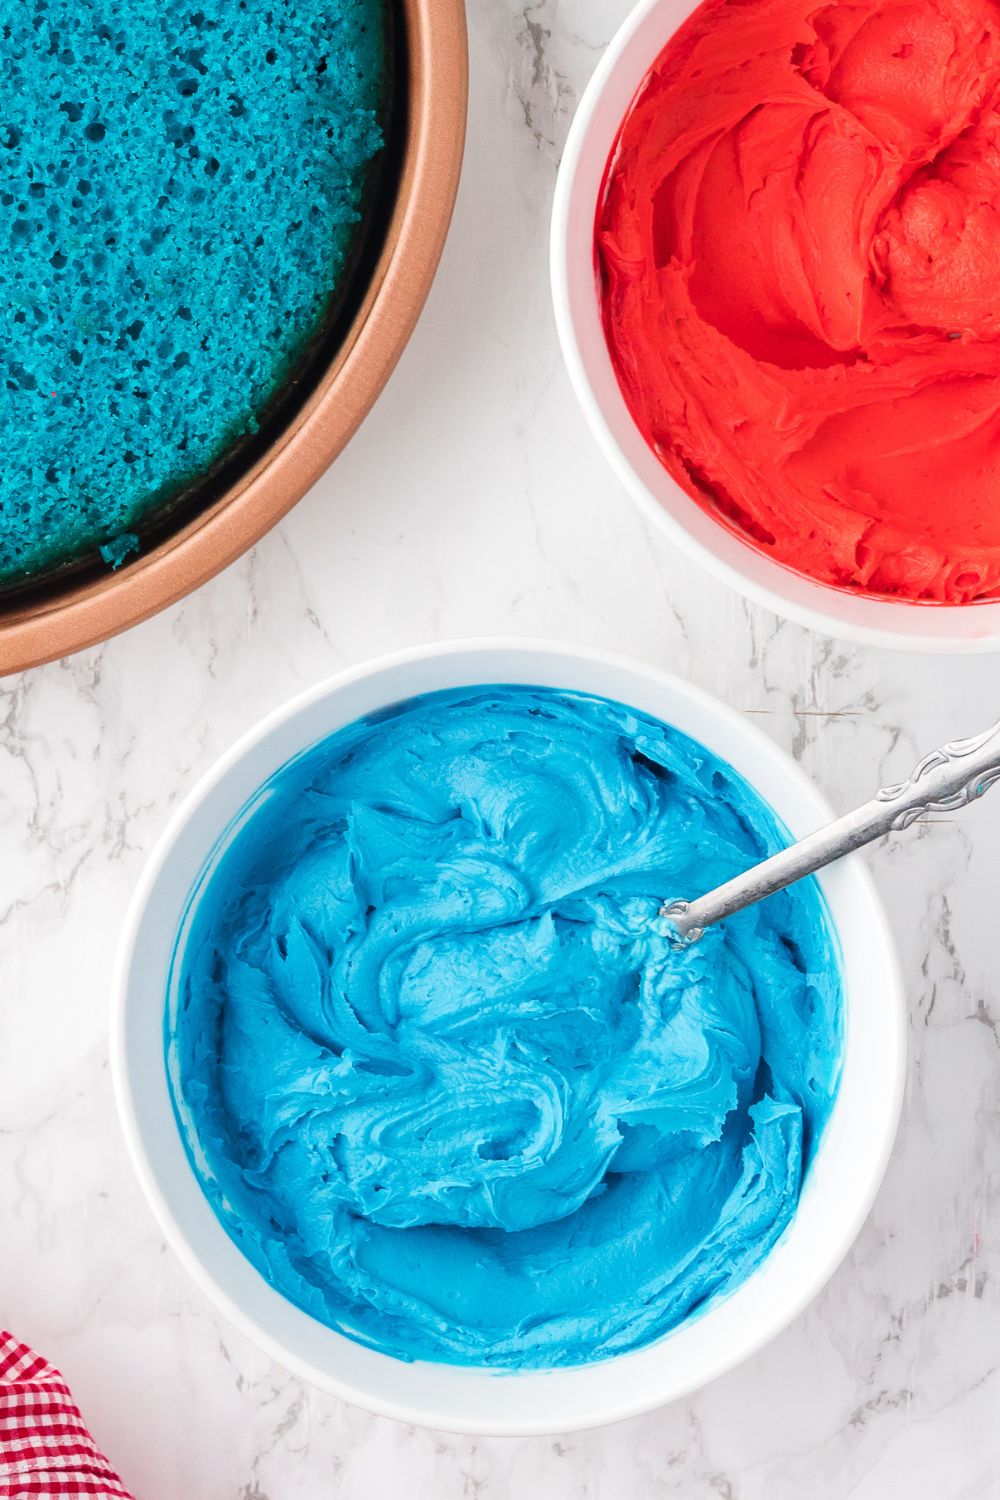
It’s a classic American buttercream: rich, thick, sweet. You’re using both butter and shortening, which gives you that sturdy, pipe-able texture that holds up in the heat (shout out to Fourth of July humidity). And the clear vanilla keeps that bright white color without that slightly tan tint you get from regular extract. That said, even with clear vanilla, butter is yellow—so you’ve got a neat little trick of a dot of purple or violet food coloring to neutralize it. No one wants a yellow “white” cake. You’re aiming for flag white, not buttercream beige.
Coloring the frosting red and blue is surprisingly satisfying. Start with small amounts of gel food coloring, because once you go too far, there’s no going back. You want bold, not blinding.
Decorating Without Losing Your Mind
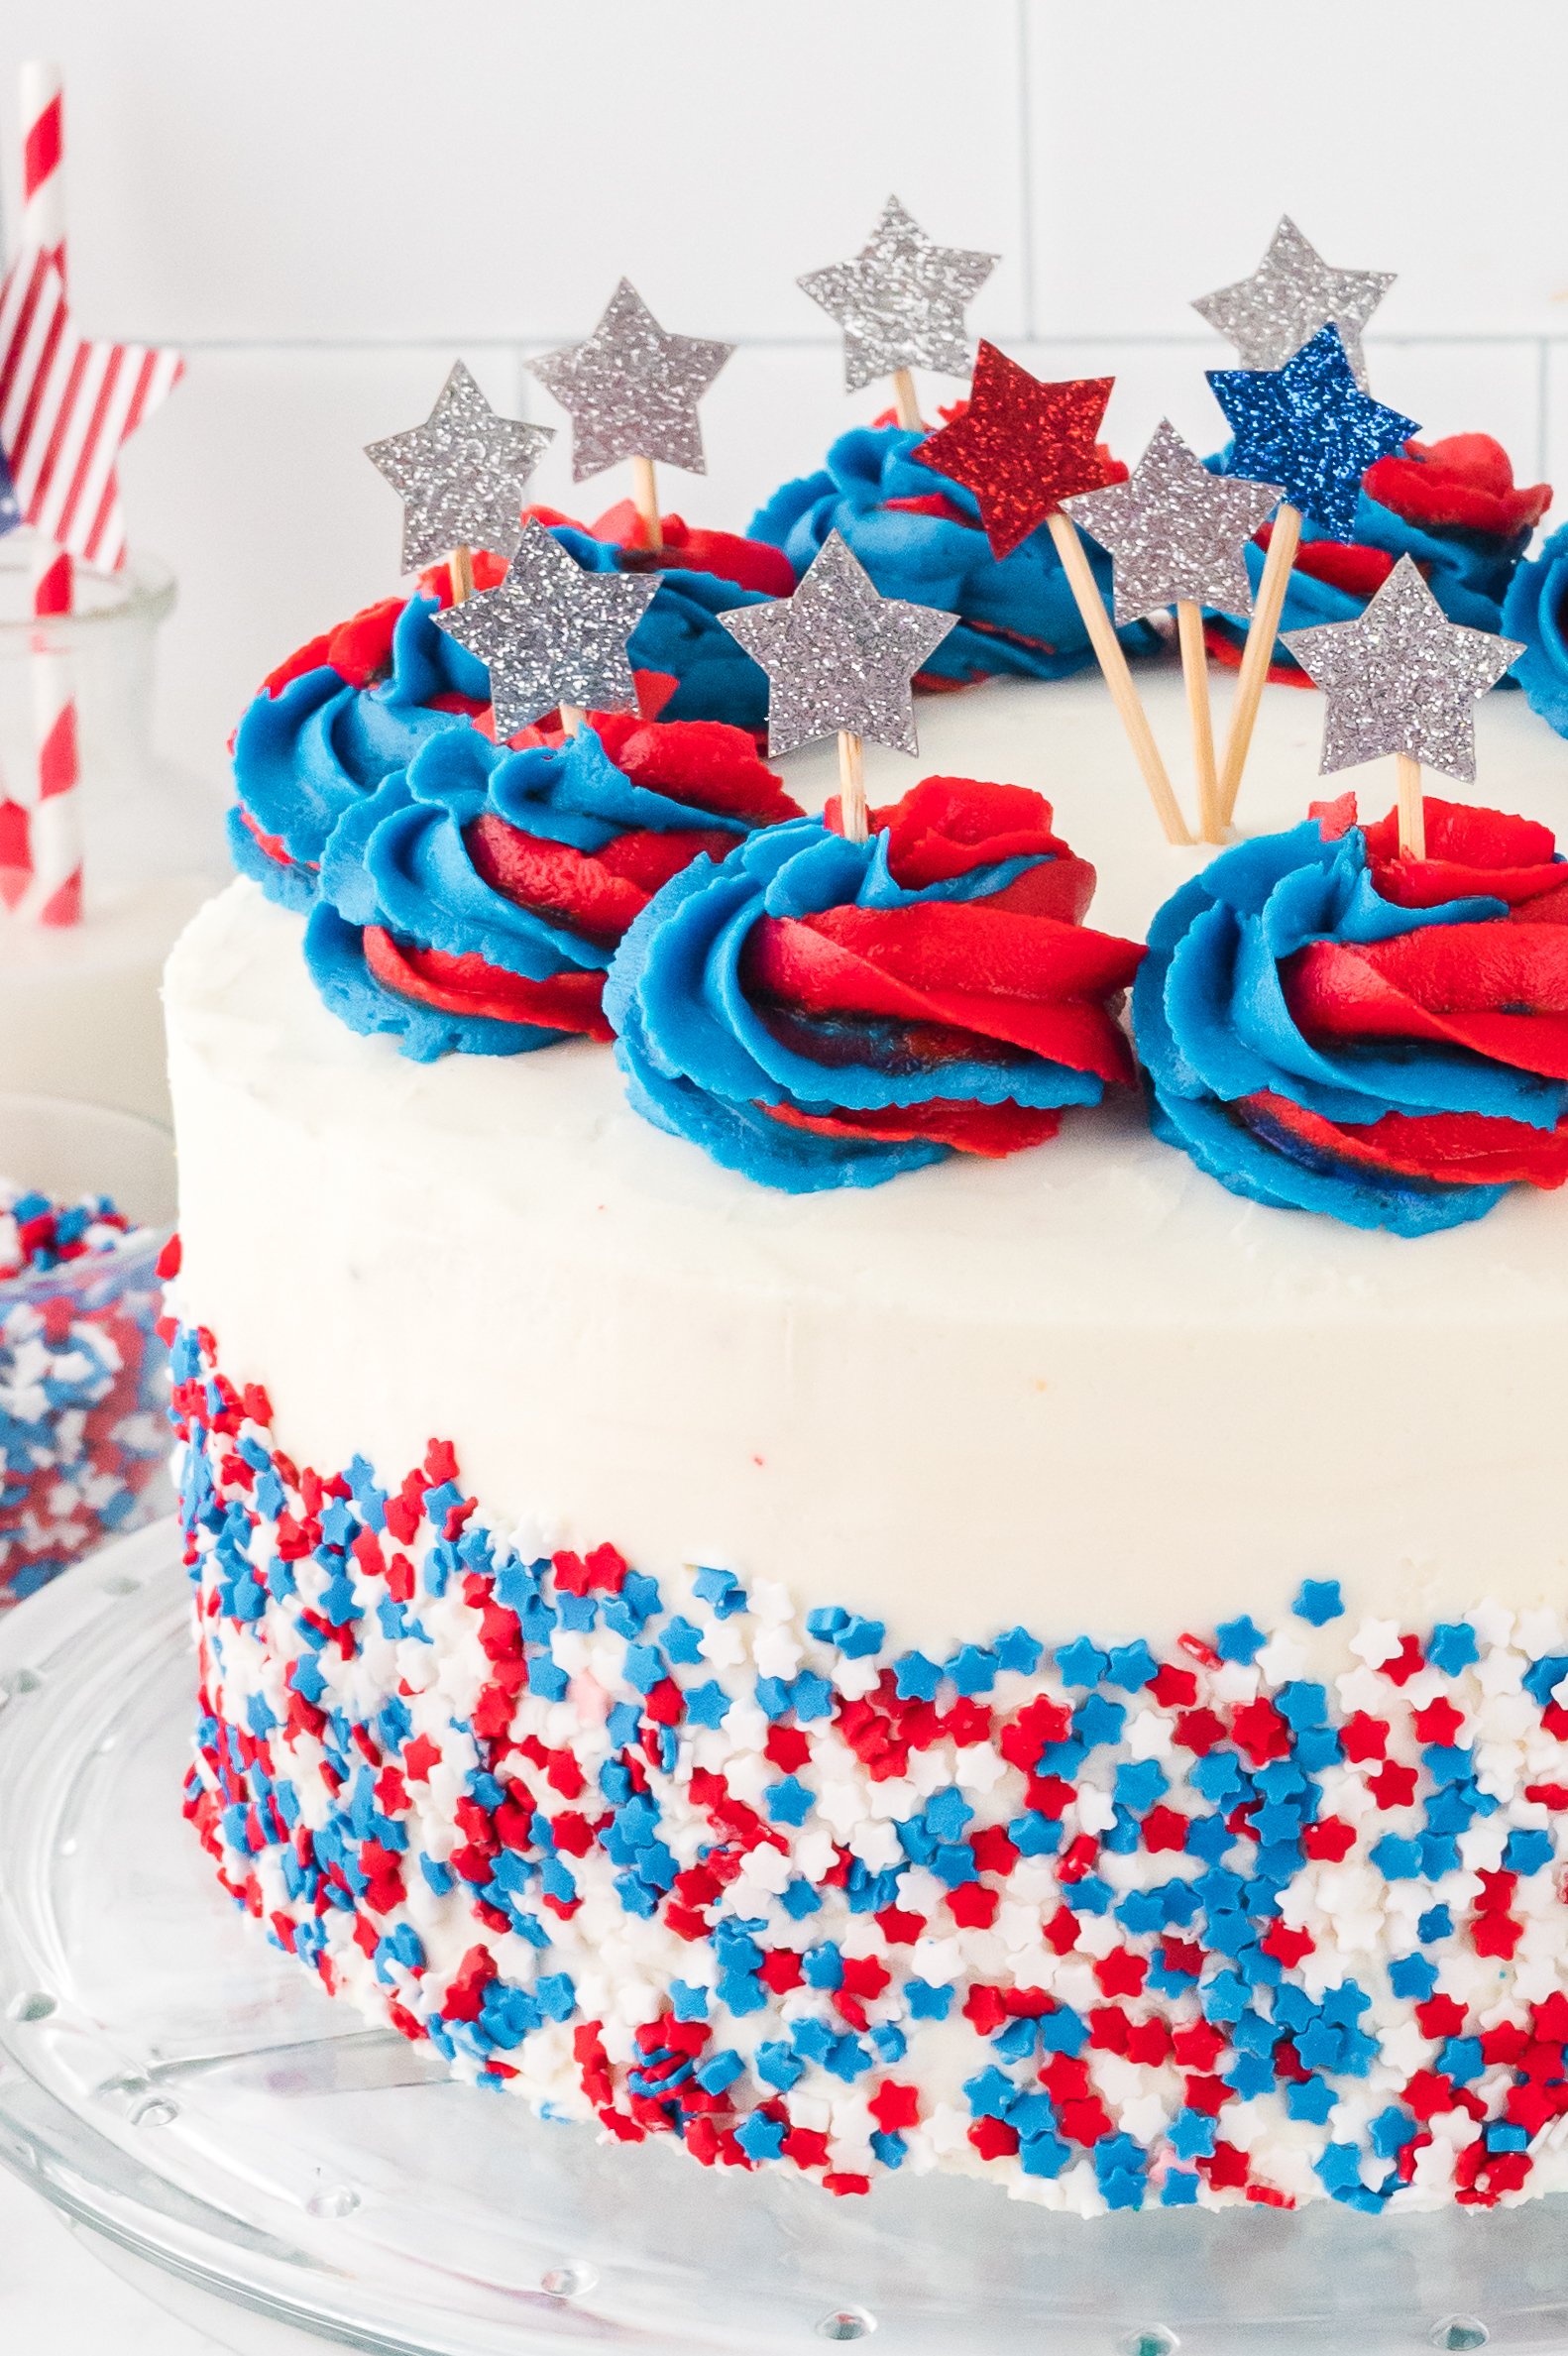
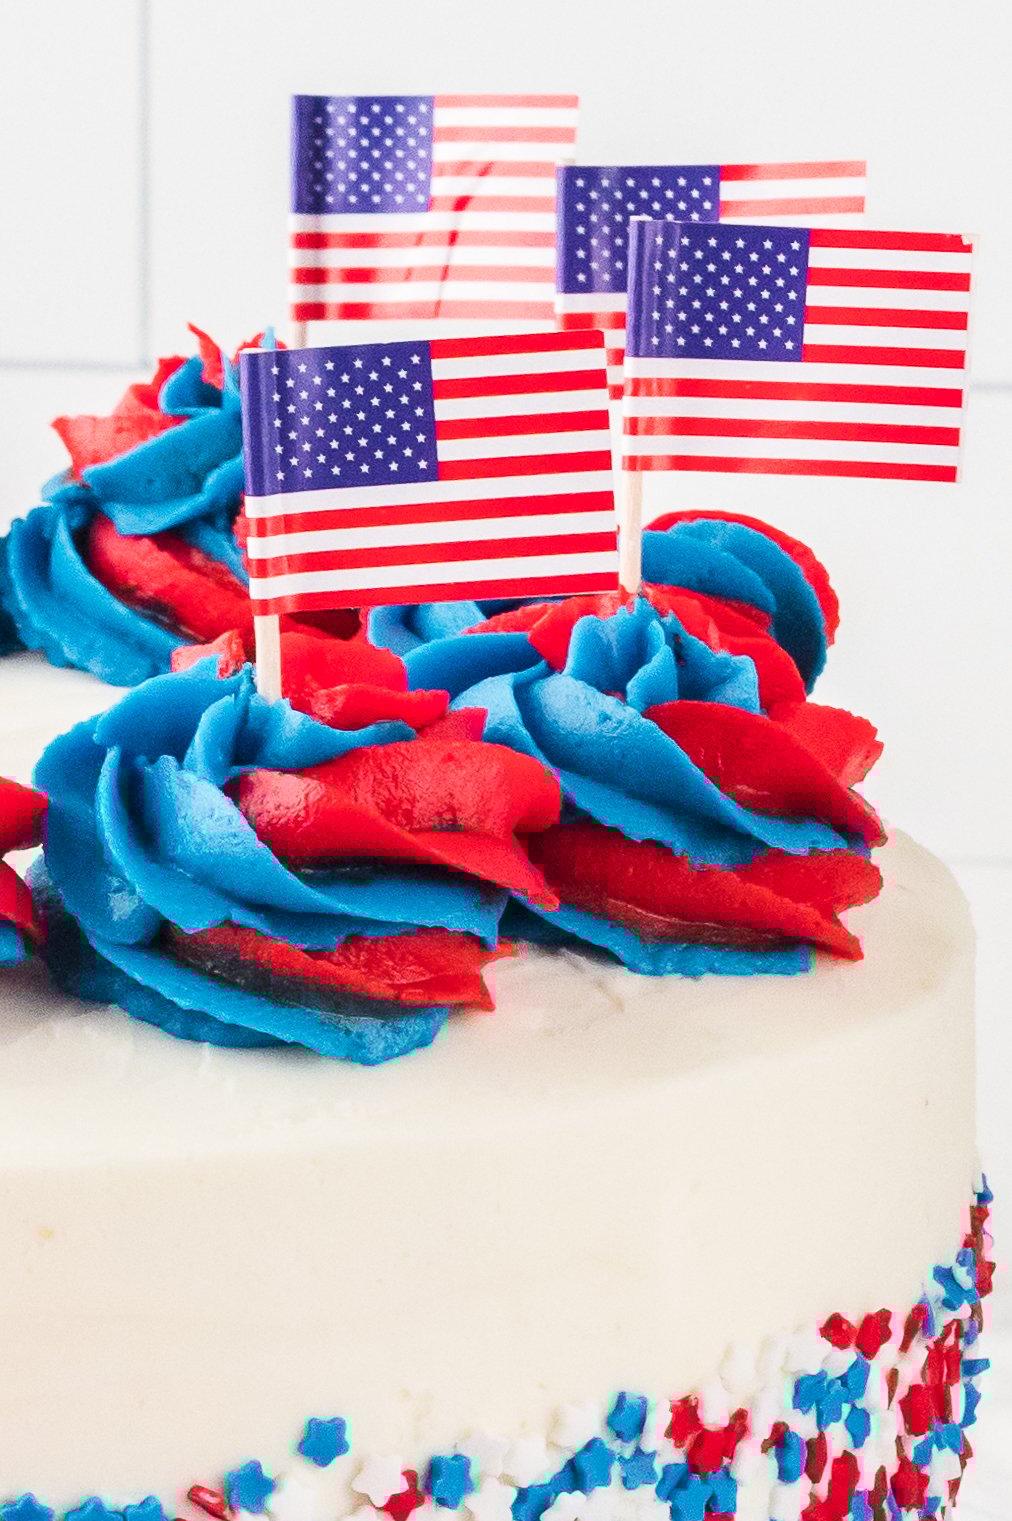
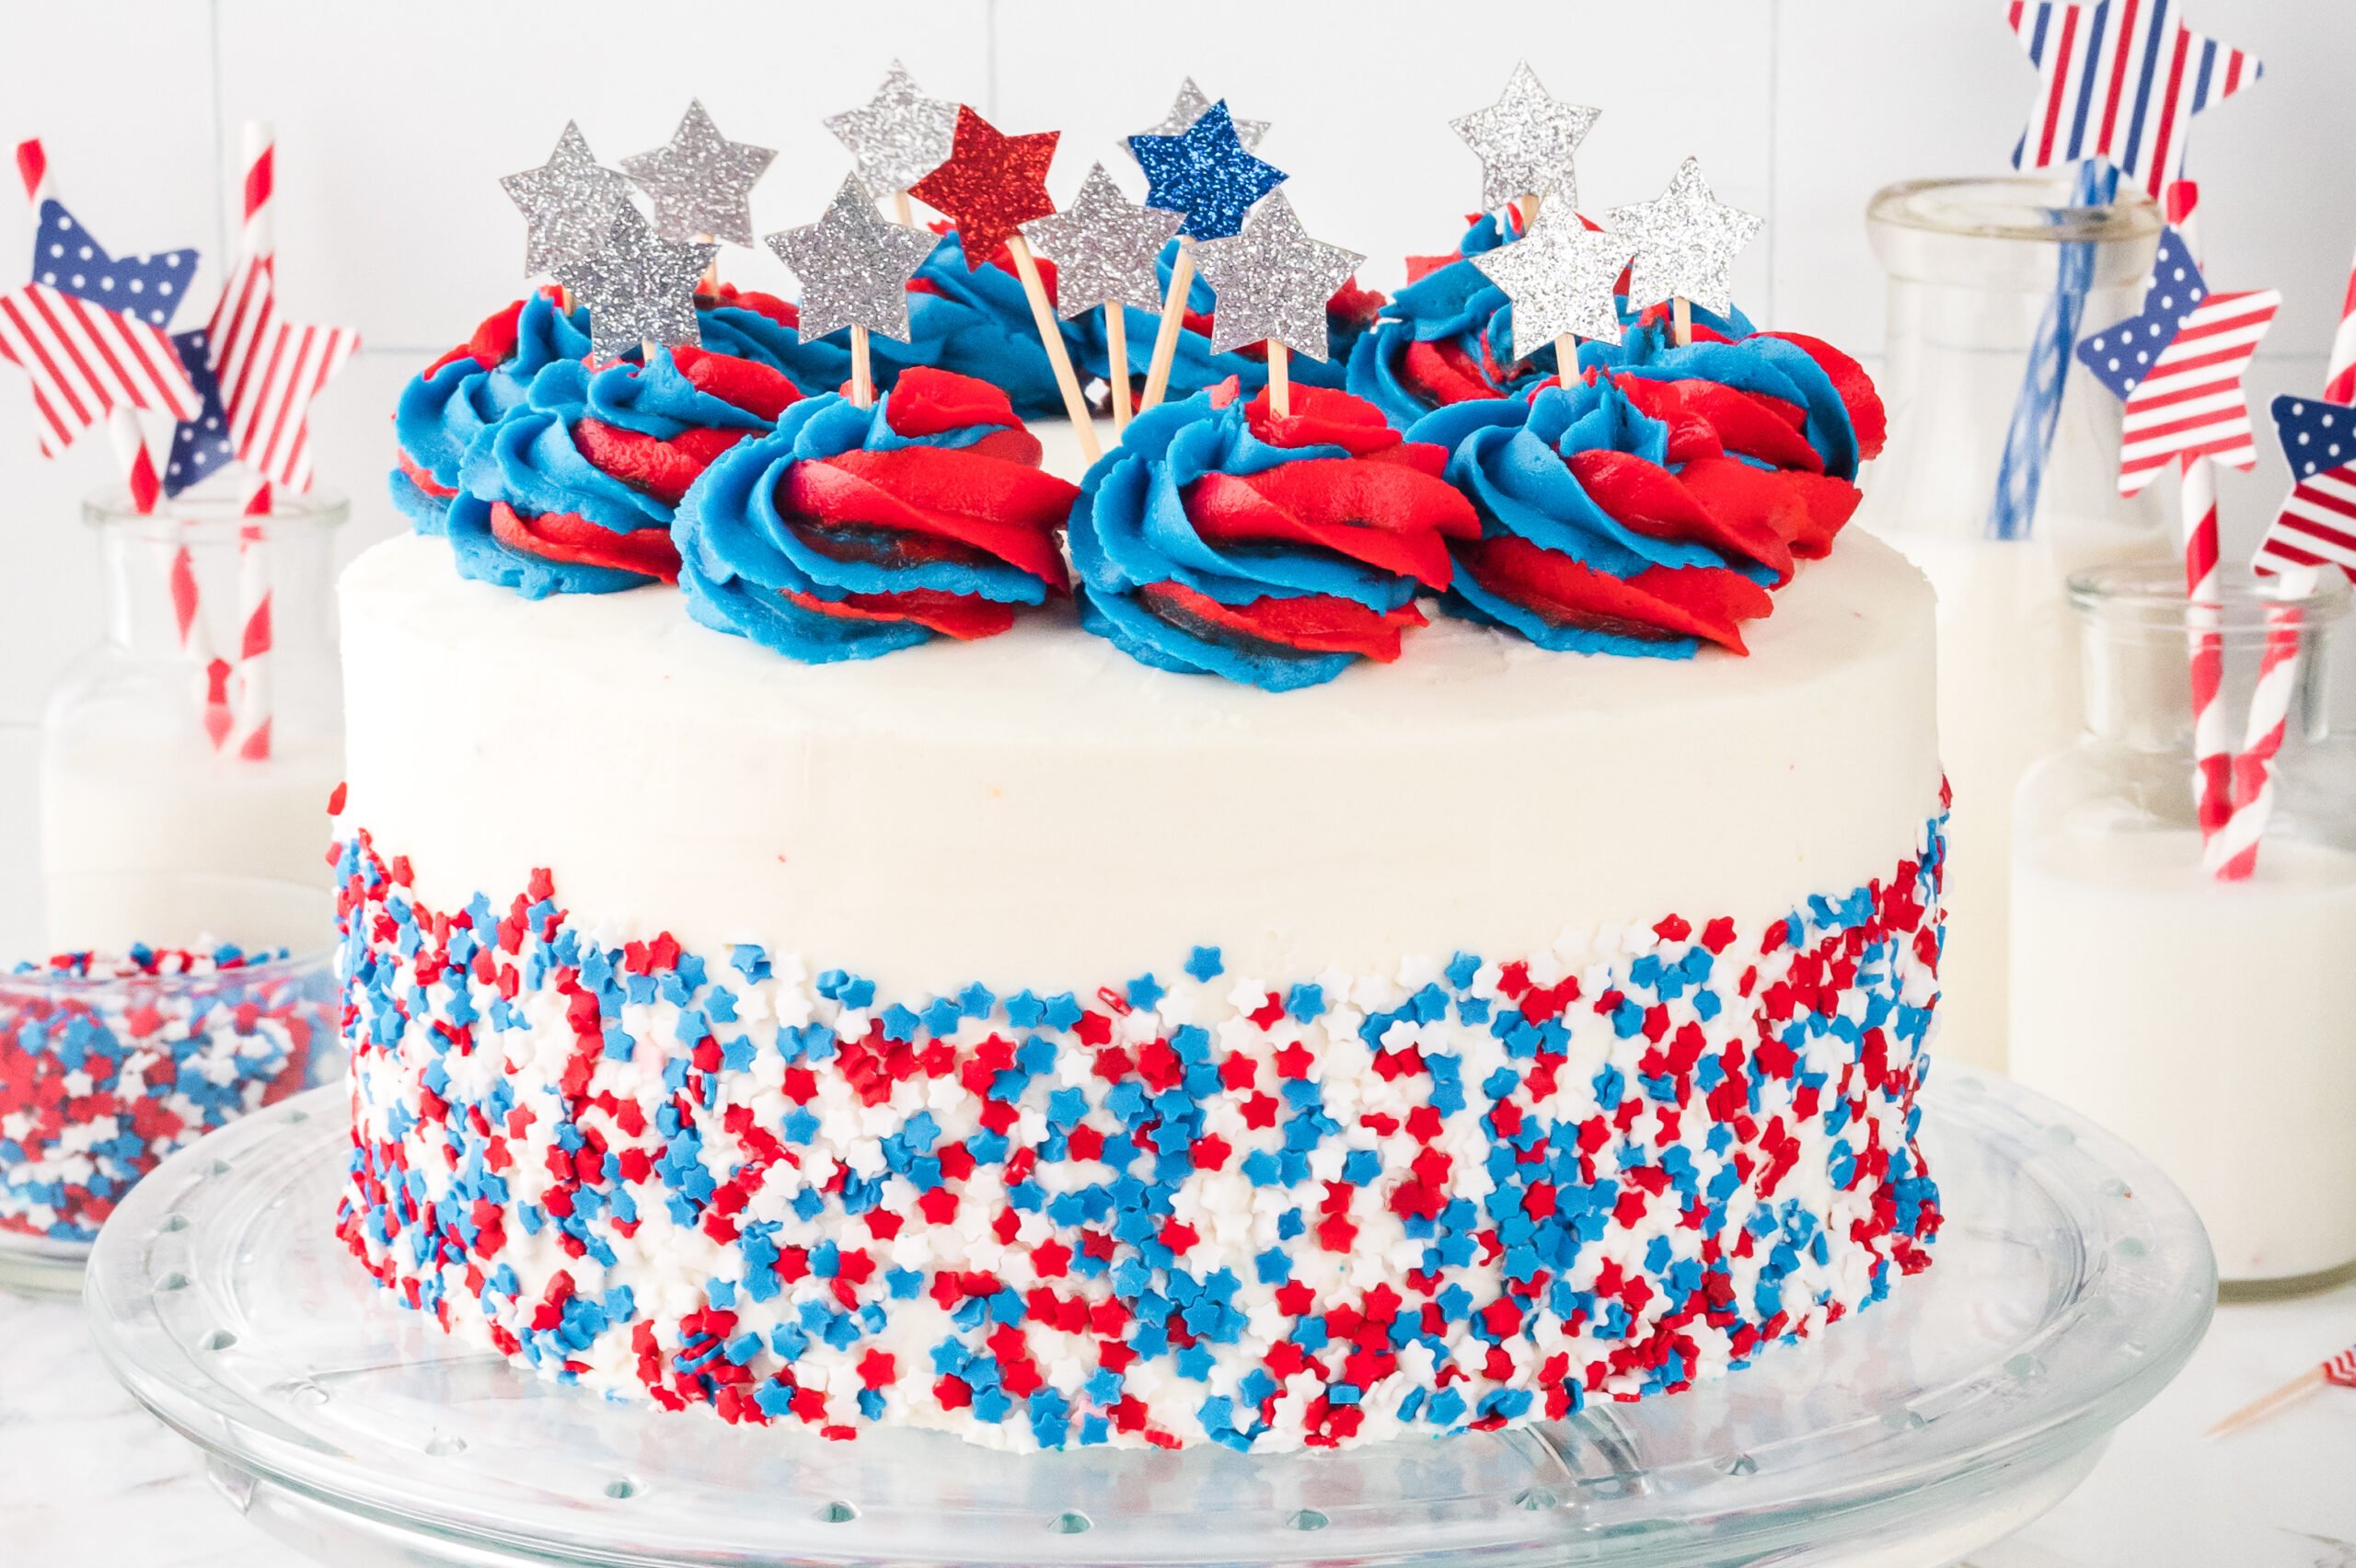
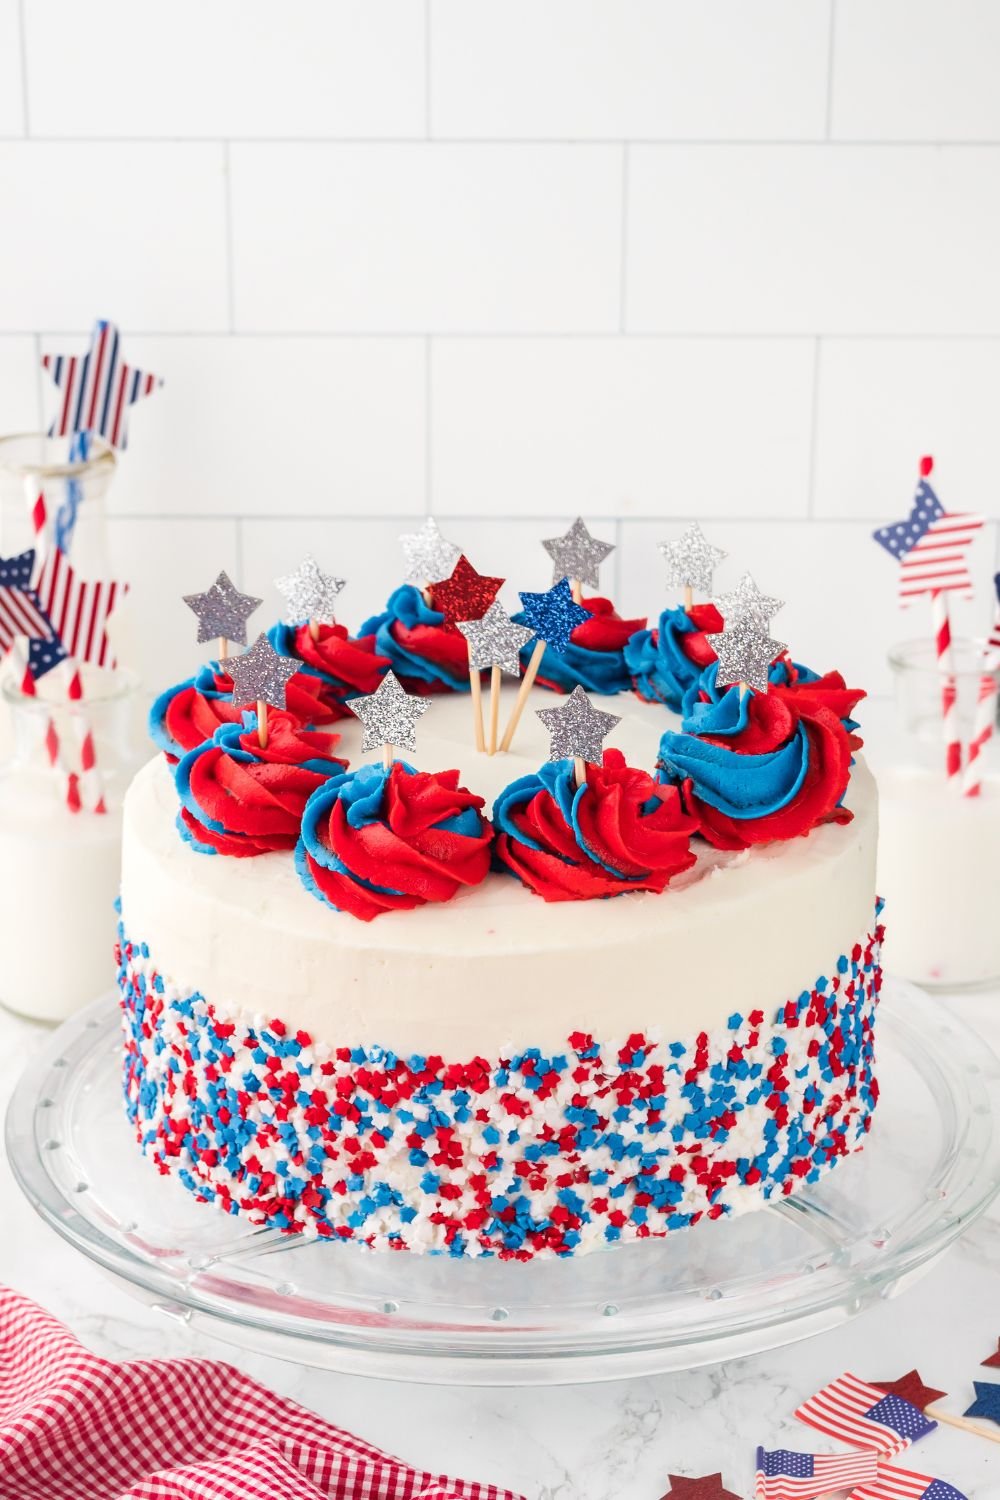
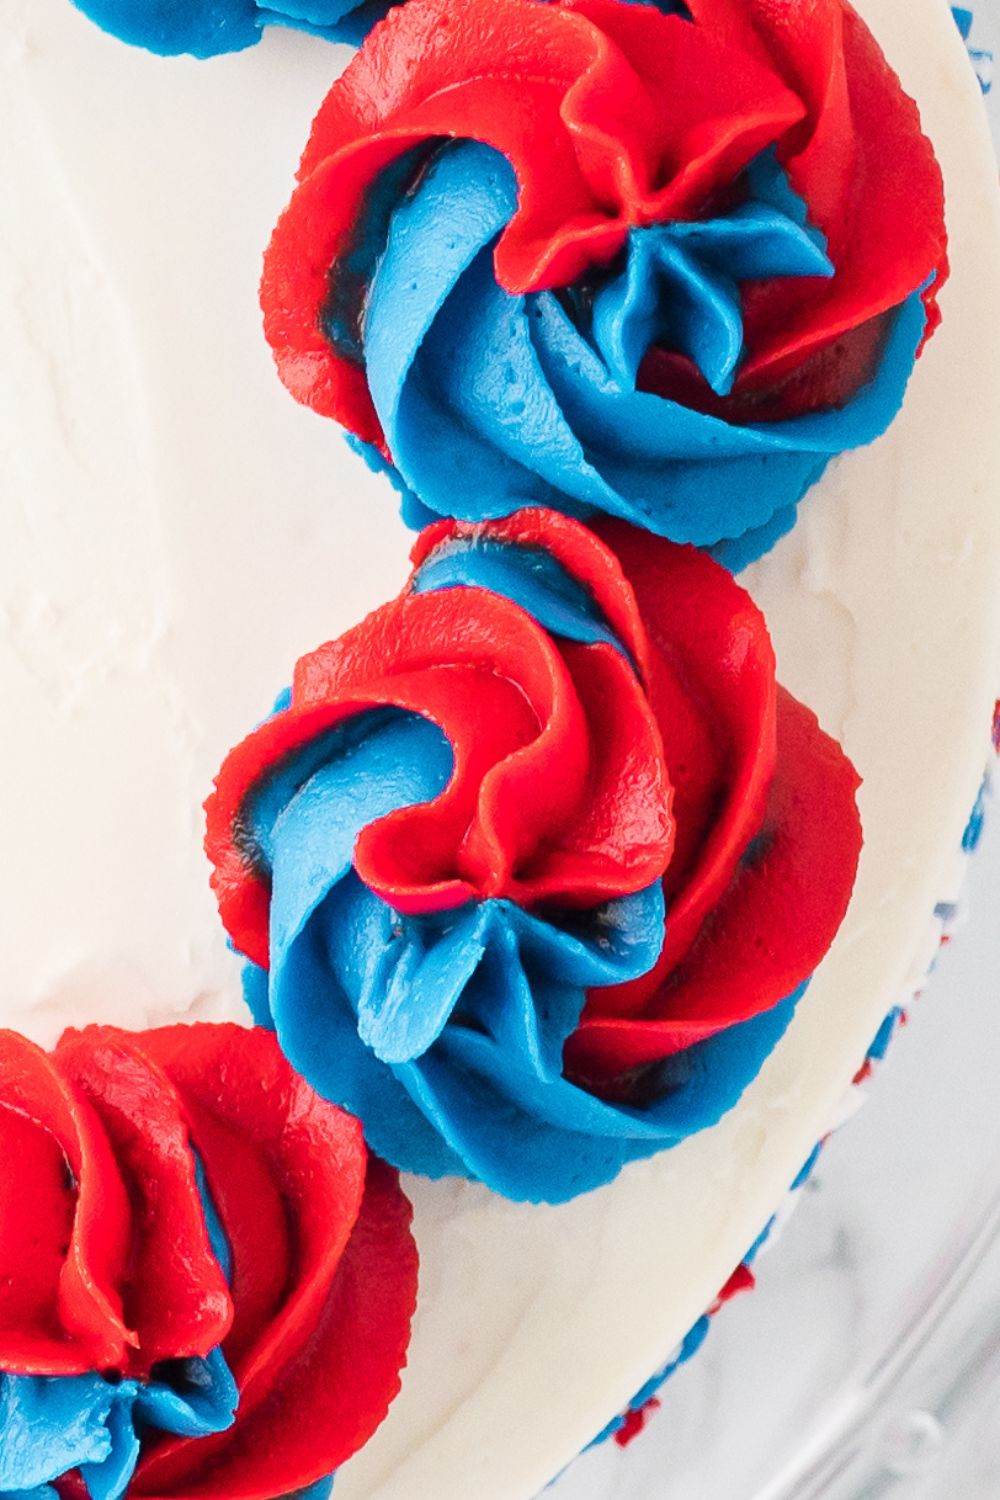
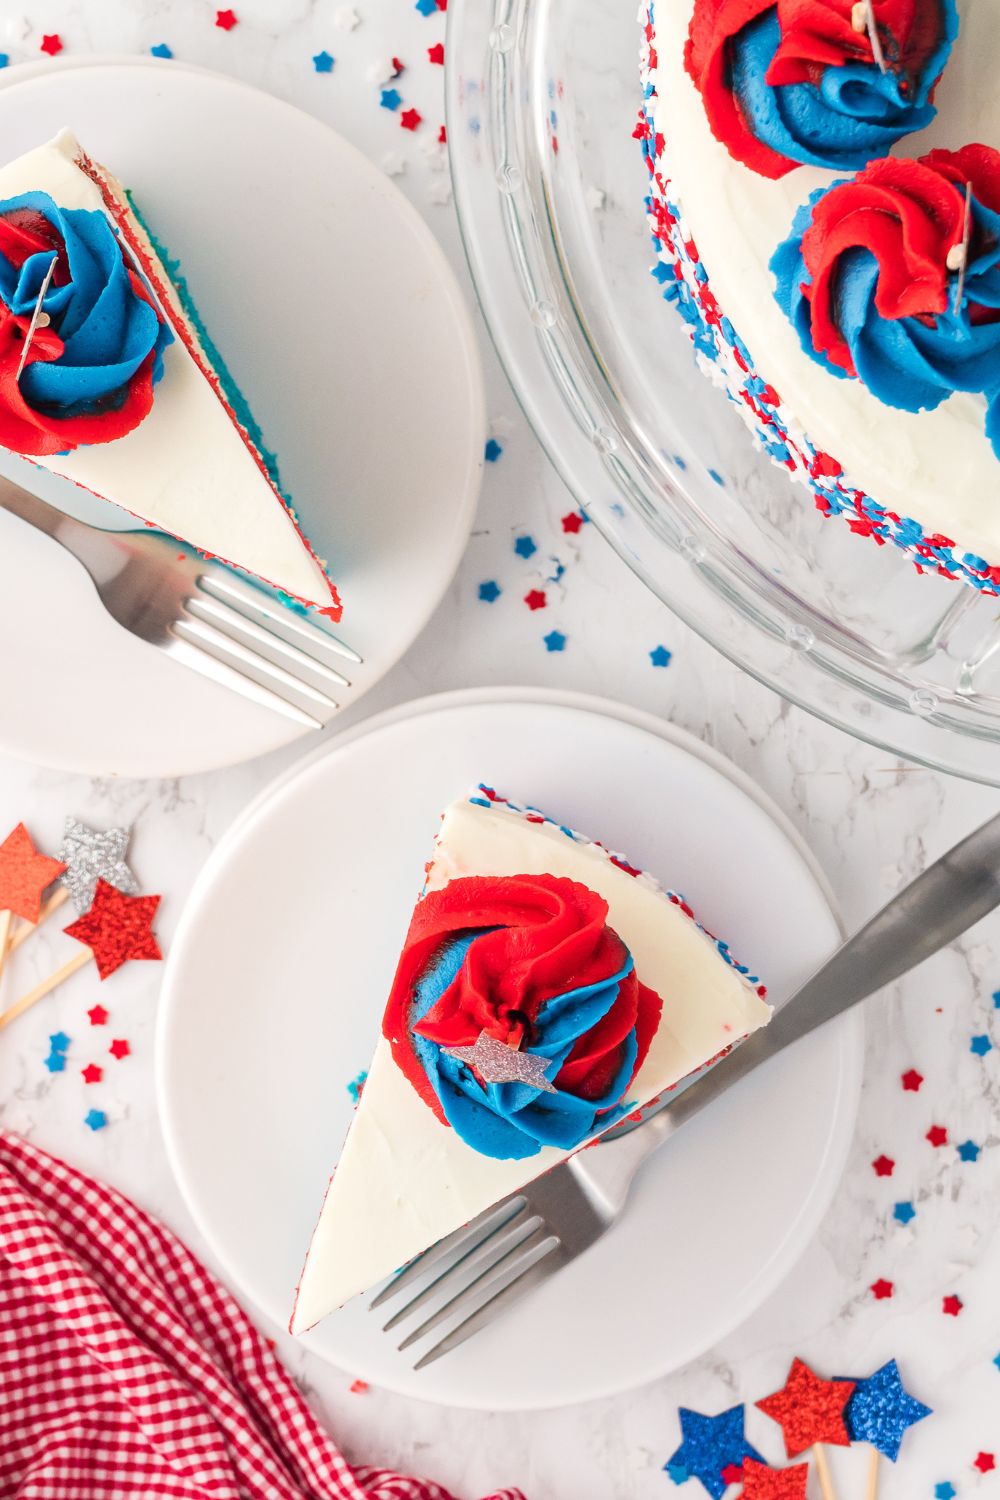
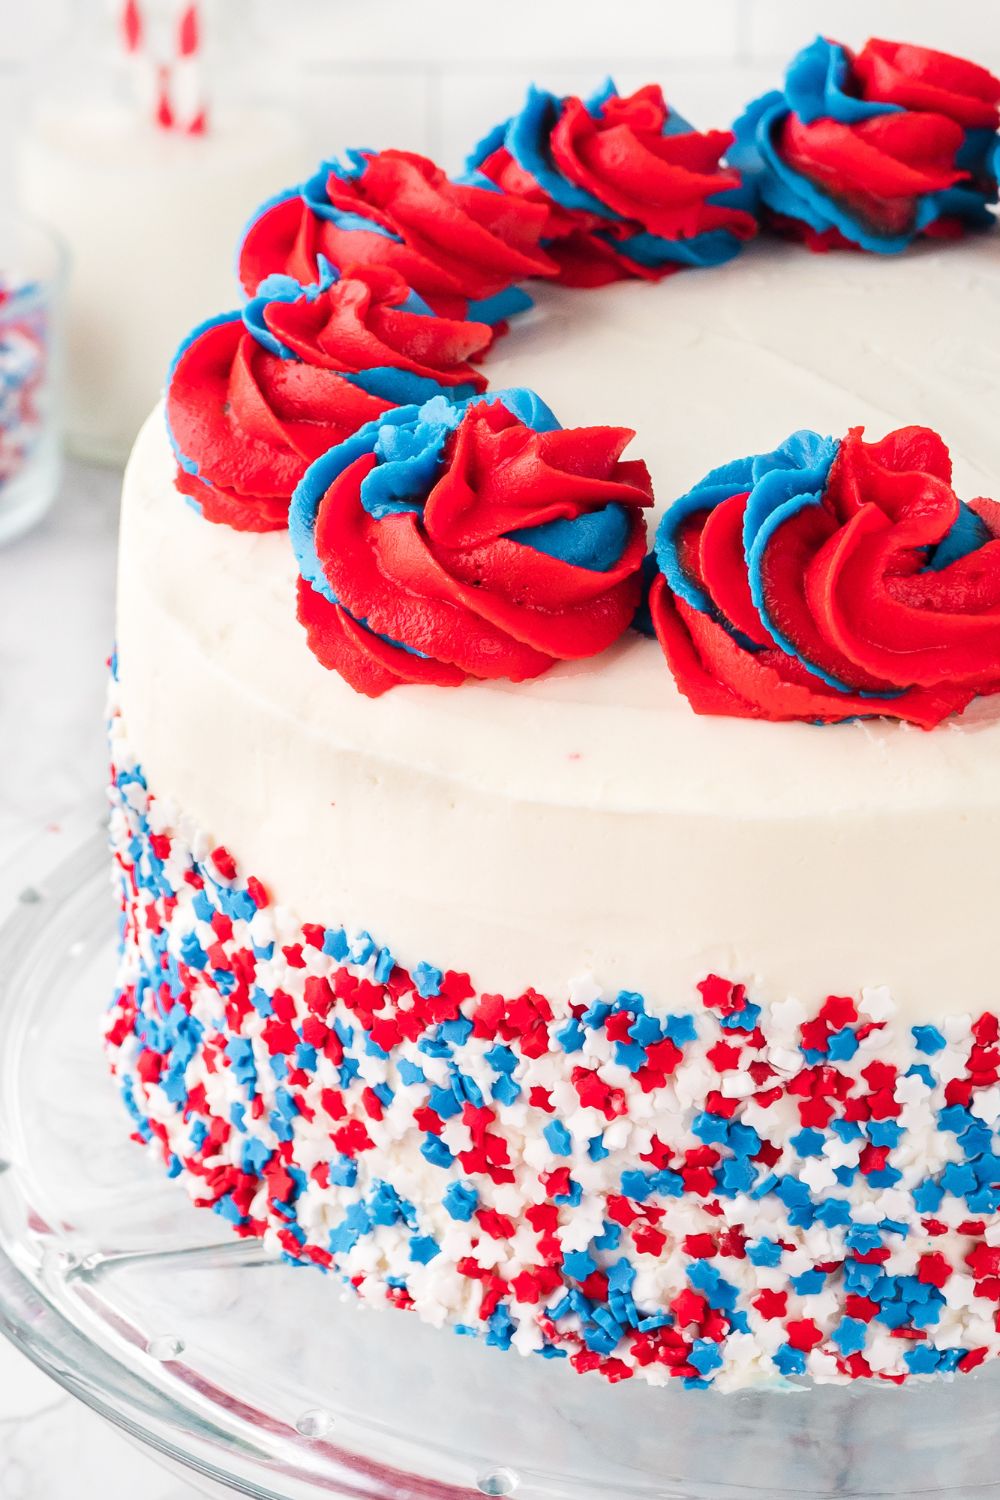
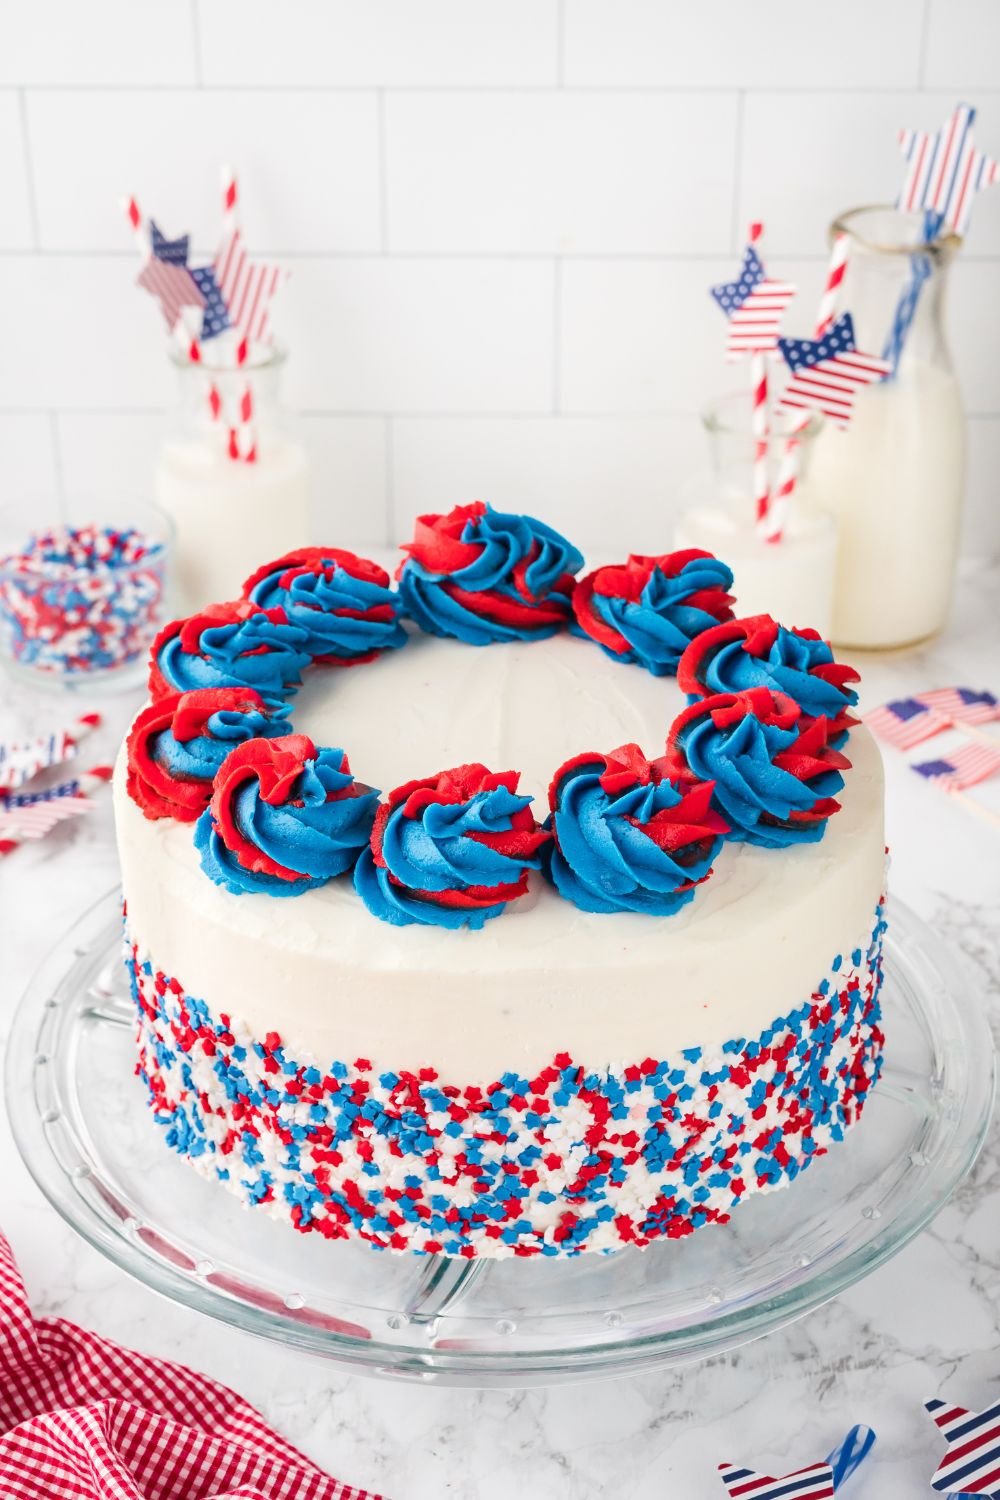
We’re not doing Pinterest-perfection here. This is more of a “good vibes, good frosting” kind of decorating situation. You’ll pipe swirls on top—if you’ve got a Wilton color swirl decorating set, great. If not, no big deal. You can totally MacGyver this with two piping bags and a bit of patience. Don’t stress about it. As long as you’ve got some contrast and height on top, it’s going to look festive. And sprinkles? Always a yes.
Do the crumb coat, chill it down, and then go in for your final smooth layer. Don’t skip chilling—it’s the difference between a sliding disaster and a cake that stays crisp and sharp.
And when you’re done? That moment of pulling off the parchment paper and seeing your clean cake board with zero frosting smudges? Pure satisfaction.
Frequently Asked Questions (FAQs)
Can I make this cake ahead of time?
Yes, and you probably should. The cake layers can be baked a day ahead—just wrap them well and store at room temperature. You can also frost and decorate the whole cake a day ahead. Store it in the fridge and let it come to room temp before serving.
I don’t have a piping set—what should I do?
No big deal. Use a gallon-sized zip-top bag with the corner snipped off. You can still do the swirl effect, or even just go for a rustic “swooped” top with a spoon or spatula. It’ll still look great.
Can I use cake mix?
You can, but just know it won’t have quite the same structure for layering and trimming. If you’re going boxed, go for a dense one (like pound cake-style) and jazz it up with vanilla extract and an extra egg.
What if I don’t want to use food coloring?
Totally fair. You can keep all three layers plain vanilla and decorate with red, white, and blue sprinkles or fresh berries on top. It won’t be a literal flag cake, but the vibe will still be there.
It’s hot out—will the frosting melt?
Not if you use the shortening-butter combo and chill it before serving. Avoid direct sun and keep it inside until dessert time. This frosting is tougher than you think.
Can I use cake flour?
Yes, the cake flour will make a lighter texture. Just use the exact measurements for the flour and make the swap.
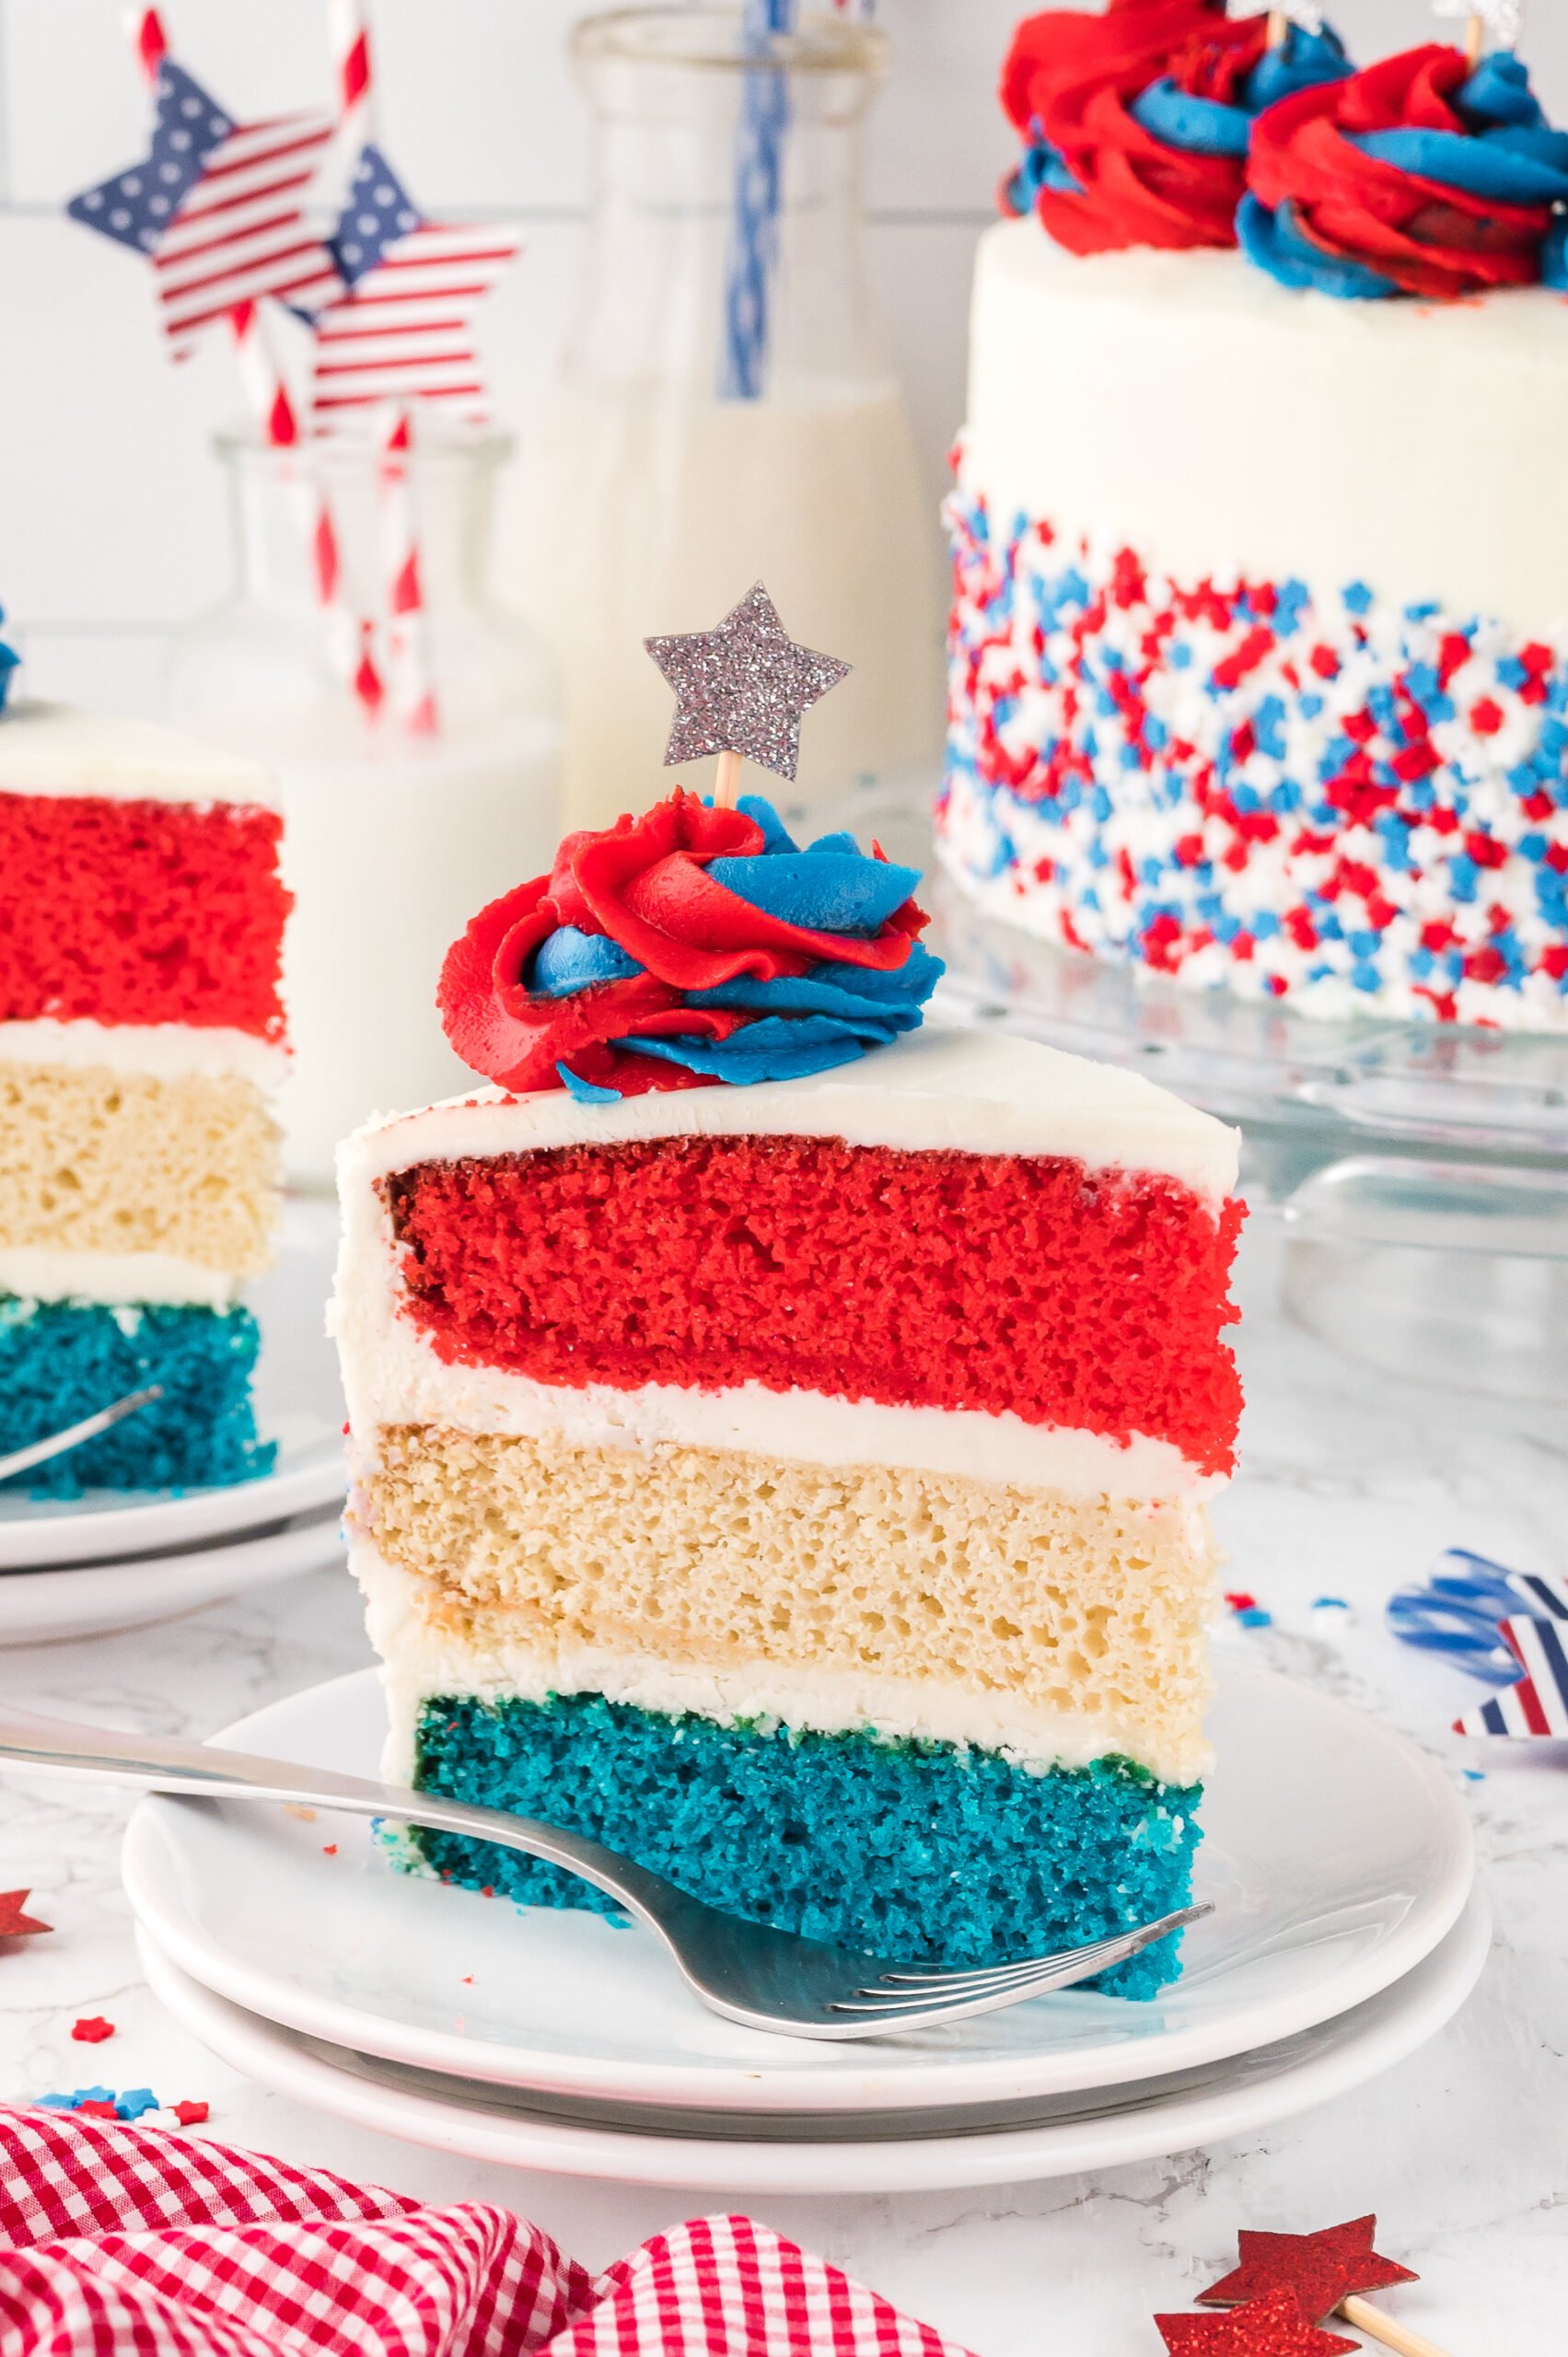
This layered cake is a 3-layer cake, and each layer is a different color. When you slice into this moist and decadent cake, you see red, white, and blue. This dessert is guaranteed to impress your guests.
Want more patriotic recipes? Check out my other 4th of July cake, or this patriotic ice cream sandwich cake. Both are a hit and will surprise everyone with a sweet treat. Or sip on this adult-only bomb pop cocktail!
Reasons To Make This American Flag Layered Cake
- Homemade Cake: This homemade cake is colored with different layers to mimic our American flag’s red, white, and blue colors.
- Gorgeous Cake: Not only is this cake delicious to eat, but it is a magnificent cake to impress everyone with—a simple design with a stunning result.
- Serves a Crowd: This cake is great for serving a crowd. Make smaller servings, and quite a few people can enjoy it.

Ingredients Needed
Flour: All-purpose flour works great for the base of the cake. Just ensure you measure the flour properly.
Baking Powder and Baking Soda: Both are needed to help create the cake’s light and fluffy texture.
Salt: A bit of table salt will help enhance all the flavors of each ingredient in the cake.
Sugar: Granulated sugar is used for the cake, and powdered sugar is used for the frosting.
Eggs: Reach for room-temperature eggs for the recipe.
Vanilla: Quality vanilla will help enhance the flavor of the cake and the frosting.
Milk: Use whole milk for a richer flavor in the recipe. Whole milk also helps create a thicker frosting.
Food Coloring: You can use liquid or gel food coloring. It is whatever your personal preference is.
Sprinkles: Reach for festive patriotic sprinkles to add more of a pop of color to the white frosting.
Butter: Unsalted butter at room temperature is what you will need.
Vegetable Shortening: This will help stabilize and add more flavor to the frosting.
Variations To The Recipe
Flavor of Cake: You can use boxed cake mix if you prefer that over making homemade cakes. This would work for vanilla, funfetti, or even a yellow cake mix. Just separate the cake and add food coloring to it. You can also flavor the cake by adding extracts like strawberry, lemon, etc.
Almond Extract: Add a few drops of almond extract to the vanilla, giving it more of a wedding cake flavor!
Filling: You can add chocolate ganache, fruit, or even your favorite jam between each cake layer for a secret flavor once you slice and serve it.
Decorate: Go ahead and decorate the cake however you would like. From piping on designs, frosting a flag theme, etc.
What Supplies Do You Need For This Layered Cake
- 3 round 9-inch cake pans
- Mixing bowls
- Hand mixer or stand mixer
- Wilton color swirl decorating set
- Piping bags
- Spatula
- Cooling rack
Tips For Success
Aim to start with all room temperature ingredients. This will ensure all the ingredients are incorporated into the best within the cake batter.
Ensure not to overmix the cake batter, or it can make your cake dense and heavy.
Use a level to cut your cake. If it mounds up, don’t worry; you want flat cake rounds so your cake is even and doesn’t tip.
Use lavender or purple food coloring to help make your white frosting even whiter. I also recommend using clear vanilla to prevent the frosting from getting a yellow tinge.
Make sure to do a crumb layer of frosting and let it chill thoroughly before you go and frost another layer.
Add sprinkles once you frost, so the frosting hasn’t set, and the sprinkles will set nicely and stick.
Storing Cake
You can store this cake at room temperature for 3-4 days or 5-7 days in the fridge. Refrigerating it will help ensure it is the moistest.
You can also freeze your cake for 2-3 months. Just wrap it in plastic wrap and store it in a freezer-friendly container. Eat straight from the freezer, or opt to thaw first. Freeze by the slice or the whole piece of the cake.
At the end of the day, this cake isn’t about perfection. It’s about celebration. It’s for the backyard hangs, the impromptu potlucks, the crowd that just wants cake. It’s sweet, a little extra, and exactly what you want to eat while fireworks crack off in the distance.
So take your time, make a mess, frost with love (and patience), and remember—this isn’t magazine cake. It’s your cake. Flag-flying, buttercream-covered, unapologetically festive.
And yeah… everyone’s going to ask you for the recipe.
More Festive Desserts

American Flag Layered Cake
Ingredients
- 3 cups all-purpose flour
- 3 tsp baking powder
- 3/4 tsp baking soda
- 3/4 tsp salt
Frosting Ingredients
- 1 1/2 cups unsalted butter at room temperature
- 2 1/4 cups granulated sugar
- 4 large eggs
- 3 tsp vanilla extract
- 1 1/2 cups whole milk
- Red and blue food coloring
- Sprinkles for decorating
- 2 cups of unsalted butter at room temperature
- ½ cup of vegetable shortening
- 9 cups powdered sugar
- 3 tsp clear vanilla extract
- 1/4 cup whole milk add more if it is too thick
- Red and blue food coloring
- White and purple or violet food coloring optional to help turn the plain frosting white
Instructions
- Preheat the oven to 350°F. Grease and flour three 9-inch round cake pans.
- In a medium bowl, whisk together the flour, baking powder, baking soda, and salt.
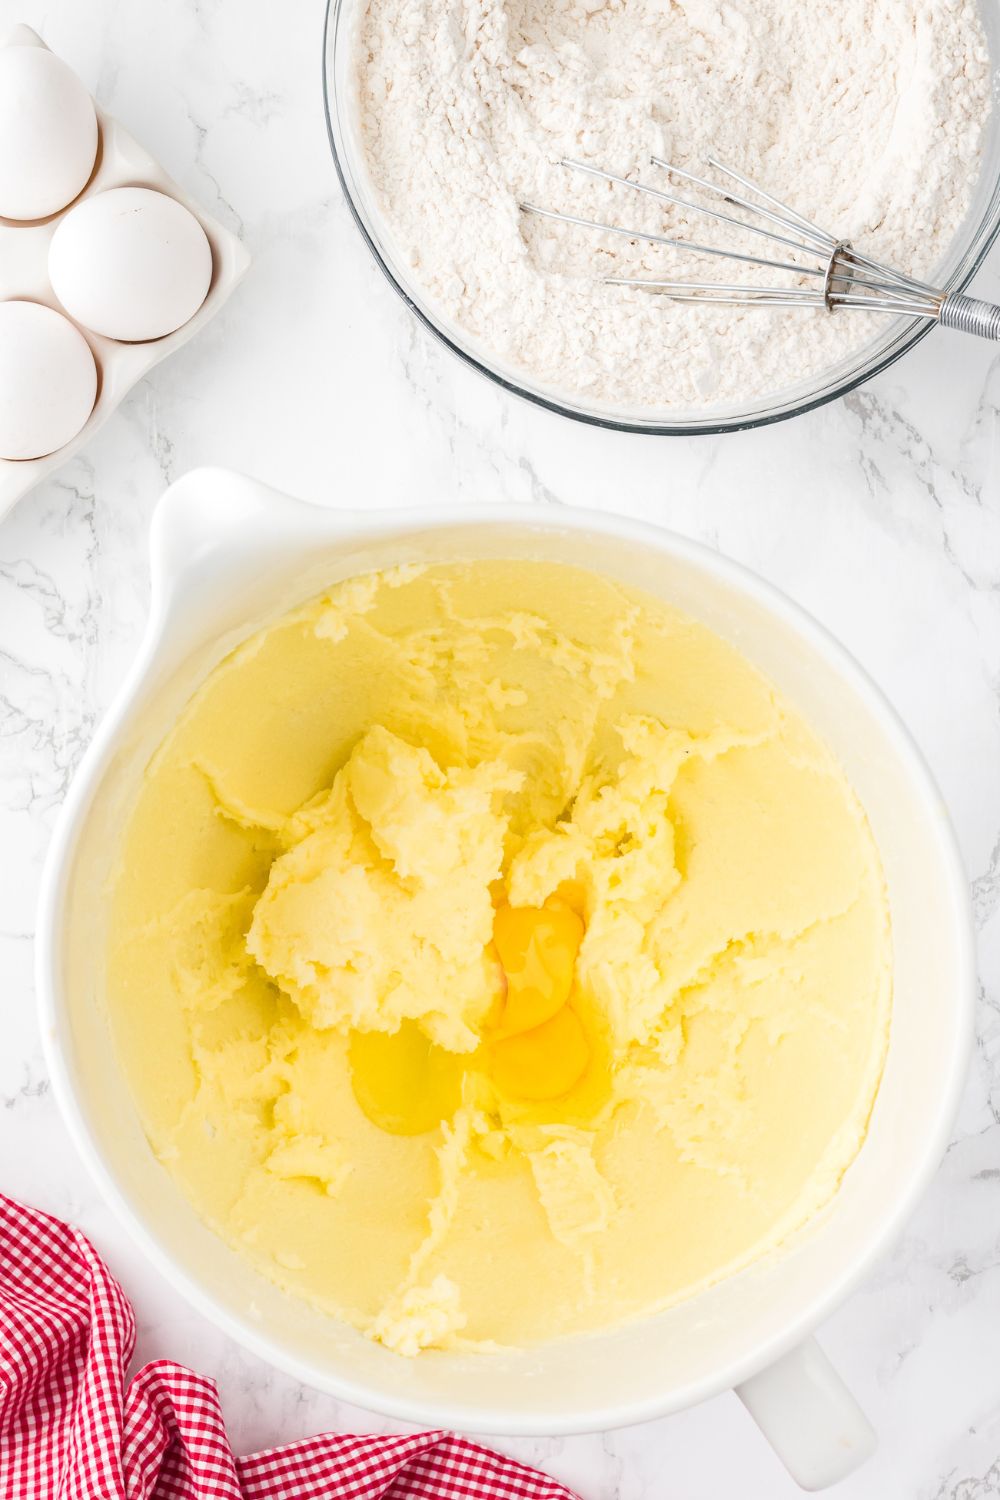
- In a large mixing bowl, cream the butter and sugar together until light and fluffy. Beat in the eggs one at a time, then stir in the vanilla extract.
- Gradually add the dry ingredients to the wet ingredients, alternating with the milk, beginning and ending with the dry ingredients.
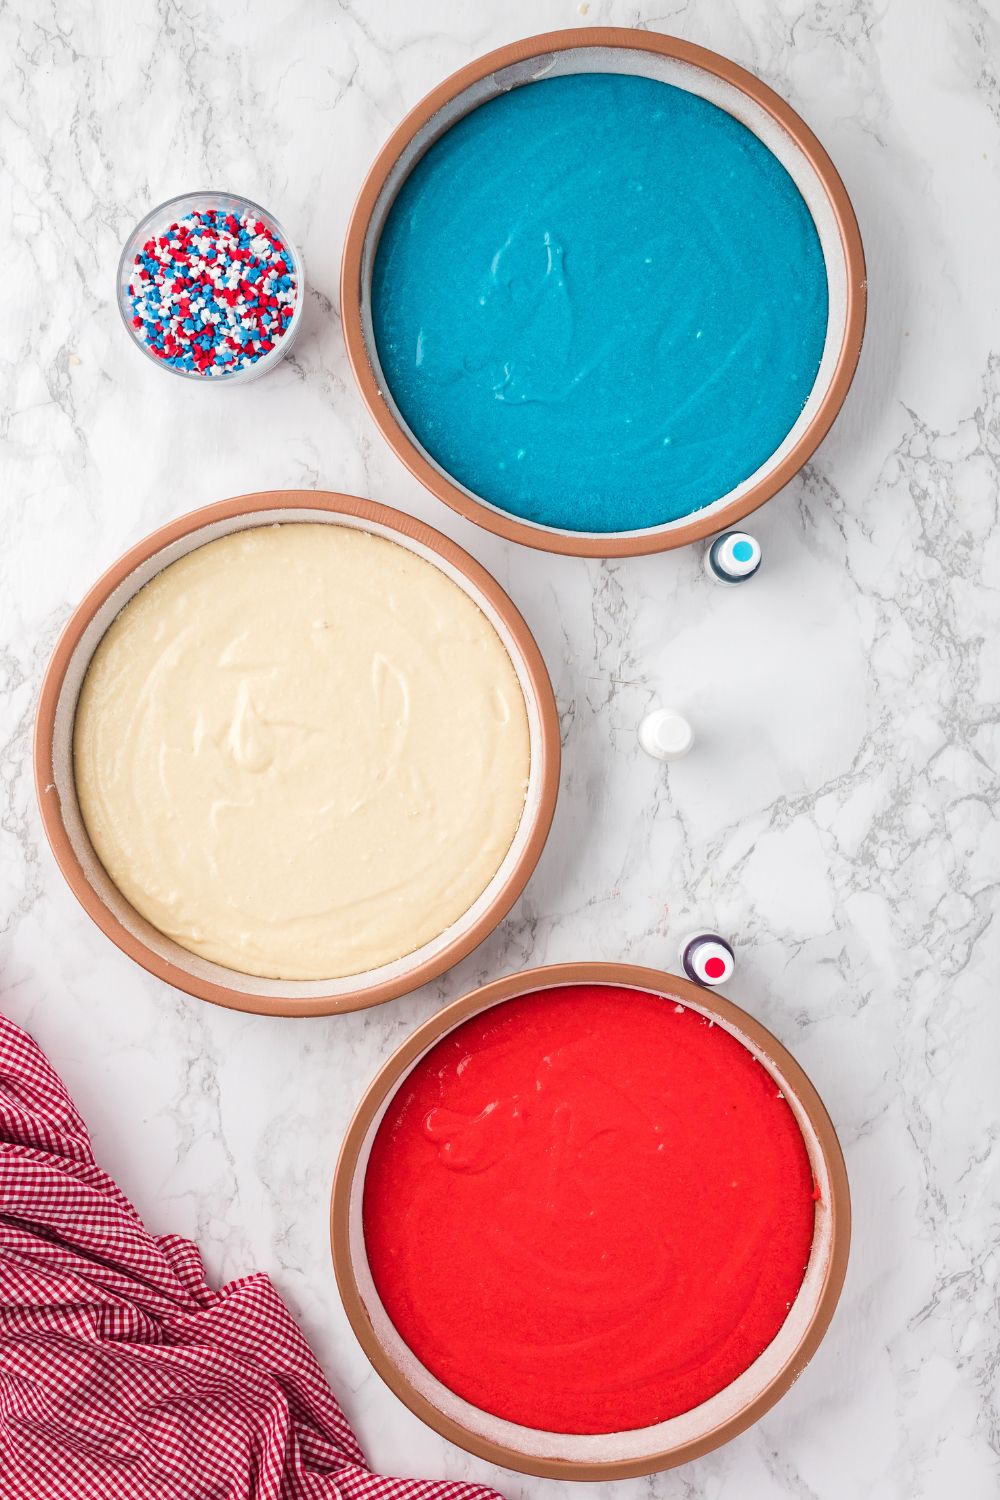
- Divide the batter equally into three bowls. Leave one bowl plain, and color one bowl red and the other blue using food coloring.
- Pour the batter into the prepared cake pans. Smooth the tops with a spatula.
- Bake for 25-30 minutes or until a toothpick inserted into the center of the cake comes out clean.
- Remove from the oven and cool on a wire rack.
- If the cakes are not level, wait for the cakes to cool completely. A warm cake may crumble when you cut it.
- Use a serrated knife to trim off the domed top of the cake. Hold the knife parallel to the cake and slowly saw back and forth while rotating the cake.
- Continue trimming until the surface of the cake is level.
- Repeat this process with the other cake layers.
Frosting Directions
- For the frosting, beat the butter and vegetable shortening in a large mixing bowl until creamy. Gradually beat in the powdered sugar, then add the vanilla extract and milk. Beat until smooth.
- You can adjust the amount of powdered sugar in the frosting recipe to achieve your desired level of sweetness and thickness.
- If the frosting is too thick, you can add a little more milk, a teaspoon at a time, until the desired consistency is reached.
- Take 2 cups of frosting and split it between two bowls. (1 cup in each bowl) Color one bowl red, and one blue by mixing in small amounts of food dye until you get the desired colors.
- With the rest of the frosting, if you feel this frosting is slightly yellow in color from the butter you can add some white food coloring along with the tiniest bit of purple or violet food coloring. Use a toothpick and dip it into the violet food coloring. Scrape that into the plain frosting. That should be enough to take the yellow color out.
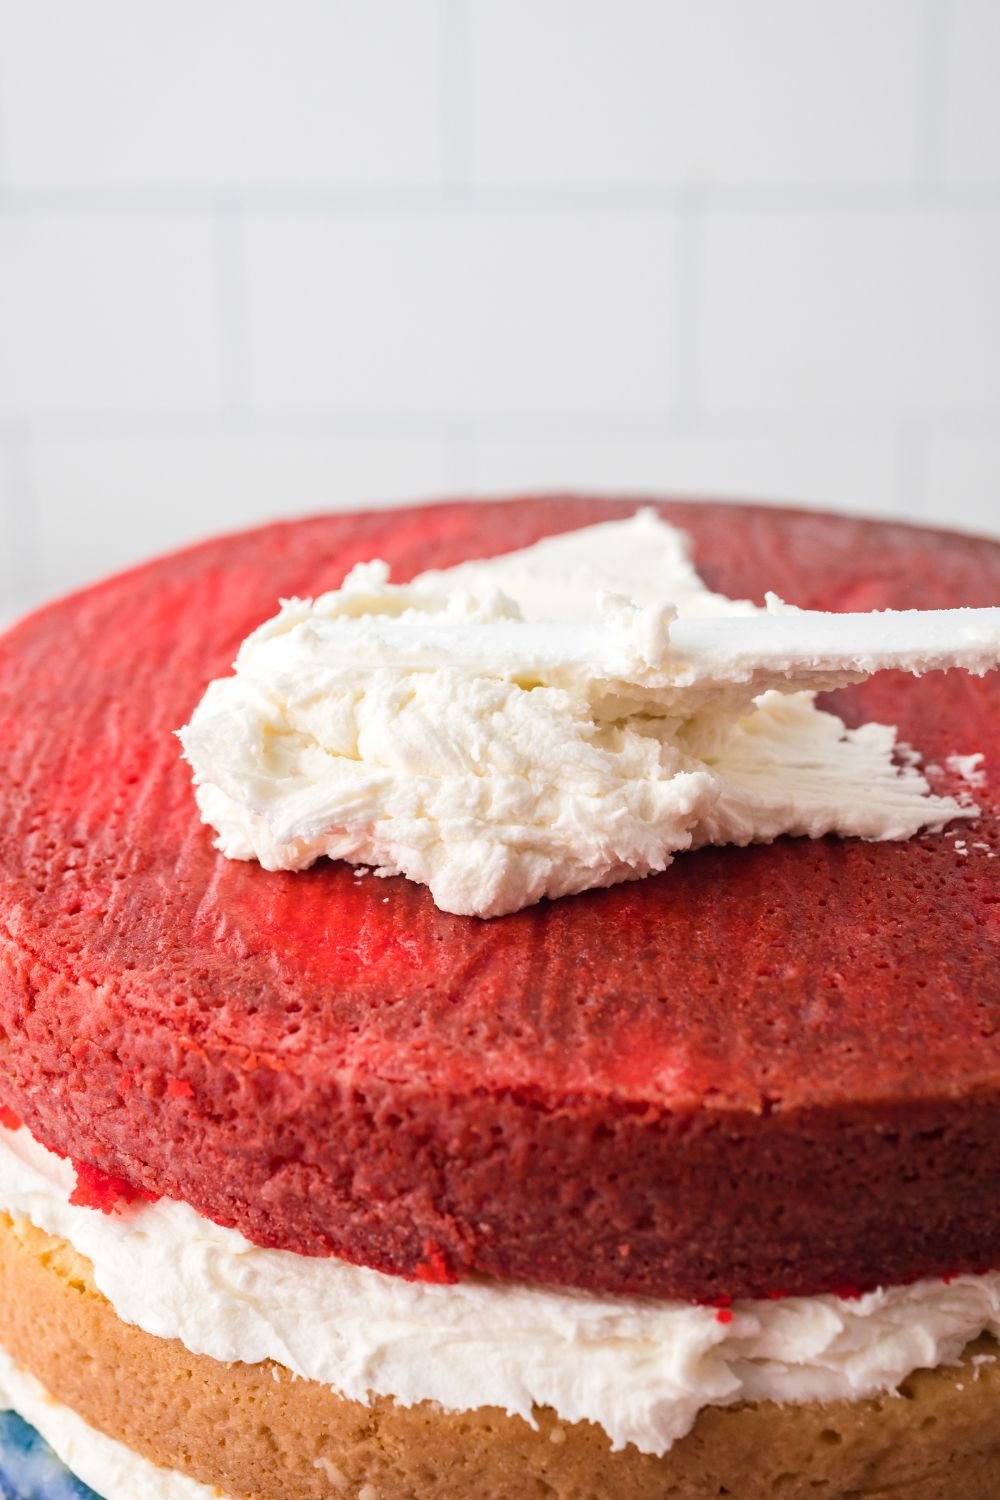
- Place a tablespoon of the white frosting in the center of a cake stand. Cut two rectangular pieces of parchment paper and put them joining together in the center on top of the frosting. This will help keep your cake stand clean and can be easily removed when you are finished decorating.
- Put another small amount of frosting on top of the parchment paper and place the blue cake layer on top. Spread a layer of white frosting over the top, then place the white cake layer on top. Spread a layer of white frosting over the top, then place the red cake layer on top.
- Spread a thin layer of plain white frosting over the top and sides of the cake. This will be the crumb layer. Put the cake into the fridge for 30 min to chill
- Do a final layer of white icing on top and around the sides of the cake. Smooth it as best you can with a cake spatula.
- Decorate the sides with some sprinkles.
- Use a Wilton color swirl decorating set to pipe swirls of red and blue frosting on top of the cake. It will allow you to do 3 colors at once but I just filled two of the bags with red and blue frosting and left the 3rd bag empty. I packed some kitchen roll down into the empty bag to prevent the frosting from coming back up into the empty bag.
Equipment
Did you make this recipe?
Make sure to follow on Pinterest for more recipes!

Leave A Reply!